Quantcast
Channel: MongoDB | Blog
Viewing all 2423 articles
Browse latest View live

Generating Globally Unique Identifiers for Use with MongoDB

$
0
0

By default, MongoDB generates a unique ObjectID identifier that is assigned to the _id field in a new document before writing that document to the database. In many cases the default unique identifiers assigned by MongoDB will meet application requirements. However, in some cases an application may need to create custom unique identifiers, such as:

  • The application may require unique identifiers with a precise number of digits. For example, unique 12 digit identifiers might be required for bank account or credit card numbers.
  • Unique identifiers may need to be generated in a monotonically increasing and continuous sequential order.
  • Unique identifiers may need to be independent of a specific database vendor.

Due to the multi-threaded and distributed nature of modern applications, it is not always a straightforward task to generate unique identifiers that satisfy application requirements.

Overview

This posting covers the following topics:

  • Ensure identifier uniqueness at the database level
  • Use ObjectID as a unique identifier
  • Use a single counter document to generate unique identifiers one at a time
  • Use a single counter document that allocates batches of unique identifiers
  • Use multiple counter documents that allocate batches of unique identifiers
  • Randomly choose a unique identifier in the application and retry if it is already assigned
  • Use a standard UUID algorithm for application-level unique identifier generation

Ensure identifier uniqueness at the database level

All of the approaches that we propose in this post will generate identifiers that are globally unique for all practical purposes, however depending on the chosen approach there may be remote edge cases where the generated identifier may not be absolutely globally unique. If the risk of a clash of unique identifiers is deemed to be sufficiently remote or the consequences of such a clash are minor, then one may consider writing to the database without additional uniqueness checking. This is a valid approach that may be adopted by some applications.

However, if it is absolutely essential to enforce that the generated identifier is globally unique, then code may be written defensively to guarantee that the database will never write the same unique identifier twice. This is relatively easy to implement on a non-sharded collection by specifying a unique index on a particular field, which prevents a duplicate value for that field from ever being written to the collection. It is also worth noting that the _id field has a unique index on it, so values assigned to _id will be verified for uniqueness by default.

If a document fails to be written due to a collision on a field that has a unique index, then the application should (1) catch this error, (2) generate and assign a new unique identifier to the document, and (3) try to write the document to the database again.

If a collection is sharded, there are restrictions on the use of unique indexes. If the restrictions for using a unique index on a sharded collection cannot be satisfied, then a proxy collection may be used to guarantee uniqueness before writing data to the database.

Use ObjectID as a unique identifier

Description

MongoDB database drivers by default generate an ObjectID identifier that is assigned to the _id field of each document. In many cases the ObjectID may be used as a unique identifier in an application.

ObjectID is a 96-bit number which is composed as follows:

  • a 4-byte value representing the seconds since the Unix epoch (which will not run out of seconds until the year 2106)
  • a 3-byte machine identifier (usually derived from the MAC address),
  • a 2-byte process id, and
  • a 3-byte counter, starting with a random value.

Benefits

  • ObjectID is automatically generated by the database drivers, and will be assigned to the _id field of each document.
  • ObjectID can be considered globally unique for all practical purposes.
  • ObjectID encodes the timestamp of its creation time, which may be used for queries or to sort by creation time.
  • ObjectID is mostly monotonically increasing.
  • ObjectID is 96-bits, which is smaller than some (eg. 128-bit) alternative UUID implementations, which will result in slightly smaller documents that will use slightly less disk space and RAM than these alternatives.

Drawbacks

  • Some businesses may be reluctant to link their application logic to an identifier that is generated by a specific database product.
  • ObjectID can be considered globally unique for all practical purposes, but there are edge cases where it may not be truly globally unique.
  • At 96 bits, the ObjectId is longer than some (e.g. 64-bit) alternative solutions, which means that documents will be slightly larger and will require slightly more disk space and RAM than these alternatives.

Use a single counter document to generate unique identifiers one at a time

Disclaimer

The approach described in this section is generally not recommended due to the potential for the single counter document to become a bottleneck in the application.

Description

A unique identifier may be required in a monotonically increasing and continuous sequential order, which is similar to the sequence functionality that is implemented by some RDBMSs.

This may be achieved by implementing a solution that is based on a centralised counter document that resides in a collection that we have called uniqueIdentifierCounter. This centralised counter document is the only document in the uniqueIdentifierCounter collection, and its COUNT field will track the current unique identifier value.

Each time a new unique identifier is needed, findAndModify will be used on the counter document to atomically increment the COUNT field and return the pre-increment document. The COUNT value can then be used by the application as a unique identifier. For example the application could assign the COUNT value to the _id field of a document that will be written to a given collection.

Example implementation

A counter document for unique identifier generation could look as follows:

{
    "_id"   : "UNIQUE COUNT DOCUMENT IDENTIFIER",
    "COUNT" : 0,
    "NOTES" : “Increment COUNT using findAndModify to ensure that the COUNT field will be incremented atomically with the fetch of this document",
}

And the unique identifier-generation document could be atomically requested and incremented as follows. Note that by default the document returned from findAndModify is the pre-modification document:

db.uniqueIdentifierCounter.findAndModify({
    query: { _id: "UNIQUE COUNT DOCUMENT IDENTIFIER" },
    update: {
        $inc: { COUNT: 1 },
    },
    writeConcern: 'majority'
})

Benefits

  • Easy to implement.
  • Unique identifiers are generated in a continuous and monotonically increasing manner.
  • It is possible to specify the type of value that is stored in the COUNT field, for example 32-bits (int) or 64-bits (long), to give some control over how the COUNT field will impact document size.

Drawbacks

  • This approach will likely generate a serious bottleneck in the system, as there will be contention caused by many threads simultaneously accessing the single counter document.
  • Depending on replication lag and time to flush the counter document to disk, this technique will limit the speed of unique identifier generation. If we assume that it takes 25ms for the counter document to be persisted and replicated to the database then this method would only be able to generate 40 new unique identifiers per second. If the application is waiting for unique identifier values before new documents can be inserted into a given collection, then these inserts will have a maximum write speed of 40 documents per second. Without such a bottleneck, we would expect a well functioning database to be able to write tens of thousands of documents per second.

Use a single counter document that allocates batches of unique identifiers

Description

This approach is similar to the previous approach, with the difference being that instead of incrementing the COUNT value by 1, we may wish to increment it by a larger number that will represent a batch of unique identifiers that will be allocated by the database to the application.

For example, if the application knows that it needs 1000 new unique identifiers, then the application would use findAndModify() to atomically get the current COUNT and increment the COUNT value by 1000. The document returned from the findAndModify command would contain the starting value for the batch of unique identifiers, and the application would loop over 1000 values from that starting point.

Note that with this approach an application may pass in whatever value it wishes for incrementing the COUNT value, and therefore this approach can be made to be flexible depending on the application’s requirements. For large batches this increment would be a large number, and for a single identifier this would be set to 1.

Example implementation

The following demonstrates the javascript shell commands that would atomically increment the COUNT by 1000 and return the previous (before the increment) counter document:

var seq_increment = 1000;
db.uniqueIdentifierCounter.findAndModify({
    query: { _id: "UNIQUE COUNT DOCUMENT IDENTIFIER" },
    update: {
        $inc: {COUNT: seq_increment },
    }
    writeConcern: 'majority'
})

Benefits

  • Relatively easy to implement.
  • Unique identifiers are generated by the database in a monotonically increasing manner, and will likely be used by the application in a mostly monotonically increasing manner.
  • This approach has the potential to dramatically reduce the number of requests and updates to the counter document, which may eliminate the bottleneck described in the previous approach.

Drawbacks

  • There is potential for bottlenecks if the application requests small unique identifier ranges with each request.
  • The application must understand that the number received from the database is meant as a range of values.
  • Multiple threads requesting batches of unique identifiers at a similar moment in time could cause the allocated identifiers to be used by the application in an order that is not strictly monotonically increasing, as each thread takes time to work through its allocated batch.
  • If the application misbehaves, then it could burn through a large number of unique identifiers without actually using them.

Use multiple counter documents that allocate batches of unique identifiers

Description

This approach is similar to the previous approach, but instead of having a single counter document, we could have many counter documents stored in the uniqueIdentifierCounter collection.

For example, there may be 1000 counter documents (numbered 0 to 999) each responsible for allocating 1 billion unique numbers that are taken from a specific range that has been allocated to each counter. In this example, counter 499 would be responsible for allocating values from 499000000000 to 499999999999. Note that this particular example results in unique numbers ranging from 0 to 999,999,999,999 which is a 12 digit number.

Example implementation

Below we show the format and initial values assigned to counter documents in the uniqueIdentifierCounter collection:

/* The following would be the initial state of the 0th counter document, which is responsible for the range of unique identifiers from 0 to 999,999,999 */
{
    "_id"  : "COUNTER DOCUMENT NUMBER 0",
    "MAX_VALUE": 999999999,
    "COUNT"  : 0,
    "NOTES" : "Increment COUNT using findAndModify to ensure that the COUNT field will be incremented atomically with the fetch of this document",
}

/* The following would be the initial state of 499th counter document, which is responsible for the range of unique identifiers from 499,000,000,000 to 499,999,999,999 */
{
    "_id"  : "COUNTER DOCUMENT NUMBER 499"),
    "MAX_VALUE": 499999999999,
    "COUNT"  : 499000000000,
    "NOTES" : "Increment COUNT using findAndModify to ensure that the COUNT field will be incremented atomically with the fetch of this document",
}
/* Etc… */

With this approach, each time the application needs a new unique number or a range of unique numbers, the application could randomly generate a number between 0 and 999 which it would use to perform a query against the _id attribute in the uniqueIdentifierCounter collection. This would select a particular counter document from which to retrieve the unique identifier batch.

This is demonstrated in the following example, in which we randomly select one of the counter documents, and request a batch of 100 unique numbers from that counter:

var which_counter_to_query = Math.floor((Math.random()*1000));
var seq_increment = 100;
db.Unique Identifier_counter.findAndModify({
    query: { _id:  "COUNTER DOCUMENT NUMBER " + which_counter_to_query},
    update: {
        $inc: {COUNT: seq_increment },
    },
    writeConcern: 'majority'
})

Benefits

  • Compared to the previous approaches, this approach will reduce contention by having fewer threads simultaneously accessing each counter document.

Drawbacks

  • This is more complicated than the previous implementations.
  • There is potential for bottlenecks if this approach is used for generating small batches and has a small number of counter documents.
  • The number of counter documents must be predefined and the range of unique identifiers assigned to each counter document needs to be allocated in advance.
  • Care must be taken to ensure that the pre-defined range that is assigned to each counter document does not roll-over.

Randomly choose a unique identifier in the application and retry if it is already assigned

Description

This approach relies on the fact that if a unique index is defined in a collection, that any document written to that collection must have a unique value assigned to that field in order for it to be successfully written. Therefore, we can randomly generate a unique identifier number in the application, assign it to the unique field in a document, and try to write that document to the collection. If the write succeeds, then we know that the value that we assigned to it is unique. If the write fails, then the application must catch the failure and randomly generate a new unique identifier which can then be used to write the document to the collection. If the number of collisions is low, then this can be an efficient way to write documents to the database with each document having a guaranteed unique identifier.

Example implementation

If we know that we will have a maximum of one billion records in our database, in order to have a low probability of selecting an identifier that has already been assigned (aka a collision), we could randomly choose a number between 0 and 999,999,999,999 (from zero to one trillion minus one). For this example, the range that we are using to select the random number is 1000 times bigger than the number of documents that we expect to write to this collection, which results in a worst case expected 0.1% chance of a collision.

We would then assign the randomly generated number to a field that has a unique index, and write that document to the database. If the write succeeds, then we know that the identifier is unique. If the write fails, then the application must randomly choose another identifier and try again until the write succeeds. Note that there are some restrictions on the use of unique indexes when used in sharded clusters. If the restrictions for using a unique index on a sharded collection cannot be satisfied, then a proxy collection may be used to help generate unique indexes.

Benefits

This approach is not difficult to implement.

Drawbacks

  • Some businesses do not like the random nature of this approach to unique identifier generation.
  • Testing unique identifier collisions may be tricky since it relies on random numbers.
  • If the random number generator is not good then there may be a potential for multiple collisions and multiple retries required before successfully writing a document.

Use a standard UUID algorithm for application-level unique identifier generation

Description

RFC 4122 defines a standard for generating 128-bit UUIDs. The RFC specifies different algorithms for generating UUIDs, which are called RFC 4122 versions.

Standard libraries exist that will generate 128-bit UUIDs at the application level. The BSON specification defines UUID as a valid subtype, and can be found at: http://bsonspec.org/spec.html.

Benefits

  • This approach effectively addresses UUID-related bottlenecks.
  • UUIDs are fully generated in application code, which saves a round-trip to the database that is required with some of the alternative approaches.
  • This is a standard implementation that relies on existing libraries.
  • This approach does not use a database-generated identifier for business functions.
  • For all practical purposes, UUIDs generated with this approach are globally unique.
  • If RFC 4122 version 1 or version 2 is used and is properly implemented, then the generated UUIDs are guaranteed to be globally unique.

Drawbacks

  • These unique identifiers are 128-bits, which is longer than some alternative approaches. This results in slightly larger documents, and therefore uses slightly more disk space and memory.
  • For RFC 4122 algorithm versions other than version 1 and version 2, it is theoretically possible to generate a UUID that is not absolutely globally unique. However, for all practical purposes the resulting UUIDs are globally unique. More information can be found in the Wikipedia article about UUID generation.

About the Author

Alexander is a Senior Consulting Engineer at MongoDB who has worked closely with clients of all shapes and sizes, advising on all aspects of running MongoDB at scale and in mission-critical environments. Prior to joining MongoDB, Alexander was the founder and principal developer at Lexabit Inc., which owned several social networking websites that were scaled out to tens of thousands of unique visitors per day. Alex has a Masters Degree in Computer Engineering from the University of Toronto, a B.Sc. from the University of Manitoba, and an MBA from the IESE Business School.
The Modern Application Stack – Part 4: Building a Client UI Using Angular 2 (formerly AngularJS) & TypeScript

$
0
0

Introduction

This is the fourth in a series of blog posts examining technologies such as Angular that are driving the development of modern web and mobile applications.

"Modern Application Stack – Part 1: Introducing The MEAN Stack" introduced the technologies making up the MEAN (MongoDB, Express, Angular, Node.js) and MERN (MongoDB, Express, React, Node.js) Stacks, why you might want to use them, and how to combine them to build your web application (or your native mobile or desktop app).

The remainder of the series is focussed on working through the end to end steps of building a real (albeit simple) application. – MongoPop. Part 2: Using MongoDB With Node.js created an environment where we could work with a MongoDB database from Node.js; it also created a simplified interface to the MongoDB Node.js Driver. Part 3: Building a REST API with Express.js built on Part 2 by using Express.js to add a REST API which will be used by the clients that we implement in the final posts.

This post demonstrates how to use Angular 2 (the evolution of Angular.js) to implement a remote web-app client for the Mongopop application.

Angular 2 (recap)

Angular, originally created and maintained by Google, runs your JavaScript code within the user's web browsers to implement a reactive user interface (UI). A reactive UI gives the user immediate feedback as they give their input (in contrast to static web forms where you enter all of your data, hit "Submit" and wait.

Reactive Angular 2 application

Version 1 of Angular was called AngularJS but it was shortened to Angular in Angular 2 after it was completely rewritten in Typescript (a superset of JavaScript) – Typescript is now also the recommended language for Angular apps to use.

You implement your application front-end as a set of components – each of which consists of your JavaScript (Typescript) code and an HTML template that includes hooks to execute and use the results from your Typescript functions. Complex application front-ends can be crafted from many simple (optionally nested) components.

Angular application code can also be executed on the back-end server rather than in a browser, or as a native desktop or mobile application.

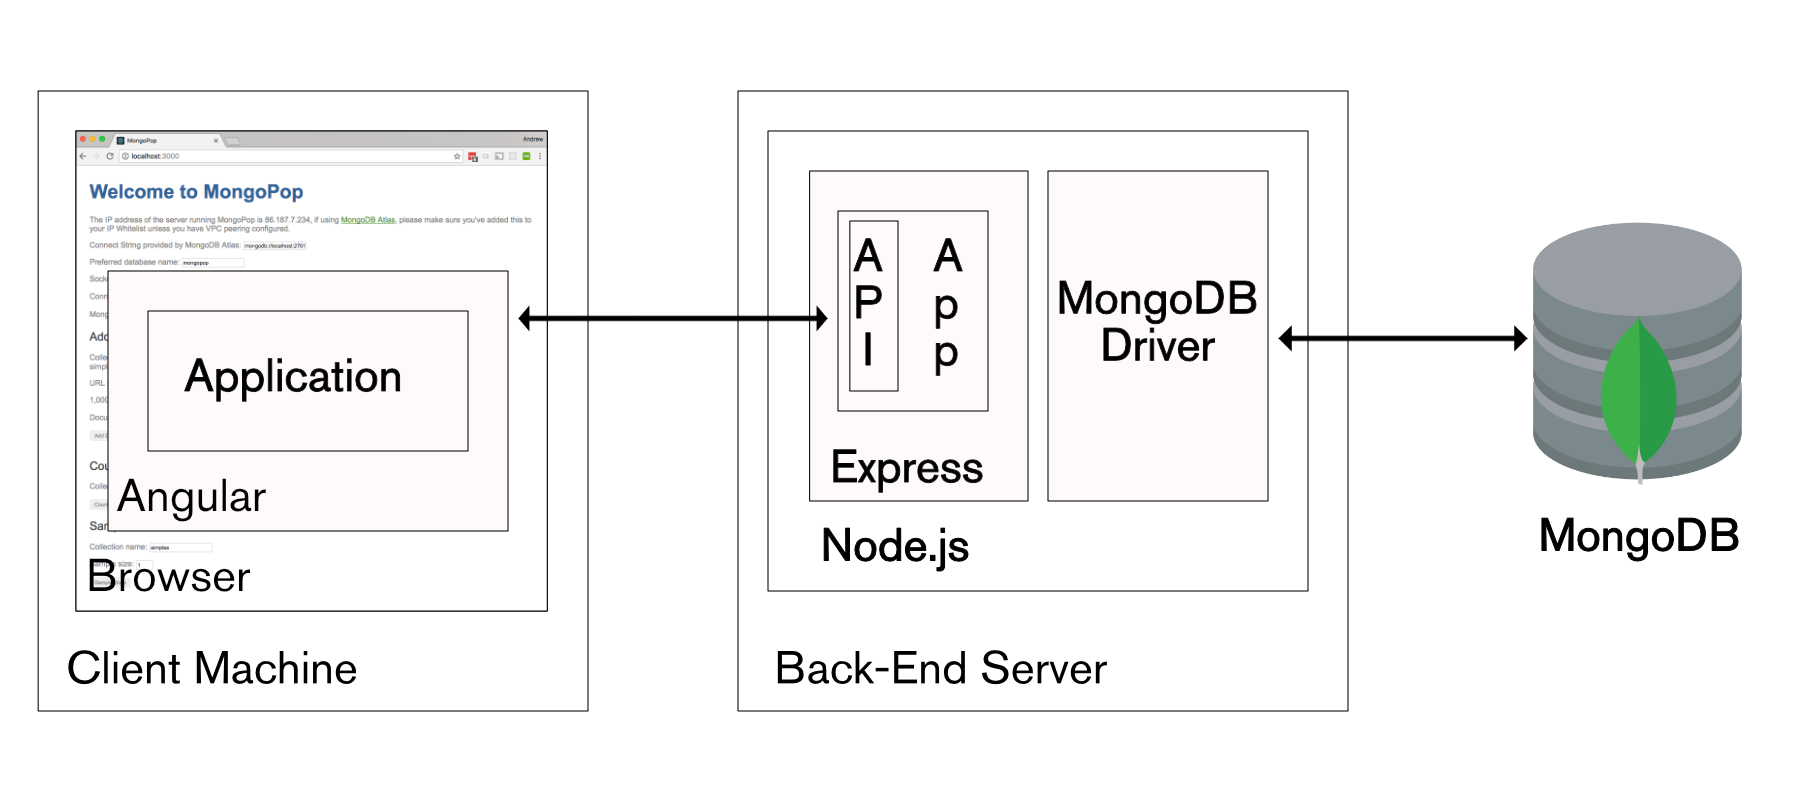
MEAN Stack Architecture

Downloading, running, and using the Mongopop application

The Angular client code is included as part if the Mongopop package installed in Part 2: Using MongoDB With Node.js.

The back-end application should be run in the same way as in parts 2 & 3. The client software needs to be transpiled from Typescript to JavaScript – the client software running in a remote browser can then download the JavaScript files and execute them.

The existing package.json file includes a script for transpiling the Angular 2 code:

  "scripts": {
        ...
    "tsc:w": "cd public && npm run tsc:w",
        ...
},

That tsc:w delegates the work to a script of the same name defined in public/package.json;

  "scripts": {
        ...
    "tsc:w": "tsc -w",
        ...
},

tsc -w continually monitors the client app's Typescript files and reruns the transpilation every time they are edited.

To start the continual transpilation of the Angular 2 code:

npm run tsc:w

Component architecture of the Mongopop Angular UI

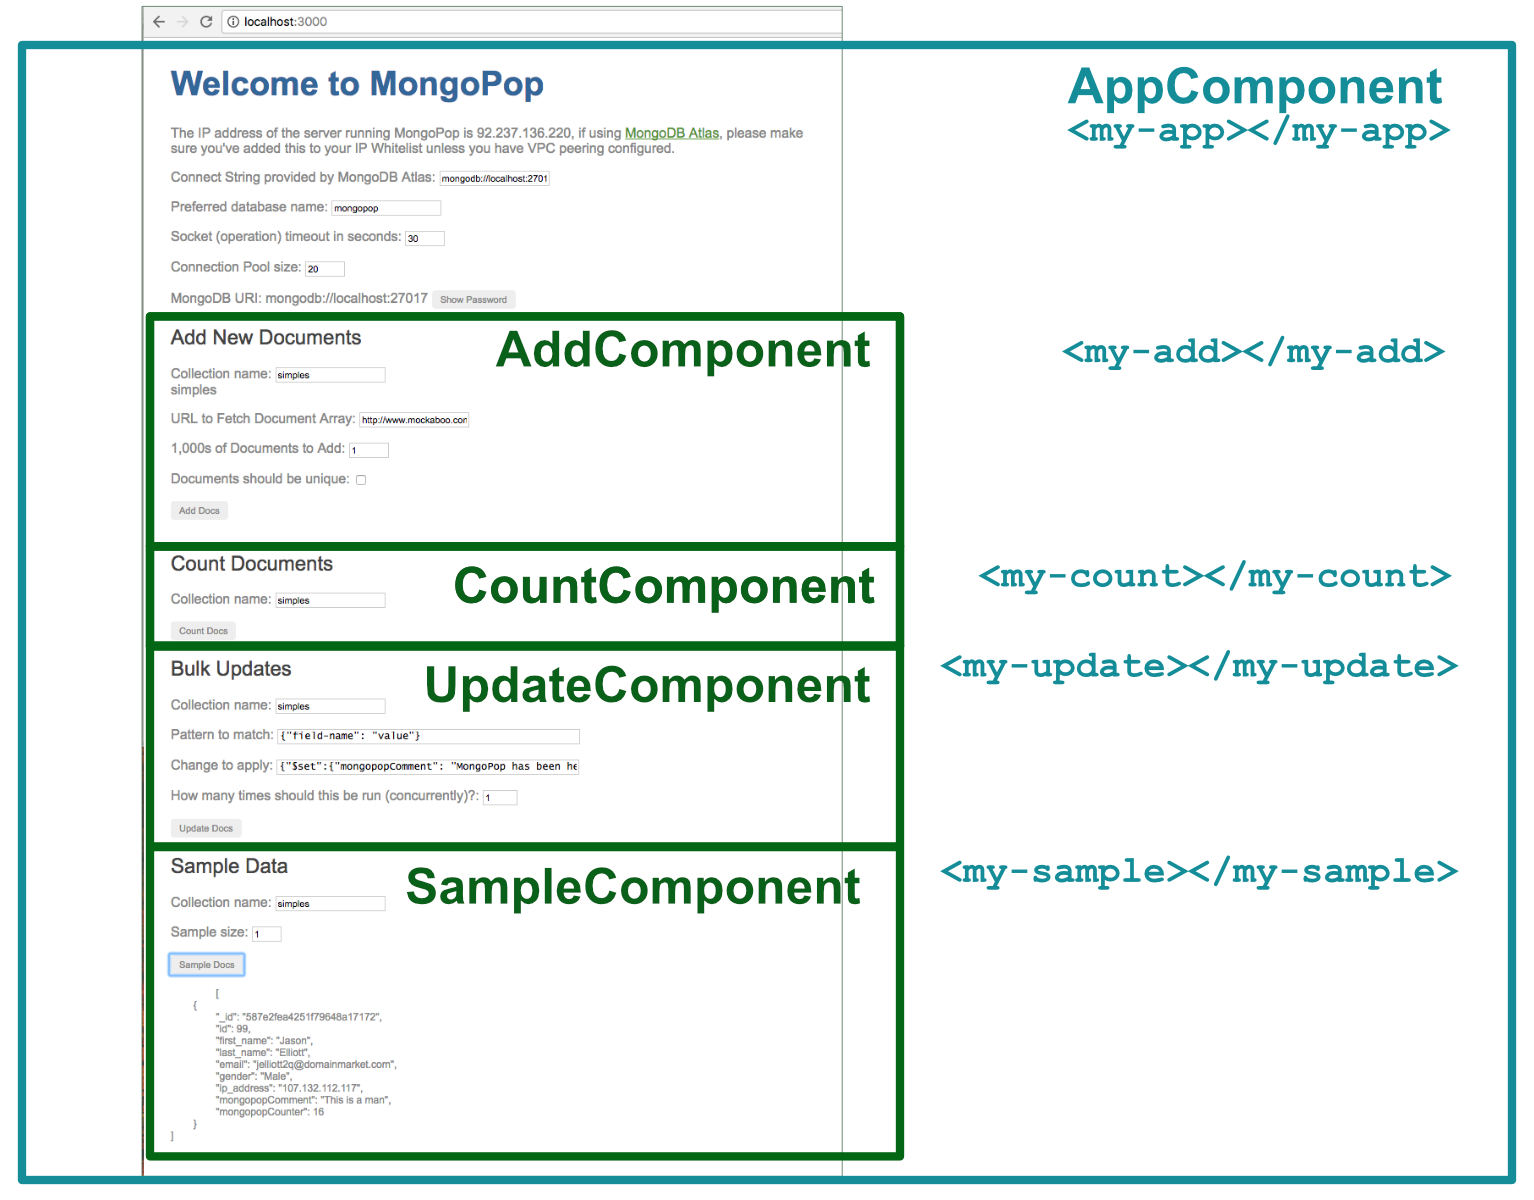
Angular applications (both AngularJS and Angular2) are built from one or more, nested components – Mongopop is no exception:

Mongopop Angular2 Components

The main component (AppComponent)contains the HTML and logic for connecting to the database and orchestrating its sub-components. Part of the definition of AppComponent is meta data/decoration to indicate that it should be loaded at the point that a my-app element (<my-app></my-app>) appears in the index.html file (once the component is running, its output replaces whatever holding content sits between <my-app> and </my-app>). AppComponent is implemented by:

  • A Typescript file containing the AppComponent class (including the data members, initialization code, and member functions
  • A HTML file containing
    • HTML layout
    • Rendering of data members
    • Elements to be populated by sub-components
    • Data members to be passed down for use by sub-components
    • Logic (e.g. what to do when the user changes the value in a form)
  • (Optionally) a CSS file to customise the appearance of the rendered content

Mongopop is a reasonably flat application with only one layer of sub-components below AppComponent, but more complex applications may nest deeper.

Changes to a data value by a parent component will automatically be propagated to a child – it's best practice to have data flow in this direction as much as possible. If a data value is changed by a child and the parent (either directly or as a proxy for one of its other child components) needs to know of the change, then the child triggers an event. That event is processed by a handler registered by the parent – the parent may then explicitly act on the change, but even if it does nothing explicit, the change flows to the other child components.

This table details what data is passed from AppComponent down to each of its children and what data change events are sent back up to AppComponent (and from there, back down to the other children):

Flow of data between Angular components
Child component Data passed down Data changes passed back up
AddComponent
Data service Collection name
Collection name
Mockaroo URL
CountComponent
Data service Collection name
Collection name
UpdateComponent
Data service Collection name
Collection name
SampleComponent
Data service Collection name
Collection name Existence of sample data

What are all of these files?

To recap, the files and folders covered earlier in this series:

  • package.json: Instructs the Node.js package manager (npm) what it needs to do; including which dependency packages should be installed
  • node_modues: Directory where npm will install packages
  • node_modues/mongodb: The MongoDB driver for Node.js
  • node_modues/mongodb-core: Low-level MongoDB driver library; available for framework developers (application developers should avoid using it directly)
  • javascripts/db.js: A JavaScript module we've created for use by our Node.js apps (in this series, it will be Express) to access MongoDB; this module in turn uses the MongoDB Node.js driver.
  • config.js: Contains the application–specific configuration options
  • bin/www: The script that starts an Express application; this is invoked by the npm start script within the package.json file. Starts the HTTP server, pointing it to the app module in app.js
  • app.js: Defines the main back-end application module (app). Configures:
    • That the application will be run by Express
    • Which routes there will be & where they are located in the file system (routes directory)
    • What view engine to use (Jade in this case)
    • Where to find the views to be used by the view engine (views directory)
    • What middleware to use (e.g. to parse the JSON received in requests)
    • Where the static files (which can be read by the remote client) are located (public directory)
    • Error handler for queries sent to an undefined route
  • views: Directory containing the templates that will be used by the Jade view engine to create the HTML for any pages generated by the Express application (for this application, this is just the error page that's used in cases such as mistyped routes ("404 Page not found"))
  • routes: Directory containing one JavaScript file for each Express route
    • routes/pop.js: Contains the Express application for the /pop route; this is the implementation of the Mongopop REST API. This defines methods for all of the supported route paths.
  • public: Contains all of the static files that must be accessible by a remote client (e.g., our Angular to React apps).

Now for the new files that implement the Angular client (note that because it must be downloaded by a remote browser, it is stored under the public folder):

  • public/package.json: Instructs the Node.js package manager (npm) what it needs to do; including which dependency packages should be installed (i.e. the same as /package.json but this is for the Angular client app)
  • public/index.html: Entry point for the application; served up when browsing to http://<backend-server>/. Imports public/system.config.js
  • public/system.config.js: Configuration information for the Angular client app; in particular defining the remainder of the directories and files:
    • public/app: Source files for the client application – including the Typescript files (and the transpiled JavaScript files) together the HTML and any custom CSS files. Combined, these define the Angular components.
      • public/app/main.ts: Entry point for the Angular app. Bootstraps public/app/app.module.ts
      • public/app/app.module.ts: Imports required modules, declares the application components and any services. Declares which component to bootstrap (AppComponent which is implemented in public/app/app.component.*)
      • public/app/app.component.html: HTML template for the top-level component. Includes elements that are replaced by sub-components
      • public/app/app.component.ts: Implements the AppComponent class for the top-level component
      • public/app/X.component.html: HTML template for sub-component X
      • public/app/X.component.ts: Implements the class for sub-component X
      • AddDocsRequest.ts, ClientConfig.ts, CountDocsRequest.ts, MongoResult.ts, MongoReadResult.ts, SampleDocsRequest.ts, & UpdateDocsRequest.ts: Classes that match the request parameters and response formats of the REST API that's used to access the back-end
      • data.service.ts: Service used to access the back-end REST API (mostly used to access the database)
      • X.js* & *X.js.map: Files which are generated by the transpilation of the Typescript files.
    • public/node-modules: Node.js modules used by the Angular app (as opposed to the Express, server-side Node.js modules)
    • public/styles.css: CSS style sheet (imported by public/index.html) – applies to all content in the home page, not just content added by the components
    • public/stylesheets/styles.css: CSS style sheet (imported by public/app/app.component.ts and the other components) – note that each component could have their own, specialized style sheet instead

"Boilerplate" files and how they get invoked

This is an imposing number of new files and this is one of the reasons that Angular is often viewed as the more complex layer in the application stack. One of the frustrations for many developers, is the number of files that need to be created and edited on the client side before your first line of component/application code is executed. The good news is that there is a consistent pattern and so it's reasonable to fork you app from an existing project – the Mongopop app can be cloned from GitHub or, the Angular QuickStart can be used as your starting point.

As a reminder, here is the relationship between these common files (and our application-specific components):

Angular2 boilerplate files

Contents of the "boilerplate" files

This section includes the contents for each of the non-component files and then remarks on some of the key points.

public/package.json

The scripts section defines what npm should do when you type npm run <command-name> from the command line. Of most interest is the tsc:w script – this is how the transpiler is launched. After transpiling all of the .ts Typescript files, it watches them for changes – retranspiling as needed.

Note that the dependencies are for this Angular client. They will be installed in public/node_modules when npm install is run (for Mongopop, this is done automatically when building the full project ).

public/index.html

Focussing on the key lines, the application is started using the app defined in systemjs.config.js:

And the output from the application replaces the placeholder text in the my-app element:

<my-app>Loading MongoPop client app...</my-app>

public/systemjs.config.js

packages.app.main is mapped to public/app/main.js – note that main.js is referenced rather than main.ts as it is always the transpiled code that is executed. This is what causes main.ts to be run.

public/app/main.ts

This simply imports and bootstraps the AppModule class from public/app/app.module.ts (actually app.module.js)

public/app/app.module.ts

This is the first file to actually reference the components which make up the Mongopop application!

Note that NgModule is the core module for Angular and must always be imported; for this application BrowserModule, HttpModule, and FormsModule are also needed.

The import commands also bring in the (.js) files for each of the components as well as the data service.

Following the imports, the @NgModule decorator function takes a JSON object that tells Angular how to run the code for this module (AppModule) – including the list of imported modules, components, and services as well as the module/component needed to bootstrap the actual application (AppComponent).

Typescript & Observables (before getting into component code)

As a reminder from "Modern Application Stack – Part 1: Introducing The MEAN Stack"; the most recent, widely supported version is ECMAScript 6 – normally referred to as /ES6/. ES6 is supported by recent versions of Chrome, Opera, Safari, and Node.js). Some platforms (e.g. Firefox and Microsoft Edge) do not yet support all features of ES6. These are some of the key features added in ES6:

  • Classes & modules
  • Promises – a more convenient way to handle completion or failure of synchronous function calls (compared to callbacks)
  • Arrow functions – a concise syntax for writing function expressions
  • Generators – functions that can yield to allow others to execute
  • Iterators
  • Typed arrays

Typescript is a superset of ES6 (JavaScript); adding static type checking. Angular 2 is written in Typescript and Typescript is the primary language to be used when writing code to run in Angular 2.

Because ES6 and Typescript are not supported in all environments, it is common to transpile the code into an earlier version of JavaScript to make it more portable. tsc is used to transpile Typescript into JavaScript.

And of course, JavaScript is augmented by numerous libraries. The Mongopop Angular 2 client uses Observables from the RxJS reactive libraries which greatly simplify making asynchronous calls to the back-end (a pattern historically referred to as AJAX).

RxJS Observables fulfil a similar role to ES6 promises in that they simplify the code involved with asynchronous function calls (removing the need to explicitly pass callback functions). Promises are more contained than Observables, they make a call and later receive a single signal that the asynchronous activity triggered by the call succeeded or failed. Observables can have a more complex lifecycle, including the caller receiving multiple sets of results and the caller being able to cancel the Observable.

The Mongopop application uses two simple patterns when calling functions that return an Observable; the first is used within the components to digest the results from our own data service:

In Mongopop's use of Observables, we don't have anything to do in the final arrow function and so don't use it (and so it could have used the second pattern instead – but it's interesting to see both).

The second pattern is used within the data service when making calls to the Angular 2 http module (this example also shows how we return an Observable back to the components):

Calling the REST API

The DataService class hides the communication with the back-end REST API; serving two purposes:

  • Simplifying all of the components' code
  • Shielding the components' code from any changes in the REST API signature or behavior – that can all be handled within the DataService

By adding the @Injectable decorator to the class definition, any member variables defined in the arguments to the class constructor function will be automatically instantiated (i.e. there is no need to explicitly request a new Http object):

After the constructor has been called, methods within the class can safely make use of the http data member.

As a reminder from Part 3: Building a REST API with Express.js, this is the REST API we have to interact with:

Express routes implemented for the Mongopop REST API
Route Path HTTP Method Parameters Response Purpose
                      
/pop/
GET
{
"AppName": "MongoPop",
"Version": 1.0
}
        
Returns the version of the API.
/pop/ip
GET
{"ip": string}
Fetches the IP Address of the server running the Mongopop backend.
/pop/config
GET
{
mongodb: {
    defaultDatabase: string,
    defaultCollection: string,
    defaultUri: string
},
mockarooUrl: string
}
        
Fetches client-side defaults from the back-end config file.
/pop/addDocs
POST
{
MongoDBURI: string;
collectionName: string;
dataSource: string;
numberDocs: number;
unique: boolean;
}
        
{
success: boolean;
count: number;
error: string;
}
        
Add numberDocs batches of documents, using documents fetched from dataSource
/pop/sampleDocs
POST
{
MongoDBURI: string;
collectionName: string;
numberDocs: number;
}
        
{
success: boolean;
documents: string; error: string; }
Read a sample of the documents from a collection.
/pop/countDocs
POST
{
MongoDBURI: string;
collectionName: string;
}
        
{
success: boolean;
count: number; error: string; }
Counts the number of documents in the collection.
/pop/updateDocs
POST
{
MongoDBURI: string;
collectionName: string;
matchPattern: Object;
dataChange: Object;
threads: number;
}
        
{
success: boolean;
count: number;
error: string;
}
        
Apply an update to all documents in a collection which match a given pattern

Most of the methods follow a very similar pattern and so only a few are explained here; refer to the DataService class to review the remainder.

The simplest method retrieves a count of the documents for a given collection:

This method returns an Observable, which in turn delivers an object of type MongoResult. MongoResult is defined in MongoResult.ts:

The pop/count PUT method expects the request parameters to be in a specific format (see earlier table); to avoid coding errors, another Typescript class is used to ensure that the correct parameters are always included – CountDocsRequest:

http.post returns an Observable. If the Observable achieves a positive outcome then the map method is invoked to convert the resulting data (in this case, simply parsing the result from a JSON string into a Typescript/JavaScript object) before automatically passing that updated result through this method's own returned Observable.

The timeout method causes an error if the HTTP request doesn't succeed or fail within 6 minutes.

The catch method passes on any error from the HTTP request (or a generic error if error.toString() is null) if none exists.

The updateDBDocs method is a little more complex – before sending the request, it must first parse the user-provided strings representing:

  • The pattern identifying which documents should be updated
  • The change that should be applied to each of the matching documents

This helper function is used to parse the (hopefully) JSON string:

If the string is a valid JSON document then tryParseJSON returns an object representation of it; if not then it returns an error.

A new class (UpdateDocsRequest) is used for the update request:

updateDBDocs is the method that is invoked from the component code:

After converting the received string into objects, it delegates the actual sending of the HTTP request to sendUpdateDocs:

A simple component that accepts data from its parent

Recall that the application consists of five components: the top-level application which contains each of the add, count, update, and sample components.

When building a new application, you would typically start by designing the the top-level container and then work downwards. As the top-level container is the most complex one to understand, we'll start at the bottom and then work up.

A simple sub-component to start with is the count component:

Mongopop Angular2 component public/app/count.component.html defines the elements that define what's rendered for this component:

You'll recognise most of this as standard HTML code.

The first Angular extension is for the single input element, where the initial value (what's displayed in the input box) is set to {{MongoDBCollectionName}}. Any name contained within a double pair of braces refers to a data member of the component's class (public/app/count.component.ts).

When the button is clicked, countDocs (a method of the component's class) is invoked with CountCollName.value (the current contents of the input field) passed as a parameter.

Below the button, the class data members of DocumentCount and CountDocError are displayed – nothing is actually rendered unless one of these has been given a non-empty value. Note that these are placed below the button in the code, but they would still display the resulting values if they were moved higher up – position within the HTML file doesn't impact logic flow. Each of those messages is given a class so that they can be styled differently within the component's CSS file:

Angular 2 success message

Angular 2 error message

The data and processing behind the component is defined in public/app/count.component.ts:

Starting with the @component decoration for the class:

This provides meta data for the component:

  • selector: The position of the component within the parent's HTML should be defined by a <my-count></my-count> element.
  • templateUrl: The HMTL source file for the template (public/app/count.component.ts in this case – public is dropped as the path is relative)
  • styleUrls: The CSS file for this component – all components in this application reference the same file: public/stylesheets/style.css

The class definition declares that it implements the OnInit interface; this means that its ngOnInit() method will be called after the browser has loaded the component; it's a good place to perform any initialization steps. In this component, it's empty and could be removed.

The two data members used for displaying success/failure messages are initialized to empty strings:

this.DocumentCount = "";
this.CountDocError = "";

Recall that data is passed back and forth between the count component and its parent:

Flow of data between Angular components
Child component Data passed down Data changes pased back up
CountComponent
Data service Collection name
Collection name

To that end, two class members are inherited from the parent component – indicated by the @Input() decoration:

// Parameters sent down from the parent component (AppComponent)
@Input() dataService: DataService;
@Input() MongoDBCollectionName: string;

The first is an instance of the data service (which will be used to request the document count); the second is the collection name that we used in the component's HTML code. Note that if either of these are changed in the parent component then the instance within this component will automatically be updated.

When the name of the collection is changed within this component, the change needs to be pushed back up to the parent component. This is achieved by declaring an event emitter (onCollection):

Recall that the HTML for this component invokes a member function: countDocs(CountCollName.value) when the button is clicked; that function is implemented in the component class:

After using the data service to request the document count, either the success or error messages are sent – depending on the success/failure of the requested operation. Note that there are two layers to the error checking:

  1. Was the network request successful? Errors such as a bad URL, out of service back-end, or loss of a network connection would cause this check to fail.
  2. Was the back-end application able to execute the request successfully? Errors such as a non-existent collection would cause this check to fail.

Note that when this.CountDocError or this.DocumentCount are written to, Angular will automatically render the new values in the browser.

Passing data down to a sub-component (and receiving changes back)

We've seen how CountComponent can accept data from its parent and so the next step is to look at that parent – AppComponent.

The HTML template app.component.html includes some of its own content, such as collecting database connection information, but most of it is delegation to other components. For example, this is the section that adds in CountComponent:

Angular will replace the <my-count></my-count> element with CountComponent; the extra code within that element passes data down to that sub-component. For passing data members down, the syntax is:

[name-of-data-member-in-child-component]="name-of-data-member-in-this-component"

As well as the two data members, a reference to the onCollection event handler is passed down (to allow CountComponent to propagate changes to the collection name back up to this component). The syntax for this is:

(name-of-event-emitter-in-child-component)="name-of-event-handler-in-this-component($event)"

As with the count component, the main app component has a Typescript class – defined in app.component.ts – in addition to the HTML file. The two items that must be passed down are the data service (so that the count component can make requests of the back-end) and the collection name – these are both members of the AppComponent class.

The dataService object is implicitly created and initialized because it is a parameter of the class's constructor, and because the class is decorated with @Injectable:

MongoDBCollectionName is set during component initialization within the ngOnInit() method by using the data service to fetch the default client configuration information from the back-end:

Finally, when the collection name is changed in the count component, the event that it emits gets handled by the event handler called, onCollection, which uses the new value to update its own data member:

Conditionally including a component

It's common that a certain component should only be included if a particular condition is met. Mongopop includes a feature to allow the user to apply a bulk change to a set of documents - selected using a pattern specified by the user. If they don't know the typical document structure for the collection then it's unlikely that they'll make a sensible change. Mongopop forces them to first retrieve a sample of the documents before they're given the option to make any changes.

The ngIf directive can be placed within the opening part of an element (in this case a <div>) to make that element conditional. This approach is used within app.component.html to only include the update component if the DataToPlayWith data member is TRUE:

Note that, as with the count component, if the update component is included then it's passed the data service and collection name and that it also passes back changes to the collection name.

Angular includes other directives that can be used to control content; ngFor being a common one as it allows you to iterate through items such as arrays:

Returning to app.component.html, an extra handler (onSample) is passed down to the sample component:

sample.component.html is similar to the HTML code for the count component but there is an extra input for how many documents should be sampled from the collection:

On clicking the button, the collection name and sample size are passed to the sampleDocs method in sample.component.ts which (among other things) emits an event back to the AppComponent's event handler using the onSample event emitter:

Other code highlights

Returning to app.component.html; there is some content there in addition to the sub-components:

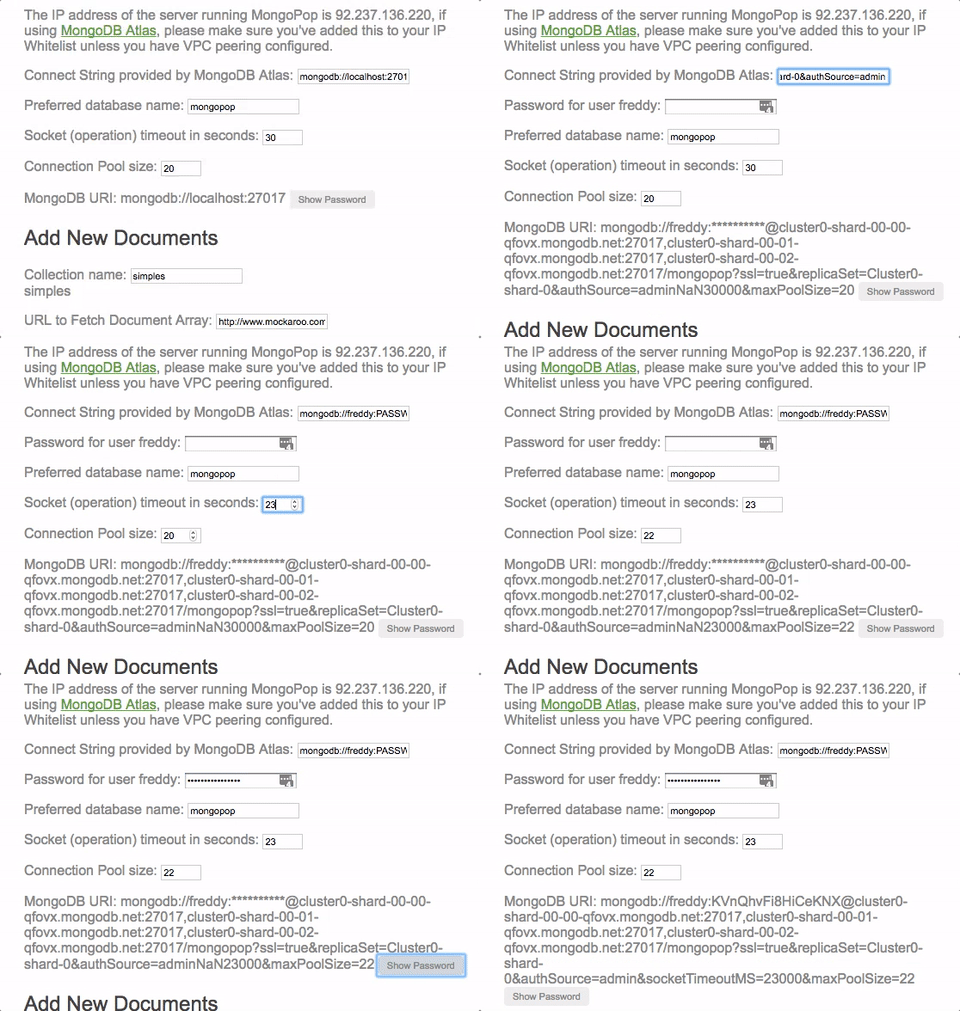
Most of this code is there to allow a full MongoDB URI/connection string to be built based on some user-provided attributes. Within the input elements, two event types (keyup & change) make immediate changes to other values (without the need for a page refresh or pressing a button):

Reactive Angular 2 Component

The actions attached to each of these events call methods from the AppComponent class to set the data members – for example the setDBName method (from app.component.ts):

In addition to setting the dBInputs.MongoDBDatabaseName value, it also invokes the data service method calculateMongoDBURI (taken from data.service.ts ):

This method is run by the handler associated with any data member that affects the MongoDB URI (base URI, database name, socket timeout, connection pool size, or password). Its purpose is to build a full URI which will then be used for accessing MongoDB; if the URI contains a password then a second form of the URI, MongoDBURIRedacted has the password replaced with **********.

It starts with a test as to whether the URI has been left to the default localhost:27017 – in which case it's assumed that there's no need for a username or password (obviously, this shouldn't be used in production). If not, it assumes that the URI has been provided by the MongoDB Atlas GUI and applies these changes:

  • Change the database name from <DATATBASE> to the one chosen by the user.
  • Replace <PASSWORD> with the real password (and with ********** for the redacted URI).
  • Add the socket timeout parameter.
  • Add the connection pool size parameter.

Testing & debugging the Angular application

Now that the full MEAN stack application has been implemented, you can test it from within your browser:

Debugging the Angular 2 client is straightforward using the Google Chrome Developer Tools which are built into the Chrome browser. Despite the browser executing the transpiled JavaScript the Dev Tools allows you to browse and set breakpoints in your Typescript code:

Summary & what's next in the series

Previous posts stepped through building the Mongopop application back-end. This post describes how to build a front-end client using Angular 2. At this point, we have a complete, working, MEAN stack application.

The coupling between the front and back-end is loose; the client simply makes remote, HTTP requests to the back-end service – using the interface created in Part 3: Building a REST API with Express.js.

This series will finish out by demonstrating alternate methods to implement front-ends; using ReactJS for another browser-based UI (completing the MERN stack) and then more alternative methods.

Continue following this blog series to step through building the remaining stages of the Mongopop application:


If you're interested in learning everything you need to know to get started building a MongoDB-based app you can sign up for one of our free online MongoDB University courses.

Sessions I’m Looking Forward to at MongoDB World 2017

$
0
0

Back in 2014, while I was working for BuzzFeed, the CTO asked if I wanted to head to MongoDB World. I had some basic understanding of MongoDB and how it made the lives easier for those who studied the information captured when users visited the BuzzFeed website, but that was it.

I’ve always enjoyed attending conferences. They enable me to learn new technology while meeting the people who create and implement it. So I took Mark up on his offer and headed to my first MongoDB World.

I even documented my attendance:

MongoDB World 2014

That nifty guidebook, which was also available as a mobile app, sent me on a journey to learn more about MongoDB. It steered me towards sessions on scaling, the benefits of sharding, and hardware selection for MongoDB that prepared me for future changes in technology I couldn’t have predicted at the time.

A few months later, a thing with a dress made my life very interesting. We used MongoDB to collect the data as the event occurred. Having attended MongoDB World, I felt prepared for this record traffic. While our front end web servers may have buckled under some of the pressure, our data layer was rock solid. Rather than feel the pressure, I allowed my training to take control to work alongside my team.

In 2016, after taking a journey further into Cloud Hosting, an opportunity arose for me to become a member of the MongoDB team as they launched MongoDB Atlas. I made sure that one of my primary tasks as part of this was to take part in MongoDB World as a presenter and give my first talk as a member of MongoDB.

Fast forward to MongoDB World 2017, and my name is listed in the session catalogue for the second year straight. I’ll be presenting a Jumpstart Session on MongoDB Operations. Being part of MongoDB World, initially as an attendee and eventually as a member of the MongoDB staff, has been an extraordinary experience. I often think back to my tweet to @MongoDB. The sessions I attended in 2014 lead me to where I am today.

Sessions I’m looking forward to

At MongoDB, we recently released the session catalogue for MongoDB World 2017, June 20-21 in Chicago. As a presenter, I’m always excited to see who my peers are, so I get a chance to attend some of their sessions and meet with them to chat about our experience. We have quite a lineup this year. As a person who's attended this from both sides, I wanted to share a few that are already on my calendar:

AWS Lambda and MongoDB Atlas

A newcomer to MongoDB, Raphael Londner will discuss the important details when developing an application using the AWS Lambda platform along with MongoDB Atlas, MongoDB's DBaaS (Database as a Service). Raphael is taking a really cool step that I did myself. As soon as I joined MongoDB, I shared my operations, AWS, and MongoDB skills. Similarly, Raphael joined our team in 2017 with the goals of helping developers build new applications in easier ways.

ETL for Pros: Getting Data Into MongoDB

As a person who's trained me in the past, Andre Spiegel continues to impress me. He excels at explaining how to cut to the core of your problem and providing you with better ideas to solve it. Extract, Transform, Load (known as ETL) is a method to work with your data warehouse. Andre will cover how traditional methods of dealing with rows and columns can be modernized by using complex documents. He'll also discuss tuning of the bulk loading process. When you're dealing with hundreds of GBs to TBs of data, that loading process is a big deal; luckily Andre's session will help you best prepare and execute.

How ThermoFisher Is Reducing Mass Spectrometry Experiment Times from Days to Minutes with MongoDB

In 2016, Joseph Fluckinger from Thermo Fisher had a conversation on stage with Eliot Horowitz, MongoDB’s CTO, to discuss much of his team's success with using MongoDB at AWS Re:Invent. I missed this talk and only saw some video clips. Later that night, I had dinner with Joseph and other colleagues. We spoke for hours about how much he enjoyed working with our team to build his talk, and how much the software made a difference to Thermo Fisher.

Hearing how his team replaced so many older SQL technologies with MongoDB to integrate with their tools – including a mass spectrometer – is something I’m really looking forward to.

So as June approaches, I have a ton of work to do to ready myself to present at MongoDB World. But the work is worth it. I look forward to meeting the MongoDB engineers, open-source developers, masters and rookies that will attend. Regardless of skill level, you can build something big for you, your company or your career if you attend MongoDB World. I can't wait to see you there!

What about you?

Take a look at our full list of presenters – anyone standing out you just HAVE to see? Like game designer Jane McGonigal? What's the most interesting subject you have seen in our sessions catalogue? There are three (count em… 1 - 2 - 3) sessions on Kubernetes. We have workouts, yoga, and even an international craft beer tasting.

I hope you and possibly the rest of your team make it. We’d love to have you join us for our biggest event of the year. For more information on MongoDB World sessions, visit mongodbworld.com.

Sign Up for Child Care at MongoDB World

$
0
0

As part of our mission to make MongoDB World accessible to all who want to attend, we’re proud to announce we’re offering childcare at MongoDB World, June 20-21 in Chicago.

The child care center will be available 9:00am - 5:00pm on June 20-21. It will be located onsite at the conference venue, next to our nursing room for new mothers. For the subsidized rate of $50 per child you can bring your children along to MongoDB World.

The deadline to sign up for child care is May 19, 2017. Availability is limited, so reserve your spot today.

What’s Included?

  • Safe & secure environment
  • Breakfast, snacks, & lunch on each day
  • Activities, including arts & crafts

The childcare center will be staffed by licensed professionals who are both Infant and Child CPR certified, First Aid certified, background checked, and trained to care for children ages newborn to 17 years. Children will be provided toys and will be able to participate in arts and crafts, group games, and team challenges. They will be entertained and engaged through the event, and when you pick them up, they’ll have a little handmade gift for you.

How to sign up for Child Care

  1. When you register for MongoDB World, check the box next to the question Will you need child care at the event?

  2. At the bottom of the registration form, in the Additional Items section, select Onsite Child Care.

  3. Select the number of children you’d like to enroll (open to children ranging from 6 weeks to 13 years old). And select Add to Order.

Register now

Hurry, ticket prices for MongoDB World increase on March 3!

The Modern Application Stack - Part 5: Using ReactJS, ES6 & JSX to Build a UI (the rise of MERN)

$
0
0

This is the fifth in a series of blog posts examining technologies such as ReactJS that are driving the development of modern web and mobile applications.

Modern Application Stack – Part 1: Introducing The MEAN Stack introduced the technologies making up the MEAN (MongoDB, Express, Angular, Node.js) and MERN (MongoDB, Express, React, Node.js) Stacks, why you might want to use them, and how to combine them to build your web application (or your native mobile or desktop app).

The remainder of the series is focussed on working through the end to end steps of building a real (albeit simple) application – MongoPop. Part 2: Using MongoDB With Node.js created an environment where we could work with a MongoDB database from Node.js; it also created a simplified interface to the MongoDB Node.js Driver. Part 3: Building a REST API with Express.js built on Part 2 by using Express.js to add a REST API which will be used by the clients that we implement in the final posts. Part 4: Building a Client UI Using Angular 2 (formerly AngularJS) & TypeScript completed the MEAN stack by adding an Angular 2 client.

This post is similar to Part 4 except that it uses ReactJS rather than Angular to implement a remote web-app client for the Mongopop application – completing the full MERN application stack.

ReactJS (recap)

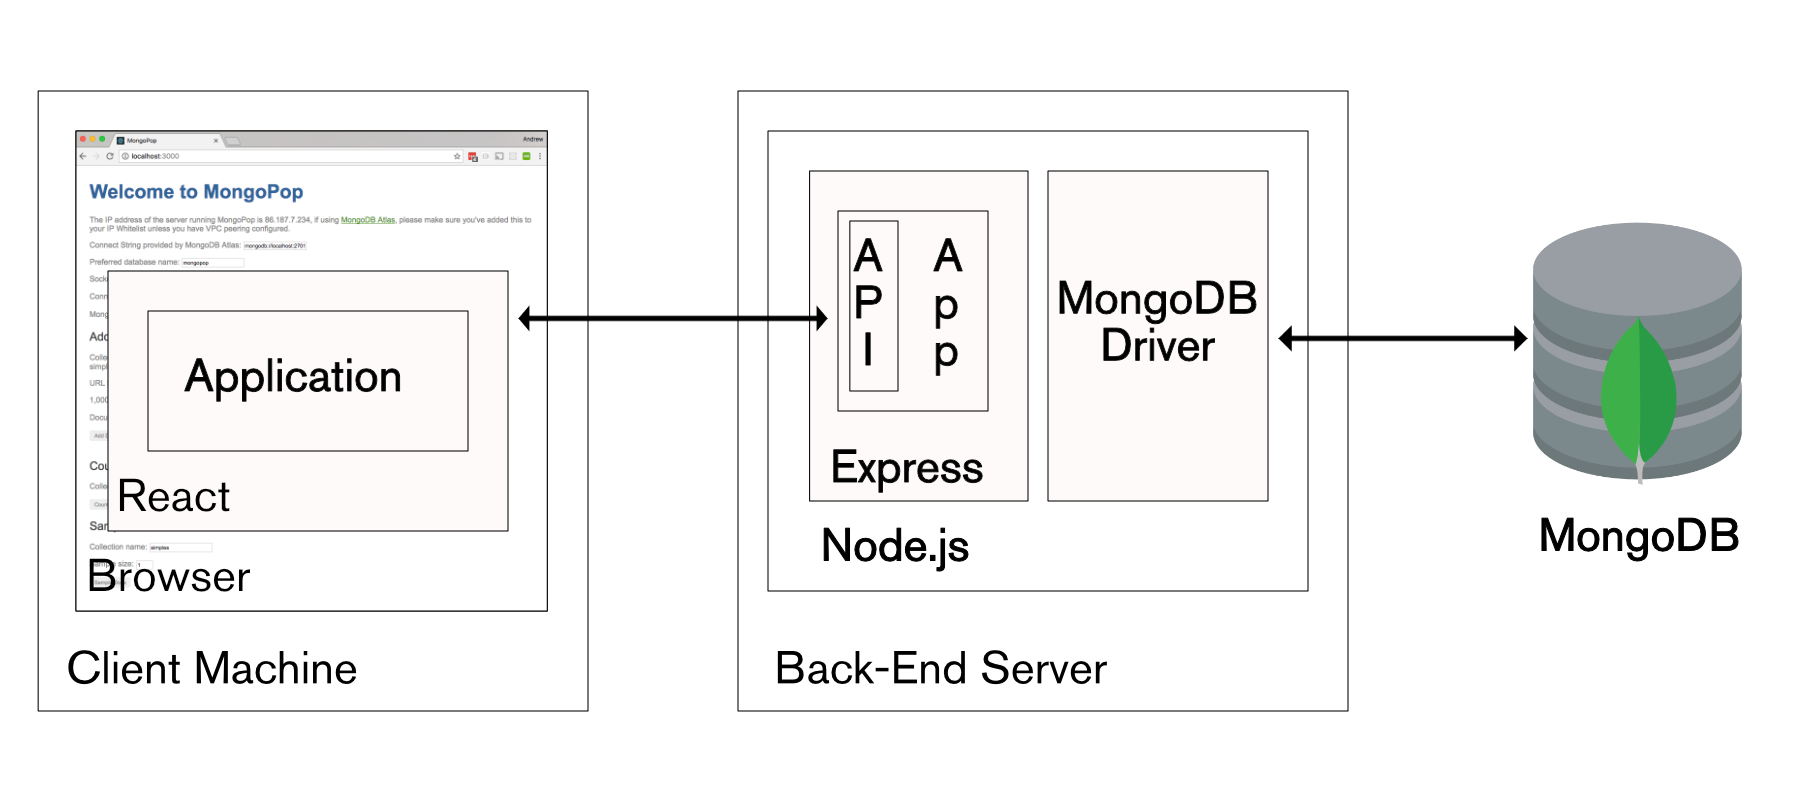
MERN Stack architecture with React

React (alternatively referred to as ReactJS), is an up and coming alternative to Angular. It is a JavaScript library, developed by Facebook and Instagram, to build interactive, reactive user interfaces. Like Angular, React breaks the front-end application down into components. Each component can hold its own state, and a parent can pass its state down to its child components (as properties) and those components can pass changes back to the parent through the use of callback functions. Components can also include regular data members (which are not state or properties) for data which isn't rendered.

State variables should be updated using the setState function – this allows ReactJS to calculate which elements of the page need to be refreshed in order to reflect the change. As refreshing the whole page can be an expensive operation, this can represent a significant efficiency and is a big part of what makes React live up to its name as “reactive”.

React components are typically implemented using JSX – an extension of JavaScript that allows HTML syntax to be embedded within the code.

React is most commonly executed within the browser but it can also be run on the back-end server within Node.js, or as a mobile app using React Native.

JSX & ReactJS

It's possible to implement ReactJS components using 'pure' JavaScript (though, we've already seen in this series that it's more complicated than that) but it's more typical to use JSX. JSX extends the JavaScript syntax to allow HTML and JavaScript expressions to be used in the same code – making the code concise and easy to understand.

Components can be implemented as a single function but in this post a class is used as it offers more options. The following code implements a very simple component:

class HelloMessage extends React.Component {
  render() {
    return <div>Hello {this.props.name}</div>;
  }
}

By extending React.Component, we indicate that the class implements a component and that the render() method returns the contents of that component

The enclosing component can pass data down to this component as properties (accessed within the component as this.props); in this case, there is just one – name. JavaScript can be included at any point in the returned HTML by surrounding it with braces {this.props.name}. The enclosing component would include this code within its own render() method, where userName is part of that component's state.:

<HelloMessage
name={this.state.userName}
/>

The state data member for a component should include all of the variable values that are to be rendered (apart from those that have been passed down as properties). State values can be initialized directly in the class's constructor function but after that, the setState({userName: "Andrew"}) method should be used so that ReactJS knows that any elements containing userName should be rerendered.

JSX gets compiled into JavaScript before it's used (this post uses the Babel compiler) and so there are no special dependencies on the browser.

Downloading, running, and using the Mongopop ReactJS application

The compiled ReactJS client code is included as part if the Mongopop package installed in Part 2: Using MongoDB With Node.js.

The back-end application should be installed & run in the same way as in parts 2 & 3:

git clone git@github.com:am-MongoDB/MongoDB-Mongopop.git
cd MongoDB-Mongopop
npm install
npm run express

Run the ReactJS client by browsing to http://<back-end-server>:3000/react.

Unlike the Angular client, the ReactJS application is developed and built as a separate project, and then compiled results are copied to public/react in the back-end server (this is covered in the next section).

Build and deploy

To access the source and build an updated version of the client, a new GitHub repository must be downloaded – MongoDB-Mongopop-ReactJS:

git clone git@github.com:am-MongoDB/MongoDB-Mongopop-ReactJS.git
cd MongoDB-Mongopop-ReactJS

As with the back-end and the Angular client, package.json includes a list of dependencies as well as scripts:

{
  "name": "mongopop-react-client",
  "version": "0.1.0",
  "private": false,
  "homepage": "http://localhost:3000/react",
  "devDependencies": {
    "react-scripts": "0.8.5"
  },
  "dependencies": {
    "mongodb": "^2.2.20",
    "react": "^15.4.2",
    "react-dom": "^15.4.2"
  },
  "scripts": {
    "start": "react-scripts start",
    "build": "react-scripts build",
    "eject": "react-scripts eject"
  }
}

Before running any of the software, the Node.js dependencies (as defined in package.json must be installed into the node_modules directory):

npm install

To compile the JSX code, start the development server, and run the ReactJS client, run:

export PORT=3030 # As Express is already using 3000 on this machine
npm start

This should automatically open the application within your browser. Note that the ReactJS code was loaded from a local development server but it will use the real REST API running in the back-end.

Note that when running in this mode, you may get errors when your browser tries accessing the REST API – this is because browsers typically block cross-site scripting. To work around this, install this extension from the Google Chrome store.

If you make changes to the ReactJS client and want to include them in the real back-end then build a new, optimized version:

npm run build

The contents of the MongoDB-Mongopop-ReactJS/build folder should then be copied to MongoDB-Mongopop/public/react.

To see exactly what react-scripts is doing for these operations, review the scripts in node_modules/react-scripts/scripts.

Component architecture of the Mongopop ReactJS UI

Most ReactJS applications are built from one or more, nested components – Mongopop is no exception:

ReactJS components making up the Mongopop client app

The top-level component (MongoPopContainer) renders the "Welcome to MongoPop" heading before delegating the the rest of the page to seven sub-components.

MongoPopContainer is implemented by a JSX class of the same name. The class contains the state variables for any information which must be used by more than one sub-component (e.g. the collection name). It also includes handler functions that will be used by sub-components when they make changes to any state variable passed down. The class implements the render() function which returns the expression that ReactJS must convert to HTML for rendering; in addition to the opening <h1>Welcome to MongoPop</h1>, it includes an element for each of the sub-components. As part of those element definitions, it passes down state variables (which the sub-component receives as properties):

<CountDocuments
  dataService={this.dataService}
  collection={this.state.MongoDBCollectionName}
/>

Changes to a data value by a parent component will automatically be propagated to a child – it's best practice to have data flow in this direction as much as possible. If a data value is changed by a child and the parent (either directly or as a proxy for one of its other child components) needs to know of the change, then the child triggers an event. That event is processed by a handler registered by the parent – the parent may then explicitly act on the change, but even if it does nothing explicit, the change flows to the other child components.

Each of the sub-components is implemented by its own JSX class – e.g. CountDocuments.

Mongopop is a reasonably flat application with only one layer of sub-components below MongoPopContainer, but more complex applications may nest deeper and reuse components.

This table details what data is passed from MongoPopContainer down to each of its children and what data change events are sent back up to MongoPopContainer (and from there, back down to the other children):

Flow of data between ReactJS components
Child component Data passed down Data changes passed back up
ServerDetails
Data service
ConnectionInfo
Data service
CollectionName
Data service Collection Name
AddDocuments
Collection Name
Data service
CountDocuments
Collection Name
Data service
UpdateDocuments
Collection Name
Data service
Existence of sample data to play with
SampleDocuments
Collection Name Sample data to play with
Data service

What are all of these files?

To recap, the files and folders covered earlier in this series (for the back-end, under MongoDB-Mongopop folder):

  • package.json: Instructs the Node.js package manager (npm) what it needs to do; including which dependency packages should be installed
  • node_modues: Directory where npm will install packages
  • node_modues/mongodb: The MongoDB driver for Node.js
  • node_modues/mongodb-core: Low-level MongoDB driver library; available for framework developers (application developers should avoid using it directly)
  • javascripts/db.js: A JavaScript module we've created for use by our Node.js apps (in this series, it will be Express) to access MongoDB; this module in turn uses the MongoDB Node.js driver.
  • config.js: Contains the application–specific configuration options
  • bin/www: The script that starts an Express application; this is invoked by the npm start script within the package.json file. Starts the HTTP server, pointing it to the app module in app.js
  • app.js: Defines the main back-end application module (app). Configures:
    • That the application will be run by Express
    • Which routes there will be & where they are located in the file system (routes directory)
    • What view engine to use (Jade in this case)
    • Where to find the views to be used by the view engine (views directory)
    • What middleware to use (e.g. to parse the JSON received in requests)
    • Where the static files (which can be read by the remote client) are located (public directory)
    • Error handler for queries sent to an undefined route
  • views: Directory containing the templates that will be used by the Jade view engine to create the HTML for any pages generated by the Express application (for this application, this is just the error page that's used in cases such as mistyped routes ("404 Page not found"))
  • routes: Directory containing one JavaScript file for each Express route
    • routes/pop.js: Contains the Express application for the /pop route; this is the implementation of the Mongopop REST API. This defines methods for all of the supported route paths.
  • public: Contains all of the static files that must be accessible by a remote client (e.g., our Angular to React apps).

In addition, for the ReactJS client application:

  • public/react The deployed ReactJS client code; e.g. the JSX code that has been compiled down into vanilla JavaScript

More significant for this post are the new files introduced under the MongoDB-Mongopop-ReactJS folder:

  • build: Directory containing the compiled and optmized JavaScript (to be copied to the back-end)
  • node-modules: Node.js modules used by the ReactJS client application (as opposed to the Express, server-side Node.js modules)
  • public/index.html: Outer template for the application (includes the rootdiv element)
  • src: Directory JSX source code files we write for the application
    • index.js: Top-level JSX for the client; creates the <App /> element as a placeholder to be expanded by App.js
    • App.js: Replaces the <App /> element from index.js with the output from the MongoPopContainer component/class. Includes the rest of the client components
    • X.component.js: Class implementing sub-component X
    • data.service.js: Service used to interact with the back-end REST API (mostly used to access the database)
  • package.json: Instructs the Node.js package manager (npm) what it needs to do; including which dependency packages should be installed

"Boilerplate" files and how they get invoked

If you've already read Part 4: Building a Client UI Using Angular 2 (formerly AngularJS) & TypeScript, you should be relieved to see that far fewer source files are involved before reaching the actual application code:

Relationships between ReactJS files

public/index.html defines a div element with its id set to root:

src/index.js accesses the root element from public/index.html so that it can be populated with the output from the application. It imports src/App.js and creates the <App /> element.

src/App.js defines the App class to satisfy the App element in src/index.js; that class renders the <MongoPopContainer /> element, which is made up of all of the sub-components. App.js imports each of the sub-component source files (X.component.js) so that they can implement those components. It also imports src/data.service.js to give access to the back-end Mongopop REST API:

Calling the REST API

The Data Service class hides the communication with the back-end REST API; serving two purposes:

  • Simplifying all of the components' code
  • Shielding the components' code from any changes in the REST API signature or behavior – that can all be handled within the DataService

The functions of the data service return promises to make working with their asynchronous behaviour simpler. Refer back to Part 2: Using MongoDB With Node.js if you need a recap on using promises.

As a reminder from Part 3: Building a REST API with Express.js, this is the REST API we have to interact with:

Express routes implemented for the Mongopop REST API
Route Path HTTP Method Parameters Response Purpose
                      
/pop/
GET
{
"AppName": "MongoPop",
"Version": 1.0
}
        
Returns the version of the API.
/pop/ip
GET
{"ip": string}
Fetches the IP Address of the server running the Mongopop backend.
/pop/config
GET
{
mongodb: {
    defaultDatabase: string,
    defaultCollection: string,
    defaultUri: string
},
mockarooUrl: string
}
        
Fetches client-side defaults from the back-end config file.
/pop/addDocs
POST
{
MongoDBURI: string;
collectionName: string;
dataSource: string;
numberDocs: number;
unique: boolean;
}
        
{
success: boolean;
count: number;
error: string;
}
        
Add numberDocs batches of documents, using documents fetched from dataSource
/pop/sampleDocs
POST
{
MongoDBURI: string;
collectionName: string;
numberDocs: number;
}
        
{
success: boolean;
documents: string; error: string; }
Read a sample of the documents from a collection.
/pop/countDocs
POST
{
MongoDBURI: string;
collectionName: string;
}
        
{
success: boolean;
count: number; error: string; }
Counts the number of documents in the collection.
/pop/updateDocs
POST
{
MongoDBURI: string;
collectionName: string;
matchPattern: Object;
dataChange: Object;
threads: number;
}
        
{
success: boolean;
count: number;
error: string;
}
        
Apply an update to all documents in a collection which match a given pattern

This data access class uses the XMLHttpRequest API to make asynchronous HTTP requests to the REST API running in the back-end (mostly to access MongoDB).

One of the simplest functions that data.service.js provides is fetchConfig which sends an HTTP GET request to the back-end to retrieve default the client configuration parameters:

When using this API, the application registers handler functions against a number of possible events; in this case:

  • onreadystatechange: triggered if/when a successful HTTP response is received
  • onerror & onabort: triggered when there has been a problem

The method returns a promise which subsequently – via the bound-in function (processRequest & processError) – either:

  • Provides an object representing the received response
  • Raises an error with an appropriate message

The baseURL data member is set to http://localhost:3000/pop but that can be changed by editing the data service creation line in App.js:

this.dataService = new DataService("http://localhost:3000/pop");

Another of the methods sends a POST message to the REST API's pop/addDocs route path to request the bulk addition of documents to a MongoDB collection:

The program flow is very similar to that of the previous function and, in the success case, it eventually resolves the returned promise with a count of the number of documents added.

A final method from the DataService class worth looking at is calculateMongoDBURI() which takes the MongoDB URI provided by MongoDB Atlas and converts it into one that can actually be used to access the database – replacing the <DATABASE> and <PASSWORD> placeholders with the actual values:

The function stores the final URI in the data service class's MongoDBURI data member – to sent to the back-end when accessing the database (see sendAddDocs above). It also returns a second value (MongoDBURIRedacted) with the password masked out – to be used when displaying the URI.

A simple component that accepts data from its parent

Recall that the application consists of eight components: the top-level application which contains each of the ServerDetails, ConnectionInfo, CollectionName, AddDocuments, CountDocuments, UpdateDocuments, and SampleDocuments components.

When building a new application, you would typically start by designing the the top-level component and then working downwards. As the top-level container is, perhaps, the most complex one to understand, we'll start at the bottom and then work up.

A simple sub-component to start with is the AddDocuments component:

ReactJS component

A central design decision for any component is what state is required (any variable data that is to be rendered by the component should either be part of the component's state or of the properties passed by its parent component). The state is initialized in the class's constructor:

Recall that any state variable X can be read using this.state.X but only the constructor should write to it that way – anywhere else should use the setState() function so that ReactJS is made aware of the change – enabling it to refresh any affected elements. In this class, there are six state variables:

  • MockarooURL: The URL from a service such as Mockaroo which will return an array containing a set of example JSON documents
  • numDocsToAdd: How many batches of documents should be added (with the default value of MockarooURL, each batch contains 1,000 documents)
  • uniqueDocs: Whether each batch should be distinct from the other batches (this significantly slows things down)
  • numDocsAdded: Updated with the number of added documents in the event that the operation succeeds
  • errorText: Updated with an error message in the event that the operation fails
  • addedCollection: Name of the collection that documents were last added to (initialized with the collection property passed by the parent component)

ReactJS state variables

Note that the constructor receives the properties passed down from the parent component. The constructor from the React.Component class must always be invoked within the component's constructor: super(props).

The binds at the end of the constructor make this available for use within the class's methods.

Further down in the class is the render() method which returns the content that ReactJS converts to HTML and JavaScript for the browser to render:

Recall that when coding in JSX, JavaScript can be embedded in the HTML by surrounding it with braces. The function uses that almost immediately to include the collection name in the component's header: <h2>Add documents to {this.props.collection}</h2>.

The first input is initialized with this.state.MockarooURL and if the user changes the value then this.handleURLChange is invoked – which in turn updates the state value:

The same pattern holds for the inputs for numDocsToAdd & uniqueDocs.

When this component's button is pressed, the onClick event calls this.handleAddSubmit():

This function invokes the sendAddDocs() method of the data service that was passed down from the parent component (and so is part of this.props). sendAddDocs() returns a promise and the first function in the then clause is called if/when that promise is successfully resolved – setting the numDocsAdded state to the number of added documents; if the promise is instead rejected then the second function is called – setting the error message. In either case, the state change will cause the associated element to be rerendered:

Passing data down to a sub-component (and receiving changes back)

The AddDocs component is embedded within the render()method of MongoPopContainer component class; implemented in App.js:

It passes down two items:

  • dataService is an instance of the DataService class and is used to access the back-end (in particular, to interact with MongoDB). Appears as part of AddDocument's properties and can be accessed as this.props.dataService.
  • collection is a string representing the collection name. Appears as part of AddDocument's properties and can be accessed as this.props.collection.

MongoDBCollectionName is initialized, and dataService is instantiated as part of the MongoPopContainer constructor:

Note that for a real, deployed application, http://localhost:3000/pop would be replaced with the public URL for REST API. Additionally, you should consider adding authentication to the API .

But where did the collection name get set – the constructor initialized it to an empty string but that's not we see when running the application? There's a clue in the constructor:

this.handleCollectionChange=this.handleCollectionChange.bind(this);

Recall that a bind like this is to allow a function (this.handleCollectionChange()) to access the this object:

The handleCollectionChange() method is passed down to the CollectionName component:

This is the CollectionName component class:

CollectionName has a single state variable – collection – which is initially set in the componentDidMount() method by fetching the default client configuration information from the back-end by calling this.props.dataService.fetchConfig(). componentDidMount is one of the component lifecycle methods that are part of any React.Component class – it is invoked after the component has been loaded into the browser, it is where you would typically fetch any data from the back-end that's needed for the component's starting state. After setting the collection state, the change notification function passed down by the parent component is invoked to pass up the new value:

_this.props.onChange(_this.state.collection);

Of course, the user needs to be able to change the collection name and so an input element is included. The value of the element is initialized with the collection state variable and when the user changes that value, this.handleCollectionNameChange is invoked. In turn, that method updates the component state and passes the new collection name up to the parent component by calling the change notification method provided by the parent.

Optionally empty components

It's common that a component should only display its contents if a particular condition is met. Mongopop includes a feature to allow the user to apply a bulk change to a set of documents – selected using a pattern specified by the user. If they don't know the typical document structure for the collection then it's unlikely that they'll make a sensible change. Mongopop forces them to first retrieve a sample of the documents before they're given the option to make any changes.

This optionality is implemented through the SampleDocuments & UpdateDocuments components:

Flow of data between ReactJS components
Child component Data passed down Data changes passed back up
UpdateDocuments
Collection Name
Data service
Sample data to play with
SampleDocuments
Collection Name Sample data to play with
Data service

Recall that the MongoPopContainer component class includes a state variable named DataToPlayWith which is initialized to FALSE:

That state is updated using the handleDataAvailabiltyChange method:

That method is passed down to the SampleDocuments component:

When the user fetches a sample of the documents from a collection, the SampleDocuments component invokes the change notification method (_this.props.onDataToWorkWith()), passing back TRUE if the request was a success, FALSE otherwise:

MongoPopContainer passes its state variable DataToPlayWith down to the UpdateDocuments component:

The UpdateDocuments component class is then able to check the value using:

Otherwise, the rest of this component is similar to those already seen:

Periodic operations

The CountDocuments component has an extra feature – if the repeat option is checked then it will fetch and display the document count every five seconds. The function that's called when the count button is clicked, checks the value of the state variable associated with the checkbox and if it's set, calls setInterval() to call the countOnce() method every five seconds:

The timer is cleared (clearInterval()) if there is an error or just before the component is unmounted (in componentWillUnmount).

Other components

For completeness, this is the full top-level component, App.js, which includes the rest of the sub-components:

The ConnectionInfo component:

The ServerDetails component:

Testing & debugging the ReactJS application

Now that the full MERN stack application has been implemented, you can test it from within your browser:

Debugging the ReactJS client is straightforward using the Google Chrome Developer Tools which are built into the Chrome browser. Despite the browser executing the transpiled JavaScript the Dev Tools allows you to navigate and set breakpoints in your JSX code:

Debug React JSX with Google Chrome Developer tools

If there is a compilation error then the error is sent to the browser:

ReactJS Compile errors in Google Chrome Developer tools

By installing the React Developer Tools from the Google Chrome Store, you get an extra "React" tab that can be used to view or modify the state or properties for any of the components:

React in Google Chrome Developer tools

ReactJS vs. Angular

So should you use Angular 2 or React for your new web application? A quick Google search will find you some fairly deep comparisons of the two technologies but in summary, Angular 2 is a little more powerful while React is easier for developers to get up to speed with and use (note how many fewer files are needed). The previous blog in this series built the Mongopop client application using Angular 2, while this one built a near-identical app using ReactJS – hopefully these posts have helped you pick a favorite.

The following snapshot from Google Trends suggests that Angular has been much more common for a number of years but that React is gaining ground: Comparing React/ReactJS popularity vs. Angular and Angular 2

Summary & what's next in the series

Previous posts stepped through building the Mongopop application back-end and then the creation of an Angular 2 client application. This post described how to build a front-end client using ReactJS. At this point, we have a complete, working, MERN stack application.

The coupling between the front and back-end is loose; the client simply makes remote, HTTP requests to the back-end service – using the interface created in Part 3: Building a REST API with Express.js.

This series will finish by demonstrating alternate methods to implement front-end client applications that aren't browser-based.

Continue to the final post this blog series to discover some more unconventional ways to use the Mongopop REST API:


If you're interested in learning everything you need to know to get started building a MongoDB-based app you can sign up for one of our free online MongoDB University courses.

Hyperscale Performance with Nuxeo Platform and MongoDB Enterprise Advanced

$
0
0
This is a guest post by Eric Barroca, CEO - Nuxeo.

Digitizing content and processes is a 20- or even 30-year-old story. The first wave of solutions delivered huge efficiency gains for enterprises – from paper, to PDF and checks, to Paypal. Today, companies across industries – from Media to Financial Services to Telecommunications – see new opportunities in a second wave of technology, such as creating new revenue streams and developing new products and services for their customers. But, so many are still managing their content in systems architected in the first wave and which now stand in the way of transformation.

Legacy systems can't support today's digital transformation needs. They lack the enterprise-wide visibility, searchability and control to keep content and the metadata that makes it valuable together. They are staggering under the crush of complexity of content and firehose of information flowing in and out of these systems on a daily basis. And, after implementation, they can’t be easily adapted to today’s ever-more dynamic and unpredictable business needs and opportunities.

To succeed in your business transformation, you need an approach that can unlock the value of assets through a system that can see, search and manage assets and metadata across 100s or even 1,000s of places across your enterprise. You need to multiply the value of your assets by empowering your entire business to easily leverage these critical assets and information. You need to accelerate innovation by leveraging the speed and investment of a cloud services ecosystem. And, you have to assume and plan for evolution and scale as your business responds to new opportunity and growth.

Nuxeo & MongoDB Enterprise Advanced: Unmatched Performance in Content Management

Nuxeo’s integration with MongoDB Enterprise Advanced, as an alternative to a relational database, is first of its kind in the Enterprise Content Management (ECM) space. The Nuxeo Platform for content management and Digital Asset Management (DAM) allows enterprises to discover the full value of their most complex digital assets, and scales to support even the largest content repositories, leveraging MongoDB Enterprise Advanced’s scaling, performance and replication capabilities.

Legacy ECM systems fall short when trying to turn data into valuable assets. Content Management and Digital Asset Management are now data-centric. Digital assets are core to any successful digital transformation. Unfortunately, value is often locked in the data surrounding these assets and many organizations have trouble unlocking this data to enable true transformation. The Nuxeo Platform helps to transform this data into valuable assets and, together with MongoDB Enterprise Advanced, allows enterprises to do it at true enterprise scale.

High performance of the Nuxeo Platform has already been tested and benchmarked to the tune of several billion documents with MongoDB Enterprise Advanced. The latest benchmarks from Nuxeo on an average cloud instance and using complex content objects now show the following results:

  • Document Processing: 30,000 doc/sec
  • Bulk Import: 5x faster than any relational database implementation
  • Overall, a 15x performance increase compared to the fastest relational database implementation

Check out our benchmark results and learn more in this video: Using MongoDB Enterprise Advanced to Build a Fast and Scalable Document Repository

Why MongoDB Enterprise Advanced as a backend storage for Nuxeo apps

Nuxeo chose MongoDB Enterprise Advanced because it enables organizations to deploy cloud-ready applications with unmatched performance and scalability. Used with the Nuxeo Platform, MongoDB Enterprise Advanced provides a database storage option offering high performance, high availability, and exceptional scalability for Enterprise Content Management (ECM) applications.

Nuxeo customers with extremely large content store requirements are able to leverage MongoDB Enterprise Advanced to get features such as replication, zero downtime and scalability. It is also a good combination with Elasticsearch, leveraging Elastic for advanced queries and MongoDB Enterprise Advanced for highly scalable content and asset storage. Nuxeo customers now have access to capabilities such as full-index support, rich querying, auto-sharding, replication and high availability, and much more.

Using the Nuxeo Platform with MongoDB Enterprise Advanced provides the opportunity to build content management applications with big data tools capable of dealing with complex, enterprise-scale data volumes at unmatched speeds.

Nuxeo for Giant ECM Applications

Nuxeo provides a Hyperscale Digital Asset Platform that helps enterprise organizations unlock the full value of their digital assets to create new revenue streams, improve performance, and maximize existing IT investments. Over 200 leading organizations use Nuxeo for digital asset management, document management, knowledge management, and other content-centric business applications.

Nuxeo is headquartered in New York with five additional offices worldwide, and raised $30 million in capital from Goldman Sachs and Kennet Partners in 2016.

More information is available at www.nuxeo.com.

How Best to Learn MongoDB in March

$
0
0

Over 450,000 software developers and operations professionals have registered for free online courses at MongoDB University. March is a great month to jump in and get started with or continue advancing your knowledge of MongoDB.

There are a number of courses running between March 21 and May 16! Each of these introductory courses will go over basic installation, JSON, schema design, querying, insertion of data, indexing and working with language drivers. These courses are a great way to get started building MongoDB-based applications.

M101P: MongoDB Developers

This course includes a brief introduction to Python. Code examples will be in Python but no previous Python knowledge is assumed. The course project involves building a blogging platform, backed by MongoDB.

M101J: MongoDB for Java Developers

In the course, you will build a blogging platform on top of MongoDB using Java. To take this course you should be familiar with Java. Knowledge of relational databases is not required.

M101JS: MongoDB for Node.js Developers

Code examples for this course will be in Node.js. During this course, you will build an e-commerce site, backed by MongoDB. To take this course you should have prior experience writing software using Node.js. You should be comfortable with JavaScript scope rules and the use of callbacks.

M101N: MongoDB for .NET Developers

If you’re a .NET developer getting started with MongoDB this is the course for you. In the course, you will build a blogging platform backed by MongoDB. Code examples will be in C#.


Sign up for a MongoDB University course today!

These aren’t the only courses available. Looking for an intermediate or advanced course? View the course schedule :

MongoDB University Course Schedule


Leaf in the Wild: World’s Most Installed Learning Record Store Migrates to MongoDB Atlas to Scale Data 5x, while Reducing Costs

$
0
0

Learning Locker moves away from ObjectRocket to scale its learning data warehouse, used by the likes of Xerox, Raytheon and U.K. Universities.

From Amazon’s recommendations to the Facebook News Feed, personalization has become ingrained in consumer experience, so it should come as no surprise that resourceful educators are now trying improve learning outcomes with that same concept. After all, no two students are identical in much the same way that no two consumers are exactly alike. Developing a truly personalized educational experience is no easy feat, but emerging standards like the xAPI are helping to make this lofty goal a reality.

xAPI is an emerging specification that enables communication between disparate learning systems in a way that standardizes learning data. That data could include things like a student’s attendance in classes, or participation in online tools, but can also stretch to performance measures in the real-world, how students apply their learning. This data-led approach to Learning Analytics is helping educators improve learning practices, tailor teaching and take early intervention if it looks like a student is moving in the wrong direction.

Learning Locker SaaS
Figure 1: Learning Locker’s software as a service (SaaS) Enterprise Dashboard

But the implications of this go far beyond the classroom, and increasingly companies are using these same techniques to support their employees development and to measure the impact of training on performance outcomes. Whilst educators are predicting the chances of a particular student dropping out, businesses can use these same tools to forecast organizational risk, based on compliance training and performance data, for example.

We recently spoke with James Mullaney, Lead Developer at HT2 Labs a company that is at the forefront of the learning-data movement. HT2 Labs’ flagship product, Learning Locker, is an open source data warehouse used by the likes of the Xerox, Raytheon and a wide-range of universities to prove the impact of training and to make more informed decisions on future learning design. To continue to scale the project, better manage their operations and reduce costs, Learning Locker migrated from ObjectRocket to database as a service MongoDB Atlas.

Tell us about HT2 Labs and Learning Locker.

HT2 Labs is the creator of Learning Locker, which is a data warehouse for learning activity data (commonly referred to as a Learning Record Store or LRS). We have a suite of other learning products that are all integrated; Learning Locker acts as the hub that binds everything together. Our LRS uses the xAPI, which is a specification developed in part by the U.S. Department of Defense to help track military training initiatives. It allows multiple learning technology providers to send data into a single data store in a common format

We started playing around with xAPI around four years ago as we were curious about the technology and had our own Social Learning Management System (LMS), Curatr. Today, Learning Locker receives learning events via an API, analyzes the data stored, and is instrumental in creating reports for our end customers.

Who is using Learning Locker?

The software is open source so our users range from hobbyists to enterprise companies, like Xerox, who use our LRS to track internal employee training.

Another example is Jisc, the R&D organization that advances technologies in UK Higher & Further Education.. Jisc are running one of the largest national-level initiatives to implement Learning Analytics across universities in the UK and our LRS is used to ingest data and act as a single source of data for predictive models. This increased level of insight into individual behavior allows Jisc to do some interesting things, such as predict and preempt student dropouts.

Visualized learning data
Figure 2: Visualizing learning data

How has Learning Locker evolved?

We’re currently on version two of Learning Locker. We’ve open sourced the product and we’ve also launched it as a hosted Software as a service (SaaS) product. Today we have clients using our LRS in on-premise installations and in the cloud. Each on-prem installation comes packaged with MongoDB. The SaaS version of Learning Locker typically runs in AWS supported by MongoDB Atlas, the managed MongoDB as a Service.

Tell us about your decision to go with MongoDB for the underlying database.

MongoDB was a very natural choice for us as the xAPI specification calls for student activities to be sent as JSON. These documents are immutable. For example, you might send a document that says, “James completed course XYZ.” You can’t edit that document to say that he didn’t complete it. You would have to send another document to indicate a change. This means that scale is very important as there is a constant stream of student activity that needs to be ingested and stored. We’ve been very happy with how MongoDB, with its horizontal scale-out architecture, is handling increased data volume; to be frank, MongoDB can handle more than our application can throw at it.

In fact, our use of MongoDB is actually award-winning: Last year we picked up the MongoDB Innovation Award for best open source project.

Beyond using the database for ingesting and storing data in Learning Locker, how else are you using MongoDB?

As mentioned earlier, our LRS runs analytics on the data stored and those analytics are then using in reporting for our end users. For running those queries, we use MongoDB’s aggregation framework and the associated aggregation APIs. This allows our end users to get quick reports on information they’re interested in, such as course completion rates, score distribution, etc.

Our indexes are also rather large compared to the data. We index on a lot of different fields using MongoDB’s secondary indexes. This is absolutely necessary for real-time analytics, especially when the end user wants to ask many different questions. We work closely with our clients to figure out the indexes that make the most sense based on the queries they want to run against the data.

Tell us about your decision to run MongoDB in the cloud. Did you start with MongoDB Atlas or were you using a third party vendor?

Our decision to use a MongoDB as a service provider was pretty simple — we wanted someone else to manage the database for us. Initially we were using ObjectRocket and that made sense for us at the time because we were hosting our application servers on Rackspace.

Interesting. Can you describe your early experiences with MongoDB Atlas and the migration process?

We witnessed the launch of MongoDB Atlas last year at MongoDB World 2016 and spun up our first cluster with Atlas in October. It became pretty clear early on that it would work for what we needed. First we migrated our Jisc deployment and our hosted SaaS product to MongoDB Atlas and we also moved our application servers to AWS for lower latency. The migration was completed in December with no issues.

Why did you migrate to MongoDB Atlas from ObjectRocket?

Cost was a major driving force for our migration from ObjectRocket. We’ve been growing and are now storing five times as much data in MongoDB Atlas at about the same costs.

ObjectRocket was also pretty opaque about what was happening in the background and that’s not the case with MongoDB Atlas, which gives you greater visibility and control. I can see, for example, exactly how much RAM I’m using at any point in time.

And finally, nobody is going to tell you that security isn’t important, especially in an industry where we’re responsible for handling potentially-sensitive student data. We were very happy with the native security features in MongoDB Atlas and the fact that we aren’t charged a percentage uplift for encryption, which was not the case with ObjectRocket.

Learning Locker Enterprise
Figure 3: Understanding student progress with Learning Locker Enterprise

Do you have any plans to integrate MongoDB with any other technologies to build more functionality for Learning Locker?

We’re looking into Hadoop, Spark, and Tableau for a few of our clients. MongoDB’s native connectors for Hadoop, Spark, and BI platforms come in handy for those projects.

Any advice for people looking into MongoDB and MongoDB Atlas?

Plan for scale. Think about what you’re doing right now and ask yourself, “Will this work when I have 100x more data? Can we afford this at 100x the scale?”

The MongoDB Atlas UI makes most things extremely easy, but remember that some things you can only do through the mongo shell. You should ensure your employees learn or retain the skills necessary to be dangerous in the CLI.

And this isn’t specific to just MongoDB, but think about the technology you’re partnering with and the surrounding community. For us, it’s incredibly important that MongoDB is a leader in the NoSQL space as it’s made it that much easier to talk about Learning Locker to prospective users and clients. We view it as a symbiotic relationship; if MongoDB is successful then so are we.

James, thanks for taking the time to share your experiences with the MongoDB community and we look forward to seeing you at MongoDB World 2017.

For deploying and running MongoDB, MongoDB Atlas is the best mix of speed, scalability, security, and ease-of-use.

Learn more about MongoDB Atlas


Announcing Free Tier and Live Migration Tool for MongoDB Atlas

$
0
0

Last June we introduced MongoDB Atlas, the database as a service for MongoDB. Atlas is designed in accordance with all of the best practices for managing MongoDB, so using it is like getting a professional MongoDB Ops team on your side. It is the easiest and most cost effective way to run MongoDB in the cloud, and it is already helping thousands of teams -- from innovative startups like Bond to established industry leaders like eHarmony and Thermo Fisher -- to build apps more efficiently by making database management as easy as possible.

We’re incredibly excited by the success our customers have had with Atlas so far, and today I’d like to share some updates to the service that will make it even easier to get started with Atlas.

Making Atlas data migrations simple with MongoMirror

It’s a cinch to spin up a MongoDB cluster with Atlas, but if you’re already running an application, you still have to migrate data, which until now has been a manual process. Today we’re introducing a new utility called MongoMirror that automates that process. MongoMirror will live migrate data to MongoDB Atlas from any pre-existing MongoDB 3.0+ replica set, making it even easier to get your existing applications migrated to Atlas.

Get MongoDB in the cloud for free with the new M0 tier

We’re also making it easier than ever to experiment with a real cloud environment for MongoDB. The new “M0” cluster type is a free cluster, ideal for learning MongoDB or building a prototype. Like our existing cluster types, the M0 tier has optimal security, availability, and managed upgrades by default.

More to come

The M0 tier and MongoMirror remove even more barriers between developers and execution of their ideas. Now you can get started with MongoDB Atlas for free, migrate without downtime, and scale up as you need, completely seamlessly. In the coming months, we’ll be bringing MongoDB Atlas to the Google Compute Engine and Microsoft Azure, and we’re actively working on even more tools to seamlessly migrate existing workloads to MongoDB Atlas, so stay tuned.

Try MongoDB Atlas for yourself


About the Author - Eliot Horowitz

Eliot Horowitz is CTO and Co-Founder of MongoDB. Eliot is one of the core MongoDB kernel committers. Previously, he was Co-Founder and CTO of ShopWiki. Eliot developed the crawling and data extraction algorithm that is the core of its innovative technology. He has quickly become one of Silicon Alley's up and coming entrepreneurs and was selected as one of BusinessWeek's Top 25 Entrepreneurs Under Age 25 nationwide in 2006. Earlier, Eliot was a software developer in the R&D group at DoubleClick (acquired by Google for $3.1 billion). Eliot received a BS in Computer Science from Brown University.

Serverless development with Node.js, AWS Lambda and MongoDB Atlas

$
0
0

The developer landscape has dramatically changed in recent years. It used to be fairly common for us developers to run all of our tools (databases, web servers, development IDEs…) on our own machines, but cloud services such as GitHub, MongoDB Atlas and AWS Lambda are drastically changing the game. They make it increasingly easier for developers to write and run code anywhere and on any device with no (or very few) dependencies.

A few years ago, if you crashed your machine, lost it or simply ran out of power, it would have probably taken you a few days before you got a new machine back up and running with everything you need properly set up and configured the way it previously was.

With developer tools in the cloud, you can now switch from one laptop to another with minimal disruption. However, it doesn’t mean everything is rosy. Writing and debugging code in the cloud is still challenging; as developers, we know that having a local development environment, although more lightweight, is still very valuable.

And that’s exactly what I’ll try to show you in this blog post: how to easily integrate an AWS Lambda Node.js function with a MongoDB database hosted in MongoDB Atlas, the DBaaS (database as a service) for MongoDB. More specifically, we’ll write a simple Lambda function that creates a single document in a collection stored in a MongoDB Atlas database. I’ll guide you through this tutorial step-by-step, and you should be done with it in less than an hour.

Let’s start with the necessary requirements to get you up and running:

  1. An Amazon Web Services account available with a user having administrative access to the IAM and Lambda services. If you don’t have one yet, sign up for a free AWS account.
  2. A local machine with Node.js (I told you we wouldn’t get rid of local dev environments so easily…). We will use Mac OS X in the tutorial below but it should be relatively easy to perform the same tasks on Windows or Linux.
  3. A MongoDB Atlas cluster alive and kicking. If you don’t have one yet, sign up for a free MongoDB Atlas account and create a cluster in just a few clicks. You can even try our M0, free cluster tier, perfect for small-scale development projects!).

Now that you know about the requirements, let’s talk about the specific steps we’ll take to write, test and deploy our Lambda function:

  1. MongoDB Atlas is by default secure, but as application developers, there are steps we should take to ensure that our app complies with least privilege access best practices. Namely, we’ll fine-tune permissions by creating a MongoDB Atlas database user with only read/write access to our app database.
  2. We will set up a Node.js project on our local machine, and we’ll make sure we test our lambda code locally end-to-end before deploying it to Amazon Web Services.
  3. We will then create our AWS Lambda function and upload our Node.js project to initialize it.
  4. Last but not least, we will make some modifications to our Lambda function to encrypt some sensitive data (such as the MongoDB Atlas connection string) and decrypt it from the function code.

A short note about VPC Peering

I’m not delving into the details of setting up VPC Peering between our MongoDB Atlas cluster and AWS Lambda for 2 reasons: 1) we already have a detailed VPC Peering documentation page and a VPC Peering in Atlas post that I highly recommend and 2) M0 clusters (which I used to build that demo) don’t support VPC Peering.

Here’s what happens if you don’t set up VPC Peering though:

  1. You will have to add the infamous 0.0.0.0/0 CIDR block to your MongoDB Atlas cluster IP Whitelist because you won’t know which IP address AWS Lambda is using to make calls to your Atlas database.
  2. You will be charged for the bandwidth usage between your Lambda function and your Atlas cluster.

If you’re only trying to get this demo code to write, these 2 caveats are probably fine, but if you’re planning to deploy a production-ready Lambda-Atlas integration, setting up VPC Peering is a security best practice we highly recommend. M0 is our current free offering; check out our MongoDB Atlas pricing page for the full range of available instance sizes.

As a reminder, for development environments and low traffic websites, M0, M10 and M20 instance sizes should be fine. However, for production environments that support high traffic applications or large datasets, M30 or larger instances sizes are recommended.

Setting up security in your MongoDB Atlas cluster

Making sure that your application complies with least privilege access policies is crucial to protect your data from nefarious threats. This is why we will set up a specific database user that will only have read/write access to our travel database. Let’s see how to achieve this in MongoDB Atlas:

On the Clusters page, select the Security tab, and press the Add New User button

Cluster Security

In the pop-up window that opens, add a user name of your choice (such as lambdauser):

lambdauser

In the User Privileges section, select the Show Advanced Options link. This allows us to assign read/write on a specific database, not any database.

User Privileges

You will then have the option to assign more fine-grained access control privileges:

Access Control

In the Select Role dropdown list, select readWrite and fill out the Database field with the name of the database you’ll use to store documents. I have chosen to name it travel.

Select Role

In the Password section, use the Autogenerate Secure Password button (and make a note of the generated password) or set a password of your liking. Then press the Add User button to confirm this user creation.

Let’s grab the cluster connection string while we’re at it since we’ll need it to connect to our MongoDB Atlas database in our Lambda code:

Assuming you already created a MongoDB Atlas cluster, press the Connect button next to your cluster:

Connect Cluster

Copy the URI Connection String value and store it safely in a text document. We’ll need it later in our code, along with the password you just set.

URI Connection String

Additionally, if you aren’t using VPC Peering, navigate to the IP Whitelist tab and add the 0.0.0.0/0 CIDR block or press the Allow access from anywhere button. As a reminder, this setting is strongly NOT recommended for production use and potentially leaves your MongoDB Atlas cluster vulnerable to malicious attacks.

Add Whitelist Entry

Create a local Node.js project

Though Lambda functions are supported in multiple languages, I have chosen to use Node.js thanks to the growing popularity of JavaScript as a versatile programming language and the tremendous success of the MEAN and MERN stacks (acronyms for MongoDB, Express.js, Angular/React, Node.js - check out Andrew Morgan’s excellent developer-focused blog series on this topic). Plus, to be honest, I love the fact it’s an interpreted, lightweight language which doesn’t require heavy development tools and compilers.

Time to write some code now, so let’s go ahead and use Node.js as our language of choice for our Lambda function.

Start by creating a folder such as lambda-atlas-create-doc

mkdir lambda-atlas-create-doc
&& cd lambda-atlas-create-doc

Next, run the following command from a Terminal console to initialize our project with a package.json file

npm init

You’ll be prompted to configure a few fields. I’ll leave them to your creativity but note that I chose to set the entry point to app.js (instead of the default index.js) so you might want to do so as well.

We’ll need to use the MongoDB Node.js driver so that we can connect to our MongoDB database (on Atlas) from our Lambda function, so let’s go ahead and install it by running the following command from our project root:

npm install mongodb --save

We’ll also want to write and test our Lambda function locally to speed up development and ease debugging, since instantiating a lambda function every single time in Amazon Web Services isn’t particularly fast (and debugging is virtually non-existent, unless you’re a fan of the console.log() function). I’ve chosen to use the lambda-local package because it provides support for environment variables (which we’ll use later):

(sudo) npm install lambda-local -g

Create an app.js file. This will be the file that contains our lambda function:

touch app.js

Now that you have imported all of the required dependencies and created the Lambda code file, open the app.js file in your code editor of choice (Atom, Sublime Text, Visual Studio Code…) and initialize it with the following piece of code:

Let’s pause a bit and comment the code above, since you might have noticed a few peculiar constructs:

  • The file is written exactly as the Lambda code Amazon Web Services expects (e.g. with an “exports.handler” function). This is because we’re using lambda-local to test our lambda function locally, which conveniently lets us write our code exactly the way AWS Lambda expects it. More about this in a minute.
  • We are declaring the MongoDB Node.js driver that will help us connect to and query our MongoDB database.
  • Note also that we are declaring a cachedDb object OUTSIDE of the handler function. As the name suggests, it's an object that we plan to cache for the duration of the underlying container AWS Lambda instantiates for our function. This allows us to save some precious milliseconds (and even seconds) to create a database connection between Lambda and MongoDB Atlas. For more information, please read my follow-up blog post on how to optimize Lambda performance with MongoDB Atlas.
  • We are using an environment variable called MONGODB_ATLAS_CLUSTER_URI to pass the uri connection string of our Atlas database, mainly for security purposes: we obviously don’t want to hardcode this uri in our function code, along with very sensitive information such as the username and password we use. Since AWS Lambda supports environment variables since November 2016 (as the lambda-local NPM package does), we would be remiss not to use them.
  • The function code looks a bit convoluted with the seemingly useless if-else statement and the processEvent function but it will all become clear when we add decryption routines using AWS Key Management Service (KMS). Indeed, not only do we want to store our MongoDB Atlas connection string in an environment variable, but we also want to encrypt it (using AWS KMS) since it contains highly sensitive data (note that you might incur charges when you use AWS KMS even if you have a free AWS account).

Now that we’re done with the code comments, let’s create an event.json file (in the root project directory) and fill it with the following data:

{
   "address" : {
      "street" : "2 Avenue",
      "zipcode" : "10075",
      "building" : "1480",
      "coord" : [ -73.9557413, 40.7720266 ]
   },
   "borough" : "Manhattan",
   "cuisine" : "Italian",
   "grades" : [
      {
         "date" : "2014-10-01T00:00:00Z",
         "grade" : "A",
         "score" : 11
      },
      {
         "date" : "2014-01-16T00:00:00Z",
         "grade" : "B",
         "score" : 17
      }
   ],
   "name" : "Vella",
   "restaurant_id" : "41704620"
}

(in case you’re wondering, that JSON file is what we’ll send to MongoDB Atlas to create our BSON document)

Next, make sure that you’re set up properly by running the following command in a Terminal console:

If you want to test it with your own cluster URI Connection String (as I’m sure you do), don’t forget to escape the double quotes, commas and ampersand characters in the E parameter, otherwise lambda-local will throw an error (you should also replace the $PASSWORD and $DATABASE keywords with your own values).

After you run it locally, you should get the following console output:

console output

If you get an error, check your connection string and the double quotes/commas/ampersand escaping (as noted above).

Now, let’s get down to the meat of our function code by customizing the processEvent() function and adding a createDoc() function:

Note how easy it is to connect to a MongoDB Atlas database and insert a document, as well as the small piece of code I added to translate JSON dates (formatted as ISO-compliant strings) into real JavaScript dates that MongoDB can store as BSON dates.

You might also have noticed my performance optimization comments and the call to context.callbackWaitsForEmptyEventLoop = false. If you're interested in understanding what they mean (and I think you should!), please refer to my follow-up blog post on how to optimize Lambda performance with MongoDB Atlas.

You’re now ready to fully test your Lambda function locally. Use the same lambda-local command as before and hopefully you’ll get a nice “Kudos” success message:

kudos message

If all went well on your local machine, let’s publish our local Node.js project as a new Lambda function!

Create the Lambda function

The first step we’ll want to take is to zip our Node.js project, since we won’t write the Lambda code function in the Lambda code editor. Instead, we’ll choose the zip upload method to get our code pushed to AWS Lambda.

I’ve used the zip command line tool in a Terminal console, but any method works (as long as you zip the files inside the top folder, not the top folder itself!) :

zip -r archive.zip node_modules/ app.js package.json

Next, sign in to the AWS Console and navigate to the IAM Roles page and create a role (such as LambdaBasicExecRole) with the AWSLambdaBasicExecutionRole permission policy:

AWSLambdaBasicExecutionRole

Let’s navigate to the AWS Lambda page now. Click on Get Started Now (if you’ve never created a Lambda function) or on the Create a Lambda function button. We’re not going to use any blueprint and won’t configure any trigger either, so select Configure function directly in the left navigation bar:

AWS Lambda Configure

In the Configure function page, enter a Name for your function (such as MongoDB_Atlas_CreateDoc). The runtime is automatically set to Node.js 4.3, which is perfect for us, since that’s the language we’ll use. In the Code entry type list, select Upload a .ZIP file, as shown in the screenshot below:

Configure Function

Click on the Upload button and select the zipped Node.js project file you previously created.

In the Lambda function handler and role section, modify the Handler field value to app.handler (why? here’s a hint: I’ve used an app.js file, not an index.js file for my Lambda function code...) and choose the existing LambdaBasicExecRole role we just created:

Lambda function handler

In the Advanced Settings section, you might want to increase the Timeout value to 5 or 10 seconds, but that’s always something you can adjust later on. Leave the VPC and KMS key fields to their default value (unless you want to use a VPC and/or a KMS key) and press Next.

Last, review your Lambda function and press Create function at the bottom. Congratulations, your Lambda function is live and you should see a page similar to the following screenshot:

Lambda Create Function

But do you remember our use of environment variables? Now is the time to configure them and use the AWS Key Management Service to secure them!

Configure and secure your Lambda environment variables

Scroll down in the Code tab of your Lambda function and create an environment variable with the following properties:

Name Value
MONGODB_ATLAS_CLUSTER_URI YOUR_ATLAS_CLUSTER_URI_VALUE
environment variables

At this point, you could press the Save and test button at the top of the page, but for additional (and recommended) security, we’ll encrypt that connection string.

Check the Enable encryption helpers check box and if you already created an encryption key, select it (otherwise, you might have to create one - it’s fairly easy):

encryption key

Next, select the Encrypt button for the MONGODB_ATLAS_CLUSTER_URI variable:

select encrypt

Back in the inline code editor, add the following line at the top:

const AWS = require('aws-sdk');

and replace the contents of the “else” statement in the “exports.handler” method with the following code:

(hopefully the convoluted code we originally wrote makes sense now!)

If you want to check the whole function code I’ve used, check out the following Gist. And for the Git fans, the full Node.js project source code is also available on GitHub.

Now press the Save and test button and in the Input test event text editor, paste the content of our event.json file:

input test event

Scroll and press the Save and test button.

If you configured everything properly, you should receive the following success message in the Lambda Log output:

Lambda Log Output

Kudos! You can savor your success a few minutes before reading on.

What’s next?

I hope this AWS Lambda-MongoDB Atlas integration tutorial provides you with the right steps for getting started in your first Lambda project. You should now be able to write and test a Lambda function locally and store sensitive data (such as your MongoDB Atlas connection string) securely in AWS KMS.

So what can you do next?

And of course, don’t hesitate to ask us any questions or leave your feedback in a comment below. Happy coding!

Enjoyed this post? Replay our webinar where we have an interactive tutorial on serverless architectures with AWS Lambda.

Watch Serverless Architectures with AWS Lambda and MongoDB Atlas

About the Author - Raphael Londner

Raphael Londner is a Principal Developer Advocate at MongoDB, focused on cloud technologies such as Amazon Web Services, Microsoft Azure and Google Cloud Engine. Previously he was a developer advocate at Okta as well as a startup entrepreneur in the identity management space. You can follow him on Twitter at @rlondner

How to Use Data Visualization Tools with MongoDB Atlas (Code Tutorial)

$
0
0

MongoDB Atlas provides you with an easy and secure way of hosting your MongoDB databases in the cloud. Once you've deployed your MongoDB database to Atlas, you may want to visualize your schema, and manipulate your data, all from the power and convenience of the MongoDB Compass GUI .

In this tutorial I will walk you through connecting MongoDB Atlas, our Database-as-a-Service, to Compass, the GUI for MongoDB to update Luke Skywalker from Jedi to Sith Lord. I won’t be using the force; rather, I'll be using CRUD on our favorite Jedi hero through Compass instead of MongoDB shell.

With MongoDB Compass you can ad hoc queries or interact with full CRUD functionality, without detailed knowledge of the MongoDB query language. Compass is pretty versatile – you can also get immediate insight into server status and query performance with visual explain plans and index utilization. We’ll come back to these.

Getting Started

Before we install Compass and run our Atlas Cluster here are a few things to be aware of:

  1. Compass is free for development usage. For production use, you will need an Atlas Professional subscription.
  2. We'll be using an M0 Atlas Cluster, which is available for free. This free tier does include some limitations, which you can view in our documentation.
  3. Because I am connecting from a remote system (my laptop) I will have to use an FQDN (fully qualified domain name) to ensure I am connecting to my primary.
  4. Ensure you have MongoDB 3.4 (and in particular, the MongoDB shell) installed on your local computer you'll be working with. (Our free tier requires that you use 3.4, the most recent version of MongoDB.)

Installing Compass

Installing Compass on my Mac is a simple process. I can go to the MongoDB Download Center. There I can get the latest version of Compass for my operating system.

MongoDB Download Center

Drag, drop, and go … we're already finished with our installation of Compass. It's time to spin up our M0 MongoDB Atlas Cluster, import our data, and then finally visualize it with Compass.

Your M0 Cluster

If you’re just getting started with a small test project on MongoDB, we recommend using our free tier M0 instance on Atlas.

Let's go to Atlas and spin up our M0:

  • Go to https://www.mongodb.com/atlas
  • Log in or sign up (if you have no existing account)
  • Click on Build a New Cluster, and make sure to keep hold of your username and password if you haven't created them in the past. (I like to set them as bash variables $USERNAME and $PASSWORD)
  • Select M0 (you are only permitted one per group) and provide it a name. You will only be able to launch your M0 in the us-east-1 region.
  • Click Confirm & Deploy
  • You'll be prompted for a CAPTCHA:

Confirm you are not a robot and your cluster will begin the build process. This could take about 7 - 10 minutes. I used the few minutes to snag a dataset I will be using to view and manipulate with Compass. Star Wars has been on my mind recently, so I wanted to manipulate and view this Star Wars characters JSON dataset provided by our friends at Tableau. Simply download the JSON file and save it to your desktop.

Download JSON file

Import the Dataset

To import the JSON dataset to MongoDB, I used mongoimport, which is part of the MongoDB suite of binary tools. I ran the following command from my Mac to ensure that I had the proper 3.4 version installed:

bash-3.2$ mongoimport --version
mongoimport version: r3.4.0
git version: 3cc9a07766fb55de63e81a13e72f3c5a7c07f477
Go version: go1.7.4
  os: darwin
  arch: amd64
  compiler: gc

OpenSSL version: OpenSSL 1.0.2j 26 Sep 2016

At this point I needed to go back to MongoDB Atlas and grab our details about our primary so I can import our data to it. I went to the Atlas interface and clicked on my Cluster name:

cluster name

Once I click on Cluster0, I see the overview dashboard. You can easily identify your primaries and secondaries in this view:

Cluster0

By clicking one of the individual node names in this view, you'll find the full hostname with the port to connect to for the individual host, You will also see the node's current role in the cluster (Primary or a Secondary):

individual node names

I copy the hostname if the primary node, and then use this along with our username and password to import our JSON data to Atlas:

bash-3.2$ mongoimport --host cluster0-shard-00-00-cbei2.mongodb.net:27017 --db starwars --type json --file ~/Desktop/starwarscharacterdata.json --jsonArray --authenticationDatabase admin --ssl --username $USERNAME --password $PASSWORD
2017-02-22T12:08:18.816-0500    no collection specified
2017-02-22T12:08:18.816-0500    using filename 'starwarscharacterdata' as collection
2017-02-22T12:08:18.922-0500    connected to: cluster0-shard-00-00-cbei2.mongodb.net:27017
2017-02-22T12:08:19.005-0500    imported 82 documents

Easy stuff, so let's get back to why we did all this: Compass.

Logging in with Compass

When I log in with Compass, I needed to ensure the node I’m connecting to is the primary replica set member. Without this, I won't be able to actually write to our database if we want to edit our data. If you are uncertain of which node is your primary, go back to the last step and follow the directions on finding the primary to your cluster.

Connecting to MongoDB using Compass is fairly simple: just add in the information we already have (username, password, host) and then connect. I really like the ability you have to save these configurations. If this database becomes something I work with more in the future (say, if I want to add some new characters from Rouge One), I'll be able to connect quickly. If my primary replica set member were to change, the hostname might really be the only part I'll need to modify in the future.

Let's look at what I entered in order to create my connection:

Connect To Host

This simple view and the ability to save all of the data makes getting started extremely fast. If you need help, just click the chat icon to chat directly with the Compass team.

We're IN!

Once I click connect, I’m able to view the starwars database and collection.

Star Wars Database and Collection

I am now able to query, view and edit any of the documents now hosted on our Atlas Cluster. I can also review performance, configure document validation, and even see how various queries are executed – but those are beyond the scope of this tutorial.

To explore Compass’s CRUD capabilities, I’ll try a very simple exercise of modifying a piece of data related to the document for Luke Skywalker.

I navigate to the document for Luke, click the small pencil to the right, and then begin editing the data.. Let's make our Jedi friend look a bit more Sith today by giving him red eyes:

Luke Document

This is something I could have done from the shell, but why? With this view, I have more visibility into the structure of other documents in this collection. Compared to the shell, Compass offers me the ability to see which fields in the document were strings and which were integers. Functionality like this helps those new to MongoDB to get productive faster, and are still super helpful, even if you’re familiar with how to access the database via the shell.

In Compass, I have the ability to perform CRUD operations on my data without having to know the full query language. I can visualize the cluster, get performance metrics,and do things like view geospatial data graphically.

visualize the cluster

The MongoDB shell is powerful, but it can't do graphics. Features like point and click access to our data really save time and help DBAs and SysAdmins. No longer do they have to learn the command-line methods of handling queries directly – rather by using Compass, they'll be able to visualize their MongoDB datasets quickly and easy.

For some additional information on using Compass, you can review the following videos:

An Introduction to MongoDB Compass

MongoDB Compass Query Building

Download MongoDB Compass

About the author - Jay Gordon

Jay is a Technical Account Manager with MongoDB and is available via our chat to discuss MongoDB Cloud Products at https://cloud.mongodb.com.


MongoDB Certified Professional Spotlight: May Mascenik

$
0
0

We’re happy to introduce a new blog series interviewing MongoDB Certified Professionals. To kick off this series, we talked with May Mascenik, an IT Engineer and Project Manager based in Los Angeles at ITP. Headquartered in Japan and focused on information design, ITP utilizes new devices, creates content designed to match user activities, and researches IoT and other new fields and technologies.

In 2016, May was selected as a MongoDB Diversity Scholar; grateful for the opportunity and eager to contribute to and learn from the MongoDB community, she made the decision to become dual-certified by MongoDB as both a Developer and a DBA. We reached out to her recently to learn more about her certification story, as well as what being certified means to her.

May Mascenik

Eloise Giegerich: To start, I would love to hear a little about your background, and how you got into tech. Where do you currently work, and what do you like about your role?

May Mascenik: Twenty years ago, I began working as a Project Administrator in the engineering department of the Standard Communications Corporation; because I admired the engineers’ work, I pursued an electronics course. I liked it, but the engineers recommended that I move to software in order to follow the tech trend. Later, I got a job at Hitachi Software (now Hitachi Solutions) where I was able to gain significant hands-on training. I started studying and obtaining tech certificates – one certificate per year – from Microsoft, Cisco, and ISACA, among others, mostly related to projects I was working on at the time.

Since 2014, I’ve been working for a company called ITP in Los Angeles as an IT Engineer/PMP. In 2016, I chose to become MongoDB certified because I desperately wanted to be fluent in the database for the specific project I was assigned. I like my role at ITP because it always offers me opportunities to learn new technology, which in turn allows me to develop and utilize new skills.

EG: How did you first discover MongoDB? What projects have you used or are you in the process of using with MongoDB?

MM: I took over a web/mobile app project; the app was built with Meteor and used MongoDB as the backend. I became interested in MongoDB while working on this project, and completed the M102 DBA course through MongoDB University, then M202 and all the DEV courses (M101J, M101JS, M101N, and M101P). With my new experience and knowledge, I was able to update the app that the former developer at my company had left; I became excited after this, and began to use MongoDB for other apps.

EG: What other databases have you worked with? How does MongoDB compare?

MM: I have worked with Microsoft SQL, Pervasive SQL, MySQL, and Oracle; all are relational databases. When it came to MongoDB, I was amazed by the flexible and dynamic data model. I’m still handling multiple relational databases and supporting the structured and predefined architecture on my current projects. However, as our business grows toward e-commerce and CMS type solutions, MongoDB’s NoSQL database is preferred because it allows us to build an application without predefining the schema, and to add any types of data to the system with different iterations.

EG: What inspired you to become MongoDB certified? Why both certifications?

MM: Besides the above-mentioned reason (for my 2016 certification selection, I chose MongoDB), I was fortunate enough to be awarded the 2016 MongoDB Diversity Scholarship, and decided that getting certified was one way to continue to contribute to the MongoDB community. I worked on DBA and DEV certifications together because I work in both fields at my company, and wanted to prove that I could be dual-certified.

EG: What was challenging about the courses? What was rewarding?

MM: Most of the courses run for seven weeks. Though you can watch the lesson videos and complete the homework at any time, the modules have strict weekly deadlines. Having a full-time job with multiple projects, I needed to take more time for work some weeks, which gave me less time to study. But in the long run, the time crunch is good! The deadlines force one to learn without delay. I felt great when I completed each course and received the certificate of course completion; I still feel like taking more MongoDB University courses.

EG: Since becoming certified, what have been some of the benefits, personal or professional, that you’ve experienced? How have you applied—or how do you intend to apply—what you’ve learned to your future projects?

MM: Since becoming certified, I have become more easily recognized through the MongoDB Certified Professional Finder and Advocacy Hub websites. I also now have a strong understanding of the challenges that the other certified professionals faced; because of this, I am eager to share my own experience and contribute to MongoDB alongside its other enthusiasts. Regarding current projects, I recently started looking into using MongoDB with AEM (Adobe Experience Manager), and am eager to continue my research.

EG: Looking back now, can you share any advice for those studying for (or retaking) their exam(s)? Are there any specific preparation strategies you found useful?

MM: First of all, for exam retakers, I’ve passed many certification exams on my first attempt, but not MongoDB’s – so if you fail, do not get discouraged! Instead, think of the Performance Report as another lesson to consider; the exam result is not an indicator of failure, but of weak points to continue to work on.

For DEV, I strongly encourage hands-on practice. When you complete the weekly homework and practice, it can be helpful to type out all of the answers and try them – run the code, verify the app or web functions – on a terminal so that you can understand what MongoDB finds acceptable.

And for both DBA and DEV, stick with the official exam study guide, which provides many links to the information you should absorb. If the online courses are still one version older, cover the difference by watching the What’s New in v3.4 (or vX.X in the future) video, and read the release notes to learn about the different features that have since been included.

EG: To close, I would love to know what has been your greatest takeaway from your experience getting certified. Why would you encourage others to pursue certification?

MM: If I can do it, so can you! In case you lose Internet connection or get disconnected from the test site for any reason during the exam, don’t panic. It happened to me once, but all of my answers were saved and I was able to resume the exam without starting from the beginning.

I would strongly encourage others to pursue a MongoDB certification; my certifications have given me great confidence and recognition thanks to my listing in the Certified Professional Finder. I am happy to receive messages and invitations from people not only in the US, but from all over the world!


Thanks to May for sharing her story! If you’re interested in getting professionally certified, you can learn more about the MongoDB certification process. If you’re already certified and would like to be featured in a future blog post, let us know at certification@mongodb.com.


Get Recognized for Your Incredible Work with a MongoDB Innovation Award

$
0
0

MongoDB InnovationAward

Building something interesting with MongoDB? Is your application leveraging MongoDB to addresses an important business need? Did you create something that wasn’t before possible?

We want to hear from you. Apply for the MongoDB Innovation Award, an annual award that recognizes organizations and individuals who create groundbreaking applications.

Submit a Nomination

Innovation Award winners receive:

  • A MongoDB Innovation Award
  • Recognition at MongoDB World, June 20-21 in Chicago
  • Photograph with MongoDB President and CEO, Dev Ittycheria and CTO, Eliot Horowitz
  • MongoDB Atlas credits

All finalists will also get two passes to MongoDB World and an invitation to the VIP party.

Each year, we receive hundreds of nominations across dozens of industries. Previous winners include the startups and Fortune 500 enterprises, and companies like Facebook, Expedia, x.ai, Amadeus, and more.

Apply or nominate someone else today! In your submission, explain what the application does, how it leverages MongoDB, and the impact it has on the business. The deadline to submit is March 17.

MongoDB Expands to New Dublin Offices as European Region Continues Explosive Growth

$
0
0

The MongoDB Dublin team

Last night our CEO, Dev Ittycheria, officially opened MongoDB’s new European headquarters in Dublin. With space for nearly 150 people in the new Ballsbridge premises, it’s another sign that the European business is continuing its strong growth. With an expanding customer base, developing our Dublin team became imperative, and because our existing team had already outgrown our first HQ, we knew it was time for a change.

President & CEO, Dev Ittycheria playing table tennis in the new Dublin Office

Our President & CEO, Dev Ittycheria playing table tennis in the new Dublin Office

Back in 2013 we launched our entire European business from Dublin offices in the Golden Lane. Now just a few short years later the business has matured and we’ve had to nearly triple the size of the office. The new office has been designed to give employees the opportunity to work in collaborative and open spaces, as well as areas that are free of distractions to allow for complete concentration.

The entrance to the MongoDB Dublin office

Along with a dedicated bike shed in basement, there’s also a pool table, table tennis and a couple of very well kitted out kitchens.

Pool table at the MongoDB Dublin office

Lounge area at the MongoDB Dublin office

The presence of MongoDB in the EMEA market is rapidly expanding and there is a lot of work to be done. Our new space provides us with the substantial room to grow. Learn about the opportunities at MongoDB:

MongoDB Careers


The Modern Application Stack - Part 6: Browsers Aren't the Only UI – Mobile Apps, Amazon Alexa, Cloud Services

$
0
0

This is the sixth and final blog post in a series examining technologies such as MongoDB and REST APIs that are driving the development of modern web and mobile applications.

Modern Application Stack – Part 1: Introducing The MEAN Stack introduced the technologies making up the MEAN (MongoDB, Express, Angular, Node.js) and MERN (MongoDB, Express, React, Node.js) stacks: why you might want to use them, and how to combine them to build your web application (or your native mobile or desktop app).

Subsequent posts focused on working through the end to end steps of building a real (albeit simple) application – MongoPop.

Part 2: Using MongoDB With Node.js created an environment where we could work with a MongoDB database from Node.js; it also created a simplified interface to the MongoDB Node.js Driver.

Part 3: Building a REST API with Express.js built on Part 2 by using Express.js to add a REST API which is used by the clients that we implement in the final 3 posts.

Part 4: Building a Client UI Using Angular 2 (formerly AngularJS) & TypeScript completed the MEAN stack by adding an Angular 2 client.

Part 5: Using ReactJS, ES6 & JSX to Build a UI (the rise of MERN) does the same but replaces Angular with ReactJS to complete the MERN stack.

Once your application back-end exposes a REST API, there are limitless ways that you or other developers can access it:

  • A dedicated browser-based client, as seen in posts 4 and 5
  • A standalone native iOS or Android mobile app
  • Voice controlled appliances, such as Amazon's Echo
  • IoT-enabled devices, such as remote sensors
  • Integrations with 3rd party applications

This post takes a look at some of these approaches. Unlike some of the earlier posts, this one aims to go wide rather than deep – touching on many technologies rather than diving too deeply into any one.

Prerequisite – the REST API

Everything that follows assumes that you have the Mongopop REST API running – if not, skip back to Part 3: Building a REST API with Express.js. Additionally, that API has been extended with 3 new routes (already included in the latest GitHub repository):

Additional Express routes implemented for the Mongopop REST API
Route HTTP Method Parameters Response Purpose
                      
/pop/checkIn
POST
{
venue: string, date: string, url: string, location: string }
{
    success: boolean,
    error: string
}
        
Stores the checkin data as a document in a collection.
/pop/checkInCount
GET
{
    success: boolean,
    count: number,
    error: string
}
        
Returns a count for the total number of checkins.
/pop/latestCheckIn
GET
{
    success: boolean,
    venue: string,
    date: string,
    url: string,
    location: string,
    error: string
}
        
Retrieves the most recent checkin.

These route paths are implemented in the pop.js module in the Mongopop repository:

/pop/lastCheckIn depends on a new method that has been added to javascripts/db.js:

The configuration file config.js is also extended – note that you should replace the value associated with the makerMongoDBURI field if you're not running MongoDB on your local machine (e.g. with the URI provided by MongoDB Atlas:

The implementation of these methods follows the same pattern as already seen – refer back to Part 3 for details – and so is not explained here.

Repurposing Angular & ReactJS code for native applications

There are frameworks for both Angular and ReactJS that enable web client application designs (and in some cases, code) to be reused for creating native iOS and Android apps.

One option for Angular is NativeScript, in which you use Typescript/JavaScript with Angular to build native apps for multiple platforms from the same source code. Of course, to get the most out of those platforms, you may want or need to add platform-specific code.

React developers will find React Native code very familiar, and applications are built from declarative components in the same way. The most obvious difference is that React Native code uses its own native components (e.g. <View> and <Text> rather that HTML elements such as <div> and <p>):

React Native provides the Fetch API to make network requests; it follows a similar patter to XMLHttpRequest (React Native also includes XMLHttpRequest which can be used directly).

While it's not as simple as just rebuilding your ReactJS or Angular code to produce native apps, the reuse of designs, skills and (some) code make it much more efficient than starting from scratch.

Combining cloud services – IFTTT

IFTTT (IF This Then That) is a free cloud service which allows you to automate tasks by combining existing services (Google Docs, Facebook, Instagram, Hue lights, Nest thermostats, GitHub, Trello, Dropbox,...). The name of the service comes from the simple pattern used for each Applet (automation rule): "IF This event occurs in service x Then trigger That action in service y".

IFTTT includes a Maker service which can handle web requests (triggers) or send web requests (actions). In this case, I use it to invoke the pop/checkIn POST method from the Mongopop REST API whenever I check in using the Swarm (Foursquare) app:

POST over REST API in IFTTT

Note that the applet makes a POST request to the http://your-mongopop-ip:3000/pop/checkIn route. The body of the POST includes the required parameters – provided as a JSON document. Each of the VenueName, CheckinDate, VenueUrl, and VenueMapImageURL values are /ingredients/ from the trigger (Foursquare) event.

IFTTT Stack - making REST calls

Using the Swarm app I check into FourSquare:

We can confirm that the MongoDB collection has been updated after this check-in:

Cluster0-shard-0:PRIMARY> use maker
switched to db maker

Cluster0-shard-0:PRIMARY> db.foursq.find().sort({_id: -1}).limit(1).pretty()
{
    "_id" : ObjectId("58c272f842067a03283be544"),
    "venueName" : "Redroofs Theatre School",
    "date" : "March 10, 2017 at 09:23AM",
    "url" : "http://4sq.com/htwamV",
    "mapRef" : "http://maps.google.com/maps/api/staticmap?center=51.52212258991317,-0.7358344376428089&zoom=16&size=710x440&maptype=roadmap&sensor=false&markers=color:red%7C51.52212258991317,-0.7358344376428089"
}

Constructing an iOS/Apple Watch App to automate workflows

The first example showed how to record a check-in into our own service as a side effect of checking into an existing service (Foursquare).

What if we wanted to create new, independent check-ins, from a mobile device? What if we also wanted to augment the check-ins with additional data? Another requirement could be to let our team know of the check-in through a Slack channel.

A valid approach would be to build a new mobile client using React Native or NativeScript. Slack and Google Maps have their own REST APIs and so the new App could certainly integrate with them in addition to our Mongopop API. Before investing in that development work, it would be great to prototype the concept and see if it proves useful.

This is where we turn to the iOS Workflow app. Workflow has a number of similarities to IFTTT but there are also some significant differences:

  • Workflow runs on your iOS device rather than in the cloud.
  • Workflows are triggered by events on your iOS device (e.g. pressing a button) rather than an event in some cloud service.
  • Workflow allows much more complex patterns than "IF This event occurs in service A Then trigger That action in service B"; it can loop, invoke multiple services, perform calculations, access local resources (e.g. camera and location information) on your device, and much more.

Both applications/Workflows that we build here can be run on an iPad, iPhone, or Apple Watch.

The first Workflow, CheckIn, performs these steps:

  • Fetch the device's current location
  • Retrieve any URL associated with that location
    • If none exists, fetch a map URL from Apple Maps
  • Fetch a Google Street View image for the location
    • Upload this image to Imgur
    • Send the image URL to Slack
  • Send a POST request to the /pop/checkIn Mongopop route
    • The request includes the location, date/time, URL (either from the venue or Apple Maps), and the StreetView image
  • Post the location and URL to Slack
  • Display error messages if anything fails

iOS Workflow stack to make REST API calls

Implementing a Workflow involves dragging actions into the work area and then adding attributes to those actions (such as the address of the Mongopop API). The result of one action is automatically used as the input to the next action in the workflow. Results can also be stored in variables for use by later actions.

This is the Check In workflow:

iOS Workflow check-in code for REST API call

This video demonstrates the use of the app when run on an iPhone:

The same app/workflow can be run from an Apple Watch:

Check in via REST API with Apple Watch and iOS Workflow app

We can confirm that check-in record has been stored as a document in MongoDB Atlas (note that the database and collection names are defined in config.js):

Cluster0-shard-0:PRIMARY> use maker
switched to db maker
Cluster0-shard-0:PRIMARY> db.foursq.find().sort({_id: -1}).limit(1).pretty()
{
    "_id" : ObjectId("58c1505742067a03283be541"),
    "venueName" : "77-79 King St, Maidenhead SL6 1DU, UK",
    "date" : "9 Mar 2017, 12:53",
    "url" : "http://maps.apple.com/?q=77-79%20King%20St,%20Maidenhead%20SL6%201DU,%20UK&ll=51.520409,-0.722196",
    "mapRef" : "http://i.imgur.com/w3KyIVU.jpg"
}

The second app/workflow retrieves and displays details of the most recent check-in. It performs these steps:

  • Read from the /pop/latestCheckIn Mongopop REST API Route using GET.
  • If the results indicate a successful operation then:
    • Extract the location from the results
    • Display the location and prompt the user if they'd like to:
      • See the location data (image)
      • Follow the location's URL (typically an Apple Maps link)
      • Finish
  • If the Mongopop operation fails, display an appropriate error.

The full workflow is shown here:

Find the latest check-in using REST API using Apple Watch

Running the app on an iPad produces these results:

Again, the same app can be run from an Apple Watch:

Find the latest check-in using REST API using Apple Watch - demo

Hands-free – Amazon Alexa Skills

Two of today's biggest industry trends are machine learning and serverless computing. Amazon's Alexa service (typically accessed through Amazon's Echo device) is at the forefront of both. In addition to interpreting voice commands for Amazon's own services (e.g. ordering more coffee beans or playing a particular song), developers can implement their own skills. Many are publicly available from 3rd parties such as Nest, Harmony, and Spotify, but you're free to implement and test your own – submitting it for review and public use when ready.

The business logic behind Alexa skills are typically run within Amazon's serverless computing service – AWS Lambda. Lambda is a great product for services that handle low or bursty levels of traffic – rather than paying a flat rate for a physical or virtual server, you pay a small fee for every event handled (and you even get a low-medium level of throughput for free). If your service really takes off then Lambda automatically scales out.

Assuming that you decide to use Lambda, there are three main components to your skill:

  • The set of intents – instructions that a user can give to Alexa
  • For each intent, a set of utterances that the user might say in order to signal that intent
  • The actual logic which is invoked whenever the user signals an intent – implemented as a Lambda function

The Mongo Alexa skill has 3 intents/commands:

  • WhereIntent: Find the most recent location that I checked in to
  • CountIntent: Count how many times I've checked in
  • HelpIntent: Explain what the available commands/intents are

The intents are defined as a JSON document:

{"intents": [
    {"intent": "WhereIntent"},
    {"intent": "CountIntent"},
    {"intent": "AMAZON.HelpIntent"},
  ]
}

The utterances for each of those intents must also be defined:

WhereIntent where is andrew
WhereIntent where is he
WhereIntent where am i
WhereIntent where did he last check in
WhereIntent where did Andrew last check in
WhereIntent where did i last check in
WhereIntent last check in

CountIntent how many checkins
CountIntent how many times have I checked in
CountIntent how many times has Andrew checked in
CountIntent how many times has he checked in
CountIntent how many check ins
CountIntent check in count

Note that no utterances need to be added for the AMAZON.HelpIntent as that intent is built in.

The skill is created in the Amazon Developer Console using the Alexa wizard; where the intentions and utterances can be added:

Add Alexa intentions and utterances

In the next screen, you indicate where the the skill's business logic runs; in this case, I provide the Amazon Resource Name (ARN) of my Lambda function:

Locate Amazon Alexa's skill code

The logic for the Mongo skill is implemented in the index.js file (part of the MongoDB-Alexa GitHub repository):

As explained earlier, the aim of this post is to cover a broad set of technologies rather than going too deeply into any one but explaining a few concepts may help you understand what this code is doing:

  • A handler is implemented for each of the intents; that handler is invoked when the user speaks one of the utterances associated with that intent
  • The handlers for the CountIntent and WhereIntent makes calls to the Mongopop REST API using the request function
  • The emit method is how the handlers can send results or errors back to the user (via Alexa)
  • The card, referred to by tellWithCard, is visual content (text and images) that are displayed in the Alexa app

Note that this is a simple skill which receives a request and sends a single response. It is also possible to implement an interactive state machine where there's a conversation between the user and Alexa - in those skills, the logic uses both the latest intent and the past context in deciding how to respond. Note that the Lambda function is always stateless and so all data should be stored in a database such as MongoDB.

The skill is deployed to AWS Lambda through the AWS Management Console. The index.js, config.js and node_modules directory (created by running npm install) should be archived into a single Zip file which is then uploaded to AWS:

Create zip file for Alexa skill to upload to AWS Lambda

Upload zip file for Alexa skill to AWS Lambda

There are a number of extra configuration options – such as the runtime environment to use (Node.js), the user role, the amount of memory to be made available to the function, and how long each invocation of the function should be allowed to run (the function is making external HTTP requests and so it may need a few seconds):

Configure AWS Lambda function for Amazon Alexa skill

As a reminder, the user speaks to the Amazon Echo device, then the Alexa application invokes an AWS Lambda function, which implements the business logic for the Mongo skill, which then interacts with the MongoDB database via the Mongopop REST API:

Stack to have Alexa make REST API calls to Mongopop

To start, test the simplest intent – asking the Mongo skill for help:

Note that the visual card can contain more information than Alexa's spoken response. For example, if there is an error in the Mongopop back-end, the returned error message is displayed on the card.

Next, we can ask Alexa how many times I've checked in and where my last check-in was. Note that I could have used any of the utterances associated with these intents (and Alexa will automatically convert similar phrases):

Summary

Previous posts stepped through building the Mongopop application back-end and then the creation of web client applications using Angular 2 and ReactJS.

This post explored some alternative ways to build client applications; in particular, it showed how to combine existing cloud services with a bit of new logic to create something brand new. We looked at a number of technologies to help build applications quickly and efficiently:

  • IFTTT: Make events in one cloud service trigger actions in another
  • Workflow: Automate complex tasks involving multiple services on an iOS device
  • Amazon Alexa: Implement your own voice-controlled skills
  • AWS Lambda: Host and scale your business logic in the cloud while only paying for the transactions you process

Increasingly, applications leverage multiple services (if only to allow the user to share their efforts on different social media networks). The key to all of these integrations is the REST APIs provided by each service. If you've jumped straight to this post then consider reading parts 1 through 3 to learn how to build your own REST API:


If you're interested in learning everything you need to know to get started building a MongoDB-based app you can sign up for one of our free online MongoDB University courses.


About the Author - Andrew Morgan

Andrew is part of the MongoDB product team, responsible for building the vision, positioning, and content for MongoDB’s products and services, including the analysis of market trends and customer requirements. Before joining MongoDB, Andrew was director of product management for MySQL at Oracle – with a particular focus on distributed, highly available databases. Prior to Oracle, Andrew worked in software development for telecoms with a focus on HA, in-memory, real-time databases.


MongoDB Certified Professional Spotlight: Ulrich Cech

$
0
0

This week in our MongoDB Certified Professionals Blog Series we’re talking to Ulrich Cech, a Developer/Architect at Deposit Solutions in Hamburg who became certified as a MongoDB developer in 2016. A longtime lover of IT and programming, Ulrich discusses how he first discovered MongoDB, how it compares to relational models, and why he believes getting certified keeps you in the Big Data loop.

Ulrich Cech, MongoDB Certified Professional


EG: Hi, Ulrich! Let’s start by discussing how you got into tech; what interested you about the industry? What do you like about your role at Deposit Solutions and what inspired you to become a developer and architect?

UC: IT and programming have always been my favorite hobbies; I like programming because with little environment and minimal limits, you can construct awesome things. It’s kind of like building your own small universe, which behaves according to your design and desire.

My first job was at a software company that focused on foreign trade and German customs. It was a very cool company in Stuttgart, and I was able to learn a lot working there. Currently, I work at Deposit Solutions in Hamburg as developer/architect, specializing in the real estate bond area. Since moving to Hamburg, I’ve had the opportunity to work on some very cool projects. In my role, I try to help to think about using the right architecture and design for the given domain, project, or product.

What most inspired me to become a developer and architect was a desire to avoid “cargo cult programming.” The latter has been one of the biggest problems I’ve encountered in projects; essentially someone says “we need framework A and library B and architecture C” because they’re new and exciting, but no one considers whether or not this structure will actually fit the current problems. This lack of planning results in tremendous code production, which in the end turns out to be completely useless.

EG: How did you first discover MongoDB? In what projects have you used/are you in the process of using MongoDB?

UC: I first discovered MongoDB at DreamIT GmbH in Hamburg, where it was used for a gaming platform. I had heard of NoSQL databases before, but my background was in the relational world. When I first saw MongoDB in action, my immediate thought was, "That cannot be real, that is too easy.” After working with the database, I grew to like it more and more; what specifically impresses me is that you don’t have to "convert" or change object-oriented thinking as you would with a relational database.

At Deposit Solutions, I am interested in employing MongoDB for a new Microservices project. As for my private projects, I use MongoDB in conjunction with Morphia as a document-to-object-mapper; I like that MongoDB enables an easy setup and the perfect match with domain-driven design.

EG: What other databases have you worked with, and how does MongoDB compare?

UC: In my former projects I dealt with Oracle, but it was mostly abstracted via Java Persistence API (JPA). Currently, I have to deal with MySQL, which is not fun. PostgreSQL is also a database I’ve worked with, and it is my favorite database to use when I’m required to use a relational database.

What I like about MongoDB is that it is incredibly easy to use. You can set it up in no time, even as a cluster on a local machine, since there is no complicated setup and installation process. Another great advantage is that you don't have to split your domain objects into relational thinking. Instead, you have your domain object and you can (nearly) insert this one-to-one into your database. And finally, you don't have this awful time-consuming process of schema updates, because MongoDB is schemaless. Sure, you should use some kind of structure, and shouldn’t put everything into one collection ;-). But if you decide to change a field for your data type, or add or remove a field, the operations don't require you to change databases.

MongoDB does lack transactions across multiple documents. In most situation, the need for transactions is due to the relational design, so this can mostly be avoided in MongoDB completely. But in some situations, you need multi-document transactions. I hope these transactions will be introduced in upcoming releases – I know it is a high priority topic for MongoDB ;-)

EG: What inspired you to become MongoDB certified?

UC: I like to prove my knowledge. In general, certifications show one’s personal ability to constantly self-educate. Unfortunately, there are many certifications out there, which usually cost a fortune. But MongoDB’s certification prices are affordable. Plus, MongoDB is relatively new on the market, so a deep knowledge of the database can be helpful in the future when it comes to new job opportunities.

EG: What was challenging about the courses and what was rewarding?

UC: The course I took – M101J: MongoDB for Java Developers – was well structured and provided a good starting point to learn the basics; topics like the aggregation framework, for instance, though challenging information to absorb, can be extremely powerful. But the courses alone should definitely not be your only means of preparation. Those hoping to be certified need to read the official documentation for MongoDB and for the individual courses in order to ensure that they can work fluidly with the database. The more you query and play with data, the more familiar you can become with all the features of MongoDB.

EG: Since becoming certified, what have been some of the benefits, personal or professional, that you’ve experienced? How have you applied – or how do you intend to apply – what you’ve learned to your future projects?

UC: Well, on a personal level, it is always a good feeling to be certified ;-). Unfortunately, in my current work projects, MongoDB is not being used. But like I mentioned above, I am actively trying to introduce it into one Microservices project.

When it comes to things like sharding and clustering, you have to understand how to correctly set up and employ these concepts. Because of this, the knowledge absorbed through preparing for MongoDB certification is a great benefit. But there is more to this, too. For successful MongoDB usage, you cannot adopt the old relational thinking.Thorough knowledge of domain design in the database comes with experience, either through projects or through playing around in a private environment, wherein you can test things and find the right solution for the right use case. MongoDB’s certification offers the necessary and fundamental platform to begin to gain this experience.

EG: Looking back now, can you share any advice for those studying for (or retaking) their exam? Are there any specific preparation strategies you found useful?

UC: Personally, I think the best strategy is to educate yourself and learn as much as possible. I know this sounds self-evident; it is. But the more you know and the more knowledge you have, the easier it is to answer questions. Like I touched on previously, you shouldn’t rely solely on the courses. They are a good starting point, but you need much more in-depth knowledge. It’s a must to read the official documentation; there are many use cases described in depth, which are very helpful.

While preparing for the certification exam, I also read through the MongoDB Definitive Guide, which I found very helpful. The guide’s third and most updated edition is forthcoming this year.

Finally, and perhaps my most important suggestion: Use MongoDB, query the database, and create indexes, analyzing if and how they perform. Use the Aggregation Framework, trying to think of some questions your datasets can answer, and build these queries and pipelines on your own. Model multiple domains and think about how the data will be best stored in MongoDB. Set up a replica set, even a sharded cluster, and add and remove nodes. The best strategy is to get hands-on knowledge of the database.

EG: And finally, what has been your greatest takeaway from your experience getting certified? Why would you encourage others to pursue certification?

UC: I think my greatest takeaway has been the confirmation that knowledge can never be bad. MongoDB is often used in the Big Data environment, and this domain is becoming increasingly important in the tech community. Because of this, demonstrating experience in this domain can be critical to finding a suitable job opportunity. And finally, it doesn’t take a lot of effort to become certified. As I mentioned, you don't have to spend a fortune, and if you prefer, you can take the courses and the exam at home and on your own time. For me, this was absolutely great and time-saving.


Thanks for sharing your story, Ulrich! If you’re interested in getting professionally certified, you can learn more about the MongoDB certification process. If you’re already certified and would like to be featured in a future blog post, let us know at certification@mongodb.com.

Learn New Skills in a MongoDB World Pre-Conference Workshop

$
0
0

MongoDB World is just around the corner, and you might be wondering, Why should I go? By not attending, you’d be missing out on great educational opportunities!

First, there are the conference sessions. You get to connect with MongoDB engineers, who give you an insider’s look on how the database is built and what’s coming on the roadmap. You can get your detailed technical questions answered in a free consulting slot during Ask the Experts. You’ll have the opportunity to meet other MongoDB users who showcase the projects they’ve built, talk about their pains, and discuss where MongoDB fits and doesn't fit their requirements.

Still, for me, the pre-conference workshops we offer are the icing on the cake. These full day training sessions, delivered by MongoDB engineers, provide the opportunity to experiment with MongoDB in a different context. By attending, you’ll get real, hands-on experience.

What You’ll Learn

Once again, we’re offering two of our most popular workshops on Ops Manager and data modeling. This year, we’re adding two new topics: how to keep your database secure and how to migrate an application from a relational database to MongoDB. No matter what your skill level is, we have a workshop to fit your needs.

MongoDB Security

In the MongoDB Security workshop, we will give you a set of instances and an app which you will need to secure, from top to bottom. You’ll start at the connection layer, using SSL and X509 certificates, then move to the underlying encryption of the storage layer by configuring the cluster using MongoDB encrypted storage engine. We’ll also cover auditing, authentication, and role-based access control.

Cleansing Time - 99% SQL Free Applications

Because migrations from relational can be cumbersome, in we’ll go through the different techniques and procedures that make this as painless as possible. You might be wondering where to start, or how to break that annoying super large join into a nice MongoDB query. We’ll address these and other common obstacles in migration. This workshop is the result of several years of experience helping our customers to perform these migrations.

Getting Started with MongoDB Ops Manager

The Getting Started with MongoDB Ops Manager workshop, for system administrators and DBAs, is a great crash course in MongoDB administration. Using a pre-configured Ops Manager installation, and using a set of AWS instances, we will be setting up and managing MongoDB clusters through both the Ops Manager UI and API commands. This will be a great way to explore the full set of features that Ops Manager provides.

Data Modeling

Data Modeling is a complex exercise, and you want to ensure you analyze all possible options to define your database documents and operations. In this workshop, we will cover the majority of schema design patterns and trade-offs between different approaches to a common use case.

We want these workshops to be an opportunity for you to learn new skills in a context that allows you to transfer them into your day-to-day work. We limit the class size for each workshop to ensure that you’ll receive individual attention.

Sign up soon; prices increase after April 28.

Register now


Integrating MongoDB Atlas, Twilio and AWS Simple Email Service with AWS Step Functions - Part 1

$
0
0

A few weeks ago, I took a close look at AWS Lambda functions and I hope you've enjoyed that tutorial. I highly suggest that you first read it if you have no previous experience with AWS Lambda, as I will build on that knowledge for the second leg of our road trip into developer-centric services available in Amazon Web Services.

Indeed, I'd like to continue our discovery journey by investigating AWS Step Functions. If that name doesn't ring a bell, don't worry: Step Functions were recently introduced at AWS re:Invent 2016 and are still relatively unknown, despite their incredible potential, which I'll try to make apparent in this post.

Lambda functions are great, but...

If you're building a real cloud native app, you probably already know that your app won't be able to rely on one single Lambda function. As a matter of fact, it will rely on a multitude of functions that interact with multiple systems, such as databases, message queues and even physical or virtual servers (yes, even in a serverless world, there are still servers!). And as the screenshot below tries to depict, your app will need to call them at certain times, in a specific order and under specific conditions.

Modern Serverless App

@Copyright Amazon Web Services (from the AWS:reInvent 2016 Step Functions SVR201 session])

Orchestrating all these calls is a tedious endeavor that falls into the developer's lap (you!). Wouldn't it be nice if there was some sort of cloud technology that would help us reliably deal with all that coordination work?

Introducing AWS Step Functions

In a nutshell, Step Functions are a cloud workflow engine: they aim at solving the issue of orchestrating multiple serverless functions (such as AWS Lambdas) without having to rely on the application itself to perform that orchestration. Essentially, Step Functions allow us to design visual workflows (or "state machines" as AWS refers to) that coordinate the order and conditions in which serverless functions should be called.

Surely enough, the concepts of orchestration and workflows have been around for quite some time so there's nothing groundbreaking about them. As a matter of fact, AWS even released its own Simple Workflow Service back in 2012, before serverless had become the cool kid on the block.
What's interesting about Step Functions though is that they provide an integrated environment primarily designed to ease the orchestration of AWS Lambda functions. And as Lambda functions become more and more popular, AWS Step Functions turn out to be exactly what we need!

So what's a good use case to employ Step Functions?

AWS Step Functions Visual Workflow

For those of you who have no idea what the screenshot above means, don't worry! In my next post, I'll dive into the technical details of the sample app it's taken from. For now, let's just say that it's the visual representation of the state machine I built. But you may ask yourself: what does this state machine do exactly and why is it relevant to the topic today?

Here's the fictitious (but probably not too hypothetical) use case I tried to solve with it: you went to a great italian restaurant in New York but you don't quite remember its exact name. But the food was so delicious you'd really like to go back there! (you might think only Dory - or me - does not to remember an amazing restaurant but I'm sure that happens even to the best of us).

Wouldn't it be useful if you could get notified instantly about the possible restaurant matches with their exact names and addresses in your area? Ideally, if there happens to be one match only, you'd like to get the notification via text message (or "SMS" in non-US parlance). But if there are a lot of matches, a text message might be difficult to read, so you'd rather get an email instead with the list of restaurants matching your search.

Now, I'm quite sure that service already exists (Yelp, anyone?) but I thought it was a good use case to demonstrate how Step Functions can help you solve a business process requirement, as well as Step Functions’ ability to easily mash up different APIs and services together into one single workflow.

How did I go about building such a step function?

As I was envisioning this sample app built with AWS Step Functions, I thought about the required components I'd have to build, and then boiled them down to 3 AWS Lambda functions:

  • A GetRestaurants function that queries a collection of restaurants stored in a MongoDB Atlas database.
  • A SendBySMS function that sends a text message using SMS by Twilio if the result of the GetRestaurants query only returns one restaurant.
  • A SendByEmail function that sends an email using AWS Simple Email Service if the GetRestaurants function returns more than one restaurant.

If you look closely at the screenshot above, you will probably notice I seemingly forgot a step: there's indeed a fourth Lambda helper function named CountItems whose purpose is simply to count the items returned by the GetRestaurants function and pass that count value on to the NotificationMethodChoice branching logic. Granted, I could have easily merged that helper function into the GetRestaurants function but I chose to leave it because I figured it was a good way to experiment with Step Functions' inputs and outputs flexibility and showcase their power to you (more about this topic in my next post). It's a Step Functions technique I've used extensively to pass my initial input fields down to the latest SendBy* Lambda functions.

I hope you liked this short introduction to AWS Step Functions and the use case of the sample app I built to demonstrate its usefulness. You can now read Part 2 here!

Enjoyed this post? Replay our webinar where we have an interactive tutorial on serverless architectures with AWS Lambda.

Watch Serverless Architectures with AWS Lambda and MongoDB Atlas

About the Author - Raphael Londner

Raphael Londner is a Principal Developer Advocate at MongoDB, focused on cloud technologies such as Amazon Web Services, Microsoft Azure and Google Cloud Engine. Previously he was a developer advocate at Okta as well as a startup entrepreneur in the identity management space. You can follow him on Twitter at @rlondner

Dedicated to Diversity: The MongoDB Women’s Group

$
0
0

MongoDB is committed to supporting diversity in tech. We’ve previously written about diversity initiatives at MongoDB World, our annual user conference. In this post, I’ll discuss one of our internal efforts. According to diversity reports from 11 of the world’s largest tech organizations, the industry is approximately 30% female. The gap is an obvious disadvantage, so more and more companies are trying to solve this problem.

Stacy Ferranti is a Director of Talent Acquisition at MongoDB. When she joined back in 2011, she was one of 30 total employees – seven of whom were women – and the sole member of the Recruiting Team. Today, she leads our Technical and Campus Recruiting teams, comprising 15 people globally and handling recruiting for what’s now 700+ person org. During her tenure at MongoDB, she created our highly sought-after internship program and built the Campus Recruiting Team.

She also co-founded the MongoDB Women’s Group, which today has over 140 members globally across all MongoDB office locations. The group was originally founded to address a few gaps created by MongoDB’s rapid growth.

MongoDB Women's Group

“I was meeting all these fantastic women in the company, but there was no formal need for us to get to know each other or work cross functionally. We know tech has a diversity problem and I wanted to create a space for women who might otherwise not meet, to be able to interact and support one another.”

The Women’s Group meets monthly to discuss any and all things relevant to women in tech and professional working women in an open and honest forum. Mentorship, guidance, and advice are offered through a mentor/mentee program (which includes members of our exec staff). Trending topics, recent news articles, blog posts, and current events are often discussed; it’s common for members to lead conversations on topics such as Assertiveness in the Workplace and Intrapreneurship, and for female board members and executive staff to host roundtables and AMAs (ask me anything). Along with more formal discussions we have a Slack channel and email group where anyone is encouraged to ask questions, start a discussion, or just post about an interesting article or book they’ve just read. It’s grown organically to the point where multiple people post several times a day from all over the globe. The group also organizes social events to raise awareness, gain new members, and have fun.

Their mission is simple: The MongoDB Women’s Group is a network of MongoDB employees (open to all genders) interested in networking, learning and professional development opportunities as well as addressing challenges faced by women.

From Stacy’s perspective, “Since its inception, the Group has really helped to benefit our employee base as a whole. I had a woman tell me a few weeks ago that she was going through some personal hardships and the Women’s Group and her Women’s Group Mentor kept her strong and sane. That meant everything to me. On a higher level it has allowed people to form bonds with women not on their team or even in their office. Above all it’s a safe space to be yourself. We held an ‘emergency meeting’ after the US Presidential Election with no agenda other than to have your voice heard. It was emotional and raw and was amazing to have helped form a group that allowed for that kind of space.”

MongoDB views diversity first and foremost as a mentality for success. The initiatives in place which support it not only benefit business outcomes by driving innovation and creativity, but they also keep our employees from going elsewhere. With different backgrounds come varying perspectives, and with varying perspectives comes the opportunity to push forward and evolve.

Interested in joining MongoDB? Learn more about working here or check out our open positions.

MongoDB Certified Professional Spotlight: Rory Bramwell

$
0
0

Rory Bramwell is a Jamaican, dual-certified MongoDB Professional working as a DevOps engineer at Pythian, a global IT services company. Pythian helps businesses adopt disruptive technologies to advance innovation and increase agility. This week, Rory’s talking to us about his extensive journey into tech, including his early determination to take a Computer Science course at college, and the support he received from his family to pursue his passion.

Rory Bramwell, MongoDB Certified Professional

Eloise Giegerich: Thank you for taking the time to share your story with us, Rory. I know you currently work at Pythian, but how did you arrive at this role? What was it that inspired you to get into tech?

Rory Bramwell: I've been curious about IT from a young age, but it was only after high school that I had access to a PC at home. This was around 1998, at the beginning of the widespread use of the worldwide web. Having access to a computer enabled me to get a firsthand view of what computers were and what they could do. This is where I discovered programming languages, the building blocks of the modern OS, and its application software. Over the next few months, I learned the Basic and Pascal programming languages.

My next milestone was starting community college in the Natural Sciences program. This program was geared towards preparation for entry to medical school. One day during our math class, the instructor said he was going to start a Computer Science course as a new offering. He asked if any of us would be willing to switch or drop any of our other courses to pursue this new path; I jumped at the opportunity. From this course I was introduced to more computing concepts and learned C++. I remember working for days on a function in C++ to display a multi-colored histogram given a set of five values. This was just for fun, but I learned that I was passionate about programming and wanted to see where it would take me.
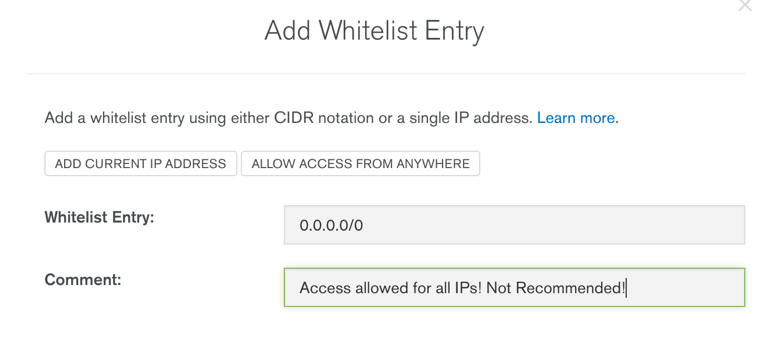
After leaving community college, I decided to enroll in a 10-month software programming course at the Caribbean Institute of Technology (CIT) (now renamed as Heart College of Innovation and Technology (HCIT)). The main location of the institution was about an hour and a half away, but a new location was slated to be opened about 20 minutes from where I lived. But the opening of the new location never happened that year, so I had to defer my enrollment until I could make arrangements to attend the course at the main location the next year. Over the next year, my passion continued to grow and I took it upon myself to learn C (yes, I went back one step to learn the origins of C++), advanced C++ (classes, templates, and standard library), and Microsoft Visual C++.

The next year, with the help of family, I relocated temporarily to the town where the main CIT campus was. Over the next 10 months, I revisited a lot of the programming languages I had previously learned, gained a basic knowledge of the UNIX and Linux operating systems, and added Visual Basic, Core Java, and Java EE to my list of programming languages. At the end of the course, I graduated at the top of the class and received a trophy for excellence as the top performing student, as well as three of four sectional awards. This was validation for my efforts, but more so for my family. A career in IT/programming was new and uncertain, and success at this stage was reassuring.

In the years following the software programming course, I worked as a technical representative for a web hosting company where I learned more about web hosting, domain, email, and linux servers. I further supplemented my knowledge by taking classes for CCNA, Cisco's associate level networking certificate, and acquired the official CCNA certification. Over the next few years I branched off into other roles spanning system and network administration, database administration, software design and development, graphic design, telecommunications, IT project management, and service delivery. Throughout the years, one of the keys to staying passionate and motivated has been continuing to learn new, innovative, and more efficient ways of doing things. I've taken full advantages of Massive Open Online Courses (MOOCs), from Coursera, edX, and Open2Study, and taken many other online and offline courses as well.
EG: Why did you decide to become a DevOps Engineer/Consultant, specifically? What do you like about your role?

RB: DevOps was a mix of all the strengths I had: Development, Operations, Database Administration. It is often said that DevOps Engineers either come from a Development or Operations background; I had a background in both. DevOps was a perfect fit; it allowed me to fully leverage the knowledge and skill set that I had acquired over the years.
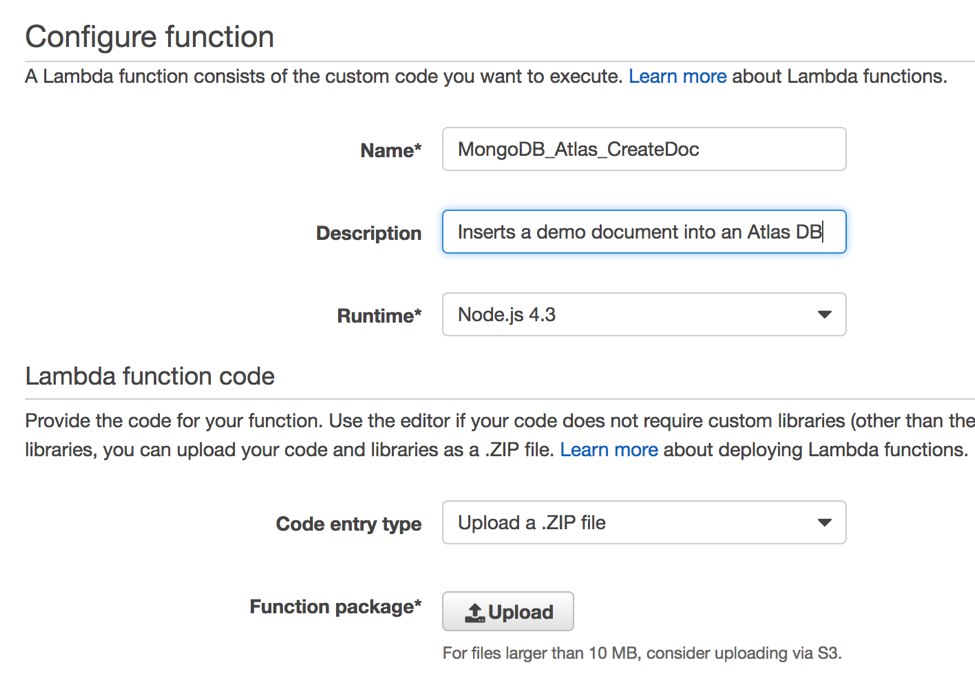
I currently work as a DevOps Engineer for Pythian, where each day I get the opportunity to help our customers achieve their business goals through the use of continuous transformation and operational excellence. I love learning new and innovative ways to use technology to solve problems. Another thing I love about my role is that I get to work with a highly skilled and talented team, and be part of an industry that has some of the greatest minds and people so passionate about what they do.

EG: How did you first discover MongoDB? Have you used or are you planning to use MongoDB in any of your projects?

RB: My first formal introduction to MongoDB was while doing a Coursera specialization on Android Mobile Application Development. In one of the videos, the instructor showed us how to perform create, read, update, and delete (CRUD) operations on MongoDB through the use of Spring Data JPA. This piqued my interest in MongoDB, and specifically the benefits it had to offer over traditional relational databases. I visited the MongoDB website and was intrigued by their approach to NoSQL. The use of JSON documents to store records, schemaless design, ease of use, flexibility, and speed of the database were all positives for me. I later discovered MongoDB University and enrolled in my first of many MongoDB Developer/DBA courses.

In the past I have used MongoDB as a backend for a mobile application. At the moment I do not have any projects that are using MongoDB. However, I am always happy to recommend MongoDB to friends and colleagues in their projects.

EG: What other databases have you worked with, and how does MongoDB compare? Please elaborate on some of the differences between databases, if possible.

RB: In addition to MongoDB, I've worked with Microsoft SQL, MySQL, Oracle in the enterprise, and a number of cloud hosted databases. There are a number of aspects to consider when choosing any database for a project. MongoDB shines in instances where you need a solid database that's flexible, fast, scales horizontally, and is aligned with development needs. It allows you to go from zero to MVP to production in a lot less effort than some of the other contenders.

EG: What inspired you to become MongoDB certified?

RB: After taking a few of the courses on the MongoDB University website, becoming certified was the next step. The courses were well put together, covering not only theoretical concepts but also providing great practical examples to enable you to be productive on day one. I would also like to give a special shout out to the docs team. I found the MongoDB docs website to be a phenomenal resource.

EG: What did you find challenging about the courses? What did you find rewarding?

RB: As I mentioned, the courses were well put together, so that was plus. In the beginning, a few of the concepts took a bit of getting used to, but each time the docs website provided great supplement and clarity. The further you go through the courses the more rewarding it becomes. You start to see how great MongoDB is and how you can use it to both achieve greater agility and scale to meet demands if/when needed.

EG: What are some of the benefits, personal or professional, you’ve experienced post-certification?

RB: I followed through on learning MongoDB from getting to know the product and becoming passionate about the myriad of possibilities it provides. I'm MongoDB Dual-Certified – that is, I hold both the MongoDB Certified Developer and MongoDB Certified DBA certifications. I'm also currently the only MongoDB Certified individual in Jamaica as reported by the MongoDB Certified Professional Finder. Being MongoDB certified has helped me stand out when it comes to job opportunities, and in fact was very instrumental in the acquisition of my current job as DevOps Engineer for Pythian.

EG: Now that you’ve successfully become certified, can you share any advice for those studying for or retaking their exam? Are there any specific preparation strategies you found useful?

RB: Here are my tips for taking and passing the MongoDB certification exams:

  • Take courses on the MongoDB University website. They are well put together and I highly recommend.
  • Make the MongoDB Documentation website your best friend. The docs website is full of great information and should be thought of as your number one go-to for all things MongoDB. The time I spent on the docs website was invaluable.
  • Jump right in: Download the MongoDB server, install it, and practice. Whether you’re doing Development or DBA, nothing substitutes for practical application of the knowledge you've acquired.

EG: It’s been great learning about your tech journey. To close, what has been your greatest takeaway from your certification process, and why would you encourage others to pursue certification?

RB: The greatest takeaway for me was the personal satisfaction of acquiring the certifications. Getting to know MongoDB and the possibilities that it provides will open your mind to thinking about new and innovative applications you can develop. Whether you’re a developer working on mobile, web, or desktop applications, or a DBA that ensures the performance, availability, and security of your organization’s databases, I encourage you to become MongoDB certified. You will stand out as a qualified and highly sought after professional, and be part of a thriving community of MongoDB certified professionals.


Thanks for sharing your story, Rory! If you’d like to hear more from Rory, follow him @RoryBramwell on Twitter. And if you’re interested in getting professionally certified, you can learn more about the MongoDB certification process. If you’re already certified and would like to be featured in a future blog post, let us know at certification@mongodb.com.


Viewing all 2423 articles
Browse latest View live