Quantcast
Channel: MongoDB | Blog
Viewing all 2423 articles
Browse latest View live

10-Step Methodology to Creating a Single View of your Business: Part 1

$
0
0

Organizations have long seen the value in aggregating data from multiple systems into a single, holistic, real-time representation of a business entity. That entity is often a customer. But the benefits of a single view in enhancing business visibility and operational intelligence can apply equally to other business contexts. Think products, supply chains, industrial machinery, cities, financial asset classes, and many more.

However, for many organizations, delivering a single view to the business has been elusive, impeded by a combination of technology and governance limitations. In this 3 part blog series, we will explore what it takes to successfully deliver a single view project:

  • In Part 1 today, we will review the business drivers behind single view projects, introduce a proven and repeatable 10-step methodology to creating the single view, and discuss the initial “Discovery” stage of the project
  • In Part 2, we dive deeper into the methodology by looking at the development and deployment phases of the project
  • In Part 3, we wrap up with the single view maturity model, look at required database capabilities to support the single view, and present a selection of case studies.

If you want to get started right now, download the complete 10-Step Methodology to Creating a Single View whitepaper. MongoDB has been used in many single view projects across enterprises of all sizes and industries. This whitepaper shares the best practices we have observed and institutionalized over the years. It provides a step-by-step guide to the methodology, governance, and tools essential to successfully delivering a single view project.

Why Single View? Why Now?

Today’s modern enterprise is data-driven. How quickly an organization can access and act upon information is a key competitive advantage. So how does a single view of data help? Most organizations have a complicated process for managing their data. It usually involves multiple data sources of variable structure, ingestion and transformation, loading into an operational database, and supporting the business applications that need the data. Often there are also analytics, BI, and reporting that require access to the data, potentially from a separate data warehouse or data lake. Additionally, all of these layers need to comply with security protocols, information governance standards, and other operational requirements.

Inevitably, information ends up stranded in silos. Often systems are built to handle the requirements of the moment, rather than carefully designed to integrate into the existing application estate, or a particular service requires additional attributes to support new functionality. Additionally, new data sources are accumulated due to business mergers and acquisitions. All of a sudden information on a business entity, such as a customer, is in a dozen different and disconnected places.

Single view use cases
Figure 1: Sample of single view use cases


Single view is relevant to any industry and domain as it addresses the generic problem of managing disconnected and duplicate data. Specifically, a single view solution does the following:

  • Gathers and organizes data from multiple, disconnected sources;
  • Aggregates information into a standardized format and joint information model;
  • Provides holistic views for connected applications or services, across any digital channel;
  • Serves as a foundation for analytics – for example, customer cross-sell, upsell, and churn risk.
Architecture of single view platform
Figure 2: High-level architecture of single view platform


Introducing the 10 Step Methodology to Delivering a Single View

From scoping to development to operationalization, a successful single view project is founded on a structured approach to solution delivery. In this section of the blog series, we identify a repeatable, 10-step methodology and tool chain that can move an enterprise from its current state of siloed data into a real-time single view that improves business visibility.

10-step methodology to deliver a single view
Figure 3: 10-step methodology to deliver a single view


The timescale for each step shown in the methodology is highly project-dependent, governed by such factors as:

  • The number of data sources to merge;
  • The number of consuming systems to modify;
  • The complexity of access patterns querying the single view.

MongoDB’s consulting engineers can assist in estimating project timescales based on the factors above.

Step 1: Define Project Scope & Sponsorship

Building a single view can involve a multitude of different systems, stakeholders, and, business goals. For example, creating a single customer view potentially entails extracting data from numerous front and back office applications, operational processes, and partner systems. From here, it is aggregated to serve everyone from sales and marketing, to call centers and technical support, to finance, product development, and more. While it’s perfectly reasonable to define a future-state vision for all customer data to be presented in a single view, it is rarely practical in the first phase of the project.

Instead, the project scope should initially focus on addressing a specific business requirement, measured against clearly defined success metrics. For example, phase 1 of the customer single view might be concentrated on reducing call center time-to-resolution by consolidating the last three months of customer interactions across the organization’s web, mobile, and social channels. By limiting the initial scope of the single view project, precise system boundaries and business goals can be defined, and department stakeholders identified.

With the scope defined, project sponsors can be appointed. It is important that both the business and technical sides of the organization are represented, and that the appointees have the authority to allocate both resources and credibility to the project. Returning to our customer single view example above, the head of Customer Services should represent the business, partnered with the head of Customer Support Systems.

Step 2: Identify Data Consumers

This is the first in a series of iterative steps that will ultimately define the single view data model. In this stage, the future consumers of the single view need to share:

  • How their current business processes operate, including the types of queries they execute as part of their day-to-day responsibilities, and the required Service Level Agreements (SLAs);
  • The specific data (i.e., the attributes) they need to access;
  • The sources from which the required data is currently extracted.

Step 3: Identify Data Producers

Using the outputs from Step 2, the project team needs to identify the applications that generate the source data, along with the business and technical owners of the applications, and their associated databases. It is important to understand whether the source application is serving operational or analytical applications. This information will be used later in the project design to guide selection of the appropriate data extract and load strategies.

Wrapping Up Part 1

That wraps up the first part of our 3-part blog series. In Part 2, we will dive deeper into the Develop and Deploy phases of the single view methodology. Remember, if you want to get started right now, download the complete 10-Step Methodology to Creating a Single View whitepaper

Download now

Optimizing AWS Lambda performance with MongoDB Atlas and Node.js

$
0
0

I attended an AWS user group meeting some time ago, and many of the questions from the audience concerned caching and performance. In this post, I review the performance implications of using Lambda functions with any database-as-a-service (DBaaS) platform (such as MongoDB Atlas). Based on internal investigations, I offer a specific workaround available for Node.js Lambda functions. Note that other supported languages (such as Python) may only require implementing some parts of the workaround, as the underlying AWS containers may differ in their resource disposal requirements. I will specifically call out below which parts are required for any language and which ones are Node.js-specific.

AWS Lambda is serverless, which means that it is essentially stateless. Well, almost. As stated in its developer documentation, AWS Lambda relies on a container technology to execute its functions. This has several implications:

  • The first time your application invokes a Lambda function it will incur a penalty hit in latency – time that is necessary to bootstrap a new container that will run your Lambda code. The definition of "first time" is fuzzy, but word on the street is that you should expect a new container (i.e. a “first-time” event) each time your Lambda function hasn’t been invoked for more than 5 minutes.

  • If your application makes subsequent calls to your Lambda function within 5 minutes, you can expect that the same container will be reused, thus saving some precious initialization time. Note that AWS makes no guarantee it will reuse the container (i.e. you might just get a new one), but experience shows that in many cases, it does manage to reuse existing containers.

  • As mentioned in the How It Works page, any Node.js variable that is declared outside the handler method remains initialized across calls, as long as the same container is reused.

Understanding Container Reuse in AWS Lambda, written in 2014, dives a bit deeper into the whole lifecycle of a Lambda function and is an interesting read, though may not reflect more recent architectural changes to the service. Note that AWS makes no guarantee that containers are maintained alive (though in a "frozen" mode) for 5 minutes, so don’t rely on that specific duration in your code.

In our very first attempt to build Lambda functions that would run queries against MongoDB Atlas, our database as a service offering, we noticed the performance impact of repeatedly calling the same Lambda function without trying to reuse the MongoDB database connection. The wait time for the Lambda function to complete was around 4-5 seconds, even with the simplest query, which is unacceptable for any real-world operational application.

In our subsequent attempts to declare the database connection outside the handler code, we ran into another issue: we had to call db.close() to effectively release the database handle, lest the Lambda function time out without returning to the caller. The AWS Lambda documentation doesn’t explicitly mention this caveat which seems to be language dependent since we couldn’t reproduce it with a Lambda function written in Python.

Fortunately, we found out that Lambda’s context object exposes a callbackWaitsForEmptyEventLoop property, that effectively allows a Lambda function to return its result to the caller without requiring that the MongoDB database connection be closed (you can find more information about callbackWaitsForEmptyEventLoop in the Lambda developer documentation). This allows the Lambda function to reuse a MongoDB Atlas connection across calls, and reduce the execution time to a few milliseconds (instead of a few seconds).

In summary, here are the specific steps you should take to optimize the performance of your Lambda function:

  • Declare the MongoDB database connection object outside the handler method, as shown below in Node.js syntax (this step is required for any language, not just Node.js):
  • In the handler method, set context.callbackWaitsForEmptyEventLoop to false before attempting to use the MongoDB database connection object (this step is only required for Node.js Lambda functions):
  • Try to re-use the database connection object using the MongoDB.connect(Uri) method only if it is not null and db.serverConfig.isConnected() returns true (this step is required for any language, not just Node.js):
  • Do NOT close the database connection! (so that it can be reused by subsequent calls).

The Serverless development with Node.js, AWS Lambda and MongoDB Atlas tutorial post makes use of all these best practices so I recommend that you take the time to read it. The more experienced developers can also find optimized Lambda Node.js functions (with relevant comments) in:

I’d love to hear from you, so if you have any question or feedback, don’t hesitate to leave them below.

Additionally, if you’d like to learn more about building serverless applications with MongoDB Atlas, I highly recommend our webinar below where we have an interactive tutorial on serverless architectures with AWS Lambda.

Watch Serverless Architectures with AWS Lambda and MongoDB Atlas

About the Author - Raphael Londner

Raphael Londner is a Principal Developer Advocate at MongoDB, focused on cloud technologies such as Amazon Web Services, Microsoft Azure and Google Cloud Engine. Previously he was a developer advocate at Okta as well as a startup entrepreneur in the identity management space. You can follow him on Twitter at @rlondner.

10-Step Methodology to Creating a Single View of your Business: Part 2

$
0
0

Welcome to part 2 of 3-part single view blog series

  • In Part 1 we reviewed the business drivers behind single view projects, introduced a proven and repeatable 10-step methodology to creating the single view, and discussed the initial "Discovery" stage of the project
  • In today’s part 2, we dive deeper into the methodology by looking at the development and deployment phases of the project
  • In Part 3, we wrap up with the single view maturity model, look at required database capabilities to support the single view, and present a selection of case studies.

If you want to get started right now, download the complete 10-Step Methodology to Creating a Single View whitepaper.

Develop & Deploy Phases of the Single View Methodology

As a reminder, figure 1 shows the 10-step methodology to creating the single view.

Single View Methodology
Figure 1: Single view methodology

In part 1 of the blog series, we covered the Discover phase. We’ll now dive into the Develop and Deploy phases, starting with Step 4 of the methodology.

Step 4: Appoint Data Stewards

A data steward is appointed for each data source identified step 3 of the methodology. The steward needs to command a deep understanding of the source database, with specific knowledge of:

  • The schema that stores the source data, and an understanding of which tables store the required attributes, and in what format;
  • The clients and applications that generate the source data;
  • The clients and applications that consume the source data.

The data steward should also be able to define how the required data can be extracted from the source database to meet the single view requirements (e.g., frequency of data transfer), without impacting either the current producing or consuming applications.

Step 5: Develop the Single View Data Model

With an understanding of both what data is needed, and how it will be queried by the consuming applications, the development team can begin the process of designing the single view schema.

Identify Common Attributes

An important consideration at this stage is to define the common attributes that must appear in every record. Using our customer single view as an example, every customer document should contain a unique customer identifier such as a customer number or email address. This is the field that the consuming applications will use by default to query the single view, and would be indexed as the record’s primary key. Analyzing common query access patterns will also identify the secondary indexes that need to be created for each record. For example, we may regularly query customers against location and products or services they have purchased. Creating secondary indexes on these attributes is necessary to ensure such queries are efficiently serviced.

There may also be many fields that vary from record to record. For example, some customers may have multiple telephone numbers for home, office, and cell phones, while others have only a cell number. Some customers may have social media accounts against which we can track interests and measure sentiments, while other customers have no social presence. MongoDB’s flexible document model with dynamic schema is a huge advantage as we develop our single view. Each record can vary in structure, and so we can avoid the need to define every possible field in the initial schema design, while using MongoDB document validation to enforce specific rules on mandatory fields.

Define Canonical Field Formats

The developers also need to define the canonical format of field names and data attributes. For example, a customer phone number may be stored as a string data type in one source system, and an integer in another, so the development team needs to define what standardized format will be used for the single view schema. We can use approaches such as MongoDB’s native document validation to create and enforce rules governing the presence of mandatory fields and data types.

Define MongoDB Schema

With a data model that allows embedding of rich data structures, such as arrays and sub-documents, within a single localized document, all required data for a business entity can be accessed in a single call to MongoDB. This design results in dramatically improved query latency and throughput when compared to having to JOIN records from multiple relational database tables.

Data modeling is an extensive topic with design decisions ultimately affecting query performance, access patterns, ACID guarantees, data growth, and lifecycle management. The MongoDB data model design documentation provides a good introduction to the factors that need to be considered. In addition, the MongoDB Development Rapid Start service offers custom consulting and training to assist customers in schema design for their specific projects.

Step 6: Data Loading & Standardization

With our data model defined, we are ready to start loading source data into our single view system. Note that the load step is only concerned with capturing the required data, and transforming it into a standardized record format. In Step 7 that follows, we will create the single view data set by merging multiple source records from the load step.

There will be two distinct phases of the data load:

  1. Initial load. Typically a one-time operation that extracts all required attributes from the source databases, loading them into the single view system for subsequent merging;
  2. Delta load. An ongoing operation that propagates updates committed to the source databases into the single view. To maintain synchronization between the source and single view systems, it is important that the delta load starts immediately following the initial load.

For all phases of the data load, developers should ensure they capture data in full fidelity, so as not to lose data types. If files are being emitted, then write them out in a JSON format, as this will simplify data interchange between different databases. If possible, use MongoDB Extended JSON as this allows temporal and binary data formats to be preserved.

Initial Load

Several approaches can be used to execute the initial load. An off-the-shelf ETL (Extract, Transform & Load) tool can be used to migrate the required data from the source systems, mapping the attributes and transforming data types into the single view target schema. Alternatively, custom data loaders can be developed, typically used when complex merging between multiple records is required. MongoDB consulting engineers can advise on which approach and tools are most suitable in your context. If after the initial load the development team discovers that additional refinements are needed to the transformation logic, then the single view data should be erased, and the initial load should be repeated.

Delta Load

The appropriate tool for delta loads will be governed by the frequency required for propagating updates from source systems into the single view. In some cases, batch loads taken at regular intervals, for example every 24 hours, may suffice. In this scenario, the ETL or custom loaders used for the initial load would generally be suitable. If data volumes are low, then it may be practical to reload the entire data set from the source system. A more common approach is to reload data only from those customers where a timestamp recorded in the source system indicates a change. More sophisticated approaches track individual attributes and reload only those changed values, even keeping track of the last-modification time in the single-view schema.

If the single view needs to be maintained in near real time with the source databases, then a message queue would be more appropriate. An increasingly common design pattern we have observed is using Apache Kafka to stream updates into the single view schema as they are committed to the source system. Download our Data Streaming with Kafka and MongoDB white paper to learn more about this approach.

Note that in this initial phase of the single view project, we are concerned with moving data from source systems to the single view. Updates to source data will continue to be committed directly to the source systems, and propagated from there to the single view. We have seen customers in more mature phases of single view projects write to the single view, and then propagate updates back to the source systems, which serve as systems of record. This process is beyond the scope of this initial phase.

Standardization

In a perfect world, an entity’s data would be consistently represented across multiple systems. In the real world, however, this is rarely the case. Instead, the same attributes are often captured differently in each system, described by different field names and stored as different data types. To better understand the challenges, take the example below. We are attempting to build a single view of our frequent travelers, with data currently strewn across our hotel, flight, and car reservation systems. Each system uses different field names and data types to represent the same customer information.

Raw Data

Figure 2: The name’s Bond….oh hang on, it might be Bind

During the load phase, we need to transform the data into the standardized formats defined during the design of the single view data model. This standardized format makes it much simpler to query, compare, and sort our data.

Step 7: Match, Merge, and Reconcile

Even after standardizing divergent field names and data types during the data load, inconsistencies can often exist in the data itself. Accurately merging disparate records is one the toughest challenges in building a single view. The good news is that MongoDB has developed tools that can assist in this process.

Looking again at our frequent traveler example above, we can see that the customer names are slightly different. These variances in the first and last names would result in storing three separate customer records, rather than aggregating the data into our desired single view.

It is not practical, or necessary, to compare each customer record to every other customer record loaded from the source systems. Instead, we can use a grouping function to cluster records with similar matching attributes. This should be executed as an iterative process:

  1. Start by matching records against unique, authoritative attributes, for example by email address or credit card number;
  2. Group remaining records by matching combinations of attributes – for example a last_name, date_of_birth, and zip_code triple;
  3. Finally, we can apply fuzzy matching algorithms such as Levenshtein distance, cosine similarity, and locality sensitive hashing to catch data errors in attributes such as names.

Using the process above, a confidence factor can be applied to each match. For those matches where confidence is high, i.e. 95%+, the records can be automatically merged and written to the authoritative single view. Note that the actual confidence factor can vary by use case, and is often dependent on data quality contained in the source systems. For matches below the desired threshold, the merged record with its conflicting attributes can be written to a pending single view record for manual intervention. Inspecting the record to resolve conflicts might be performed by the data steward, or by the application user when they access the record.

Figure 3:Using MongoDB tools to move from disparate source data to merged and reconciled single view data sets

To assist customers, MongoDB consulting engineers have developed tools to facilitate the process above:

  • A Workers framework that parallelizes document-to-document comparisons. The framework allows long running jobs to be partitioned and run over collections of records, maintaining progress of grouping and matching.
  • A Grouping tool allows records to be clustered based on attribute similarity, using algorithms such as Levenshtein to calculate the distance between different documents, and then single-linkage clustering to create precise matches for merging.

By combining the Workers framework and Grouping tool, merged master data sets are generated, allowing the project team to begin testing the resulting single view.

Step 8: Architecture Design

While the single view may initially address a subset of users, well-implemented solutions will quickly gain traction across the enterprise. The project team therefore needs to have a well-designed plan for scaling the service and delivering continuous uptime with robust security controls.

MongoDB’s Production Readiness consulting engagement will help you achieve just that. Our consulting engineer will collaborate with your devops team to configure MongoDB to satisfy your application’s availability, performance, and security needs.

Step 9: Modify the Consuming Systems

With the merged data set created and systems provisioned, we can begin modifying the applications that will consume the single view.

The first step will be to create an API that exposes the single view. This will typically be a RESTful web service that abstracts access to the underlying data set. Any number of consuming applications – whether customer-facing web and mobile services, or backend enterprise and analytics applications – can be repointed to the web service, with no or minimal modification the application’s underlying logic. Note that write operations will continue to be committed directly to the source systems.

It is generally a best practice to modify one consuming application at a time, thus phasing the development team’s effort to ensure correct operation, while minimizing business risk.

Step 10: Implement Maintenance Processes

No organization is static. Digital transformation initiatives supported by agile development methodologies are enabling enterprises to innovate faster – whether through launching new services or evolving existing applications. Our single view data model needs to maintain pace with business change. This change can manifest itself in adding new attributes from existing source systems, onboarding entirely new data sources, or creating new application uses for the single view.

The project team needs to institutionalize governance around these maintenance processes, defining a strategy on how application changes that generate new attributes of value are integrated into the single view schema. The steps defined above – scoping the required changes, identifying the data producers and stewards, updating the schema, and determining the load and merge strategies – are all essential to maintaining the single view. In some more mature single view projects, the application team may decide to write new attributes directly to the single view, thus avoiding the need to update the legacy relational schemas of source systems. This is discussed in more detail in the Maturity Model section of the whitepaper.

As we consider the maintenance process, the benefits of a flexible schema – such as that offered by MongoDB’s document data model – cannot be underestimated. As we will see in the Case Studies section in part 3, the rigidity of a traditional relational data model has prevented the single view schema from evolving as source systems are updated. This inflexibility has scuppered many single view projects in the past.

Wrapping Up Part 2

That wraps up the second part of our 3-part blog series. In the final Part 3, we will discuss the single view maturity model, explore required database capabilities to host the single view, and present a selection of case studies. Remember, if you want to get started right now, download the complete 10-Step Methodology to Creating a Single View whitepaper.

New — Live Migrations, More AWS Regions, Queryable Backups & More in MongoDB Atlas

$
0
0

Last month we announced the Free Tier in MongoDB Atlas and the availability of MongoMirror, a downloadable utility that makes migrating live MongoDB replica sets easy. We’ve since incorporated the same live migration functionality into MongoDB Atlas, our database as a service, and updated the platform with some new features.

Live Migration

Live migration allows us to automate the import of any pre-existing MongoDB 3.0+ replica set into MongoDB Atlas. It works by performing an initial sync between a source database and a target database in Atlas, and then tailing the source oplog to keep the database in Atlas in sync with live updates from your application.

To use live migration, we’ll first need to create a dedicated (M10 or above) Atlas cluster.

In the example below, we’ve created a cluster with M30-size instances in US-EAST-1. You can see from the screenshot below that we now have a new option, “Migrate Data to this Cluster”.

Migrate data to cluster

We’ll need the following for the migration:

  • Hostname: Port of the primary of our source replica set
  • Username/password (if authentication is enabled)
  • CAFile (if running MongoDB with SSL enabled and the --sslCAFile option)

Once we have this information, we’re ready to select “I’M READY TO MIGRATE”.

We’ll then be brought to a new window that asks for the location of our source replica set and credentials. The “VALIDATE” button at the bottom of the window checks to make sure that MongoDB Atlas can tail our source oplog to make sure that new operations are captured.

Clicking the “START MIGRATION” button kicks it off. We’ll get an email notification when it’s time to cut over to MongoDB Atlas; all we have to do to finalize the migration process is modify the database connection string in our app.

For a more detailed walkthrough of Live Migration in MongoDB Atlas, click here.

Now in (almost) all AWS regions

MongoDB Atlas is now available in most AWS regions, which means users around the world can leverage the database service with minimal geographical latency. As a reminder, MongoDB Atlas’ support for VPC Peering means teams can easily and securely connect their own VPCs to a new Atlas cluster in one of the new regions.


AWS Regions (Americas) AWS Regions (APAC) AWS Regions (EMEA)
us-east-1 (N. Virginia) ap-southeast-2 (Sydney) eu-west-1 (Dublin)
us-west-2 (Oregon) ap-southeast-1 (Singapore) eu-west-2 (London)
us-east-2 (Ohio) ap-northeast-1 (Tokyo) eu-central-1 (Frankfurt)
us-west-1 (N. California) ap-northeast-2 (Seoul)
ca-central-1 (Canada) ap-south-1 (Mumbai)
sa-east-1 (São Paulo)

Queryable backup snapshots

Also new in MongoDB Atlas is the ability to query backup snapshots and restore data at the document level in minutes. No longer do we need to restore an entire cluster when all we really need is a small subset of our data.

Within the Atlas UI, we can now select a backup snapshot and click on the new “Query” option.

We can opt to use a downloadable Backup Tunnel, which handles the security for connecting to our backup instance, and use the mongo shell or a MongoDB driver to connect to our backup via the tunnel.

For a walkthrough of using queryable backups in Atlas, click here.

Explore your databases from the Atlas UI

Finally, the new Data Explorer in MongoDB Atlas allows us run queries, view metadata about our databases and collections, and see index usage statistics without resorting to the mongo shell. We can access the Data Explorer for dedicated Atlas clusters by selecting the new “DATA” button associated with our databases.

This will bring us to a new view, shown below.


All of these new features are now live in MongoDB Atlas. As always, we’d love to hear your feedback at mongodb-atlas@mongodb.com!

Discuss on Hacker News

Get started on the Atlas free tier


10-Step Methodology to Creating a Single View of your Business: Part 3

$
0
0

Welcome to the final part of our single view blog series

  • In Part 1 we reviewed the business drivers behind single view projects, introduced a proven and repeatable 10-step methodology to creating the single view, and discussed the initial “Discovery” stage of the project
  • In Part 2 we dove deeper into the methodology by looking at the development and deployment phases of the project
  • In this final part, we wrap up with the single view maturity model, look at required database capabilities to support the single view, and present a selection of case studies.

If you want to get started right now, download the complete 10-Step Methodology to Creating a Single View whitepaper.

10-Step Single View Methodology

As a reminder, figure 1 shows the 10-step methodology to creating the single view.

Single View Methodology

Figure 1: Single view methodology

In parts 1 and 2 of the blog series, we stepped through each of the methodology’s steps. Lets now take a look at a roadmap for the single view – something we call the Maturity Model.

Single View Maturity Model

As discussed earlier in the series, most single view projects start by offering a read-only view of data aggregated from the source systems. But as projects mature, we have seen customers start to write to the single view. Initially they may start writing simultaneously to the source systems and single view to prove efficacy – before then writing to the single view first, and propagating updates back to the source systems. The evolution path of single view maturity is shown below.

Maturity model

Figure 2: Single view maturity model

What are the advantages of writing directly to the single view?

  1. Real-time view of the data. Users are consuming the freshest version of the data, rather than waiting for updates to propagate from the source systems to the single view.
  2. Reduced application complexity. Read and write operations no longer need to be segregated between different systems. Of course, it is necessary to then implement a change data capture process that pushes writes against the single view back to the source databases. However, in a well designed system, the mechanism need only be implemented once for all applications, rather than read/write segregation duplicated across the application estate.
  3. Enhanced application agility. With traditional relational databases running the source systems, it can take weeks or months worth of developer and DBA effort to update schemas to support new application functionality. MongoDB’s flexible data model with a dynamic schema makes the addition of new fields a runtime operation, allowing the organization to evolve applications more rapidly.

Figure 3 shows an architectural approach to synchronizing writes against the single view back to the source systems. Writes to the single view are pushed into a dedicated update queue, or directly into an ETL pipeline or message queue. Again, MongoDB consulting engineers can assist with defining the most appropriate architecture.

Writing to the single view

Figure 3: Writing to the single view

Required Database Capabilities to Support the Single View

The database used to store and manage the single view provides the core technology foundation for the project. Selection of the right database to power the single view is critical to determining success or failure.

Relational databases, once the default choice for enterprise applications, are unsuitable for single view use cases. The database is forced to simultaneously accommodate the schema complexity of all source systems, requiring significant upfront schema design effort. Any subsequent changes in any of the source systems’ schema – for example, when adding new application functionality – will break the single view schema. The schema must be updated, often causing application downtime. Adding new data sources multiplies the complexity of adapting the relational schema.

MongoDB provides a mature, proven alternative to the relational database for enterprise applications, including single view projects. As discussed below, the required capabilities demanded by a single view project are well served by MongoDB:

Flexible Data Model

MongoDB's document data model makes it easy for developers to store and combine data of any structure within the database, without giving up sophisticated validation rules to govern data quality. The schema can be dynamically modified without application or database downtime. If, for example, we want to start to store geospatial data associated with a specific customer event, the application simply writes the updated object to the database, without costly schema modifications or redesign.

MongoDB documents are typically modeled to localize all data for a given entity – such as a financial asset class or user – into a single document, rather than spreading it across multiple relational tables. Document access can be completed in a single MongoDB operation, rather than having to JOIN separate tables spread across the database. As a result of this data localization, application performance is often much higher when using MongoDB, which can be the decisive factor in improving customer experience.

Intelligent Insights, Delivered in Real Time

With all relevant data for our business entity consolidated into a single view, it is possible to run sophisticated analytics against it. For example, we can start to analyze customer behavior to better identify cross-sell and upsell opportunities, or risk of churn or fraud. Analytics and machine learning must be able to run across vast swathes of data stored in the single view. Traditional data warehouse technologies are unable to economically store and process these data volumes at scale. Hadoop-based platforms are unable to serve the models generated from this analysis, or perform ad-hoc investigative queries with the low latency demanded by real-time operational systems.

The MongoDB query language and rich secondary indexes enable developers to build applications that can query and analyze the data in multiple ways. Data can be accessed by single keys, ranges, text search, graph, and geospatial queries through to complex aggregations and MapReduce jobs, returning responses in milliseconds. Data can be dynamically enriched with elements such as user identity, location, and last access time to add context to events, providing behavioral insights and actionable customer intelligence. Complex queries are executed natively in the database without having to use additional analytics frameworks or tools, and avoiding the latency that comes from ETL processes that are necessary to move data between operational and analytical systems in legacy enterprise architectures.

Single view platform serving operational and analytical workloads

Figure 4: Single view platform serving operational and analytical workloads

MongoDB replica sets can be provisioned with dedicated analytics nodes. This allows data scientists and business analysts to simultaneously run exploratory queries and generate reports and machine learning models against live data, without impacting nodes serving the single view to operational applications, again avoiding lengthy ETL cycles.

Predictable Scalability with Always-on Availability

Successful single view projects tend to become very popular, very quickly. As new data sources and attributes, along with additional consumers such as applications, channels, and users are onboarded, so demands for processing and storage capacity quickly grow.

To address these demands, MongoDB provides horizontal scale-out for the single view database on low cost, commodity hardware using a technique called sharding, which is transparent to applications. Sharding distributes data across multiple database instances. Sharding allows MongoDB deployments to address the hardware limitations of a single server, such as bottlenecks in CPU, RAM, or storage I/O, without adding complexity to the application. MongoDB automatically balances single view data in the cluster as the data set grows or the size of the cluster increases or decreases.

MongoDB maintains multiple replicas of the data to maintain database availability. Replica failures are self-healing, and so single view applications remain unaffected by underlying system outages or planned maintenance. Replicas can be distributed across regions for disaster recovery and data locality to support global user bases.

Global distribution of the single view

Figure 5: Global distribution of the single view

Enterprise Deployment Model

MongoDB can be run on a variety of platforms – from commodity x86 and ARM-based servers, through to IBM Power and zSeries systems. You can deploy MongoDB onto servers running in your own data center, or public and hybrid clouds. With the MongoDB Atlas service, we can even run the database for you.

MongoDB Enterprise Advanced is the production-certified, secure, and supported version of MongoDB, offering:

  • Advanced Security. Robust access controls via LDAP, Active Directory, Kerberos, x.509 PKI certificates, and role-based access control to ensure a separation of privileges across applications and users. Data anonymization can be enforced by read-only views to protect sensitive, personally identifiable information. Data in flight and at rest can be encrypted to FIPS 140-2 standards, and an auditing framework for forensic analysis is provided.
  • Automated Deployment and Upgrades. With Ops Manager, operations teams can deploy and upgrade distributed MongoDB clusters in seconds, using a powerful GUI or programmatic API.
  • Point-in-time Recovery. Continuous backup and consistent snapshots of distributed clusters allow seamless data recovery in the event of system failures or application errors.

Single View in Action

MongoDB has been used in many single view projects. The following case studies highlight several examples.

MetLife: From Stalled to Success in 3 Months

In 2011, MetLife’s new executive team knew they had to transform how the insurance giant catered to customers. The business wanted to harness data to create a 360-degree view of its customers so it could know and talk to each of its more than 100 million clients as individuals. But the Fortune 50 company had already spent many years trying unsuccessfully to develop this kind of centralized system using relational databases.

Which is why the 150-year old insurer turned to MongoDB. Using MongoDB’s technology over just 2 weeks, MetLife created a working prototype of a new system that pulled together every single relevant piece of customer information about each client. Three months later, the finished version of this new system, called the 'MetLife Wall,' was in production across MetLife’s call centers.

The Wall collects vast amounts of structured and unstructured information from MetLife’s more than 70 different administrative systems. After many years of trying, MetLife solved one of the biggest data challenges dogging companies today. All by using MongoDB’s innovative approach for organizing massive amounts of data. You can learn more from the case study.

CERN: Delivering a Single View of Data from the LHC to Accelerate Scientific Research and Discovery

The European Organisation for Nuclear Research, known as CERN, plays a leading role in the fundamental studies of physics. It has been instrumental in many key global innovations and breakthroughs, and today operates the world's largest particle physics laboratory. The Large Hadron Collider (LHC) nestled under the mountains on the Swiss - Franco border is central to its research into origins of the universe.

Using MongoDB, CERN built a multi-data center Data Aggregation System accessed by over 3,000 physicists from nearly 200 research institutions across the globe. MongoDB provides the ability for researchers to search and aggregate information distributed across all of the backend data services, and bring that data into a single view.

MongoDB was selected for the project based on its flexible schema, providing the ability to ingest and store data of any structure. In addition, its rich query language and extensive secondary indexes gives users fast and flexible access to data by any query pattern. This can range from simple key-value look-ups, through to complex search, traversals and aggregations across rich data structures, including embedded sub-documents and arrays.

You can learn more from the case study.

Wrapping Up Part 3

That wraps up our 3-part blog series. Bringing together disparate data into a single view is a challenging undertaking. However, by applying the proven methodologies, tools, and technologies, organizations can innovate faster, with lower risk and cost.

Remember, if you want to get started right now, download the complete 10-Step Methodology to Creating a Single View whitepaper.


Why Attendees Love MongoDB World

$
0
0

MongoDB World is coming up on June 20-21. That’s less than two months away. At the event, you’ll have the opportunity to learn from the the engineers who build the database and the brightest thought leaders in the industry. You’ll be the first to know about the new features coming up in MongoDB, and can connect with other engaged community members in between educational sessions.

You might have heard about the unforgettable after party, fun conference games, and the countless networking opportunities available at the event. But don’t take our word for it - check out what last year’s attendees had to say:

David Strickland, CTO, MyDealerLot


Joshua Austill, Application Developer, The North 40 Outfitters


Krystal Flores, Data Services Engineer, Twine Data


Robert Fehrmann, Data Architect, Snagajob


At MongoDB World, you can expect to learn best practices directly from the experts. You’ll get a behind the scenes look at how teams and companies use MongoDB to their advantage. In addition to sessions, interactive programs and activities will ensure you get a well-rounded educational experience. Join us to strengthen your skills.

View MongoDB World 2017 Sessions

P.S. Tom Schenk, Chief Data Architect, City of Chicago and MongoDB World 2017 keynote speaker is excited to share how MongoDB powers Chicago’s Windy Grid application.

Automated MongoDB Updates, No Problem with Atlas

$
0
0

As a developer, you have a lot of different options to run the MongoDB database for your application. But as you plan to launch your app, it’s important to consider how the database is secured, upgraded, and managed moving forward. MongoDB Atlas reduces the manual operations you need to perform to ensure that you have access to the most current features and your database is running with the most recent security fixes.

Maintenance version updates for your MongoDB Atlas database – e.g., from MongoDB 3.4.2 to 3.4.3 – are automated in the background so you don't have to worry about applying the latest revision yourself. You can continue to focus on building your application without having to schedule time to upgrade your database to the latest version. This means that you always have the latest bug fixes, security patches and any other critical updates for MongoDB. MongoDB Atlas ensures these updates are done for you without any intervention by you or your team.

MongoDB Atlas makes it easy to upgrade to the latest available release series as well. There's no need to modify the underlying Operating System or concern yourself with package files. The MongoDB Atlas platform utilizes our automation agents to easily upgrade to this latest version. Upgrades from MongoDB 3.2 to the 3.4 release series are possible from MongoDB Atlas; you can see how to perform these upgrades by going to this YouTube Tutorial on upgrading with MongoDB Atlas.

MongoDB Atlas will never upgrade your version from 3.2 to 3.4 release without your explicit approval, so you maintain control over testing new database functionality and application behavior, giving you the freedom to upgrade only when the time is right for you. When you are ready to upgrade, MongoDB Atlas will automate the process for you.

MongoDB Atlas monitoring agents receive data on this process and notify our alert system if any issues occur during this process. Our 365-24-7 support staff also stand by to monitor our alert system to ensure your upgrade is executed with no issue.

Get Notified

You'll always be able to see if new revision updates have been applied to your cluster. The MongoDB Atlas Alerts page is accessible by clicking the "Alerts" button on the left side of your Atlas control panel. Here you can click on the "All Activity" tab, which provides you with a list of all the recent changes that have been applied to your MongoDB Atlas Cluster.

This screenshot above shows you that the MongoDB 3.4.3 maintenance release has recently been applied to each of our hosts in our three node cluster. During the upgrade from MongoDB 3.4.2 to 3.4.3, MongoDB Atlas recognizes the primary replica set member and automatically upgrades this node last, ensuring that inserts received during a revision upgrade can complete.

Supported MongoDB in the Cloud by MongoDB Engineers

You'll always have the tested and secure version of MongoDB provided by our team of engineers. With MongoDB Atlas, you'll get the newest and most trusted versions of MongoDB directly from the source.

You can trust MongoDB Atlas to provide you with the security, provisioning, patching, and upgrading that lets you focus more time on creating great applications.

You can get started using MongoDB Atlas's free tier to try out some of these automated services today!

Getting Started with Python and MongoDB

$
0
0

You can get started with MongoDB and your favorite programming language by leveraging one of its drivers, many of which are maintained by MongoDB engineers, and others which are maintained by members of the community. MongoDB has a native Python driver, PyMongo, and a team of Driver engineers dedicated to making the driver fit to the Python community’s needs.

In this article, which is aimed at Python developers who are new to MongoDB, you will learn how to do the following:

  • Create a free hosted MongoDB database using MongoDB Atlas
  • Install PyMongo, the Python Driver
  • Connect to MongoDB
  • Explore MongoDB Collections and Documents
  • Perform basic Create, Retrieve, Update and Delete (CRUD) operations using PyMongo

Let’s get started!

You can start working immediately with MongoDB by using a free MongoDB cluster via MongoDB Atlas. MongoDB Atlas is a hosted database service that allows you to choose your database size and get a connection string! If you are interested in using the free tier follow the instructions in the Appendix section at the end of this article.

Install the Python Driver

For this article we will install the Python driver called, “PyMongo”.

Although there are other drivers written by the community, PyMongo is the official Python driver for MongoDB. For a detailed documentation on the driver check out the documentation here.

The easiest way to install the driver is through the pip package management system. Execute the following on a command line:

python -m pip install pymongo

Note: If you are using the Atlas M0 (Free Tier) cluster, you must use Python 2.7.9+ and use a Python 3.4 or newer. You can check which version of Python and PyMongo you have installed by issuing “python --version” and “pip list” commands respectively.

For variations of driver installation check out the complete documentation:

Once PyMongo is installed we can write our first application that will return information about the MongoDB server. In your Python development environment or from a text editor enter the following code.

Replace the “<>” with your connection string to MongoDB. Save this file as “mongodbtest.py” and run it from the command line via, “python mongodbtest.py”

An example output appears as follows:

{u'asserts': {u'msg': 0,
              u'regular': 0,
              u'rollovers': 0,
              u'user': 0,
              u'warning': 0},
 u'connections': {u'available': 96, u'current': 4, u'totalCreated': 174L},
 u'extra_info': {u'note': u'fields vary by platform', u'page_faults': 0},
 u'host': u'cluster0-shard-00-00-6czvq.mongodb.net:27017',
 u'localTime': datetime.datetime(2017, 4, 4, 0, 18, 45, 616000),
.
.
.
}

Note that the ‘u’ character comes from the python output and it means that the strings are stored in unicode. This example also uses the pprint library which is not related to MongoDB but is used here only to make the output structured and visually appealing from a console.

In this example we are connecting to our MongoDB instance and issuing the “db.serverStatus()” command (reference). This command returns information about our MongoDB instance and is used in this example as a way to execute a command against MongoDB.

If your application runs successfully, you are ready to continue!

Exploring Collections and Documents

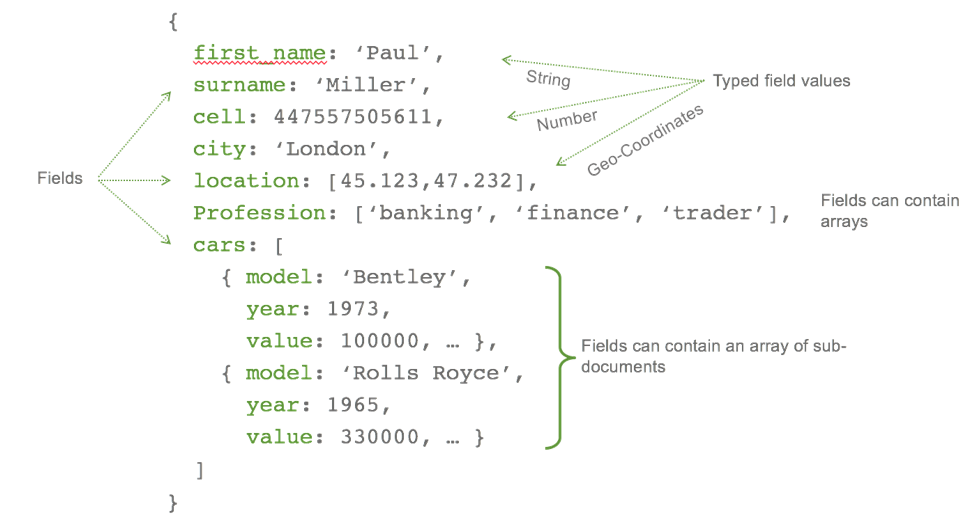
MongoDB stores data in documents. Documents are not like Microsoft Word or Adode PDF documents but rather JSON documents based on the JSON specification.
An example of a JSON document would be as follows:

JSON document example
Figure 1: Sample document

Notice that documents are not just key/value pairs but can include arrays and subdocuments. The data itself can be different data types like geospatial, decimal, and ISODate to name a few. Internally MongoDB stores a binary representation of JSON known as BSON. This allows MongoDB to provide data types like decimal that are not defined in the JSON specification. For more information on the BSON spec check out the following URL: http://bsonspec.org.

A collection in MongoDB is a container for documents. A database is the container for collections. This grouping is similar to relational databases and is pictured below:


Relational concept MongoDB equivalent
Database Database
Tables Collections
Rows Documents
Index Index

There are many advantages to storing data in documents. While a deeper discussion is out of the scope of this article, some of the advantages like dynamic, flexible schema, and the ability to store arrays can be seen from our simple Python scripts. For more information on MongoDB document structure take a look at the online documentation at the following URL: https://docs.mongodb.com/manual/core/document/.

Let’s take a look at how to perform basic CRUD operations on documents in MongoDB using PyMongo.

Performing basic CRUD operations using PyMongo

To establish a connection to MongoDB with PyMongo you use the MongoClient class.

from pymongo import MongoClient
client = MongoClient('<<MongoDB URL>>’)

The “<<MongoDB URL>>”is a placeholder for the connection string to MongoDB. See the connection string documentation for detail information on how to create your MongoDB connection string. If you are using Atlas for your MongoDB database, refer to the “testing your connection” section for more information on obtaining the connection string for MongoDB Atlas.

We can now create a database object referencing a new database, called “business”, as follows:

db = client.business

Once we create this object we can perform our CRUD operations. Since we want something useful to query let’s start by building a sample data generator application.

Generating sample data code example

Create a new file called createsamples.py using your development tool or command line text editor and copy the following code:

Be sure to change the MongoDB client connection URL to one that points to your MongoDB database instance. Once you run this application, 500 randomly named businesses with their corresponding ratings will be created in the MongoDB database called, “business”. All of these businesses are created in a single collection called, “reviews”. Notice that we do not have to explicitly create a database beforehand in order to use it. This is different from other databases that require statements like, “CREATE DATABASE” to be performed first.

The command that inserts data into MongoDB in this example is the insert_one() function. A bit self-explanatory, insert_one will insert one document into MongoDB. The result set will return the single ObjectID that was created. This is one of a few methods that insert data. If you wanted to insert multiple documents in one call you can use the insert_many function. In addition to an acknowledgement of the insertion, the result set for insert_many will include a list of the ObjectIDs that were created. For more information on insert_many see the documentation located here.

For details on the result set of insert_many check out this section of documentation as well.

We are now ready to explore querying and managing data in MongoDB using Python. To guide this exploration we will create another application that will manage our business reviews.

Exploring business review data

Now that we have a good set of data in our database let’s query for some results using PyMongo.

In MongoDB the find_one command is used to query for a single document much like select statements are used in relational databases. To use the find_one command in PyMongo we pass a Python dictionary that specifies the search criteria. For example, let’s find a single business with a review score of 5 by passing the dictionary, “{ ‘rating’ : 5 } “.

fivestar = db.reviews.find_one({'rating': 5})
print(fivestar)

The result will contain data similar to the following:

{u'rating': 5,
 u'_id': ObjectId('58e65383ea0b650c867ef195'),
 u'name': u'Fish Salty Corporation',
u'cuisine': u'Sushi Bar'}

Given we created 500 sample pieces of data there is more than one business with rating 5. The find_one method is just one in a series of find statements that support querying MongoDB data. Another statement, called “find”, will return a cursor over all documents that match the search criteria. These cursors also support methods like count() which returns the number of results in the query. To find the total count of businesses that are rated with a 5 we can use the count() method as follows:

fivestarcount = db.reviews.find({'rating': 5}).count()
print(fivestarcount)

Your results may vary since the data was randomly generated but in a test run the value of 103 was returned.

MongoDB can easily perform these straightforward queries. However, consider the scenario where you want to sum the occurrence of each rating across the entire data set. In MongoDB you could create 5 separate find queries, execute them and present the results, or you could simply issue a single query using the MongoDB aggregation pipeline as follows:

A deep dive into the aggregation framework is out of scope of this article, however, if you are interested in learning more about it check out the following URL: https://docs.mongodb.com/manual/aggregation/.

Updating data with PyMongo

Similar to insert_one and insert_many there exists functions to help you update your MongoDB data including update_one, update_many and replace_one. The update_one method will update a single document based on a query that matches a document. For example, let’s assume that our business review application now has the ability for users to “like” a business. To illustrate updating a document with this new “likes” field, let’s first take a look at what an existing document looks like from our previous application’s insertion into MongoDB. Next, let’s update the document and requery the document and see the change.

When running the sample code above you may see results similar to the following:

A sample document:
{'_id': ObjectId('58eba417ea0b6523b0fded4f'),
 'cuisine': 'Pizza',
 'name': 'Kitchen Goat Corporation',
 'rating': 1}

Number of documents modified : 1

The updated document:
{'_id': ObjectId('58eba417ea0b6523b0fded4f'),
 'cuisine': 'Pizza',
 'likes': 1,
 'name': 'Kitchen Goat Corporation',
 'rating': 1}

Notice that the original document did not have the “likes” field and an update allowed us to easily add the field to the document. This ability to dynamically add keys without the hassle of costly Alter_Table statements is the power of MongoDB’s flexible data model. It makes rapid application development a reality.

If you wanted to update all the fields of the document and keep the same ObjectID you will want to use the replace_one function. For more details on replace_one check out the pymongo documentation here.

The update functions also support an option called, “upsert”. With upsert you can tell MongoDB to create a new document if the document you are trying to update does not exist.

Deleting documents

Much like the other command discussed so far the delete_one and delete_many command takes a query that matches the document to delete as the first parameter. For example, if you wanted to delete all documents in the reviews collection where the category was “Bar Food” issue the following:

result = db.restaurants.delete_many({“category”: “Bar Food“})

If you are deleting a large number of documents it may be more efficient to drop the collection instead of deleting all the documents.

Where to go next

There are lots of options when it comes to learning about MongoDB and Python. MongoDB University is a great place to start and learn about administration, development and other topics such as analytics with MongoDB. One course in particular is MongoDB for Developers (Python). This course covers the topics of this article in much more depth including a discussion on the MongoDB aggregation framework. For more information go to the following URL: https://university.mongodb.com/courses/M101P/about

Appendix: Creating a free tier MongoDB Atlas database

MongoDB Atlas is a hosted database service that allows you to choose your database size and get a connection string! Follow the steps below to start using your free

Build your cluster for free

Follow the below steps to create a free MongoDB database:

  1. Go to the following URL: https://www.mongodb.com/cloud/atlas.
  2. Click the “Start Free” button
  3. Fill out the form to create an account. You will use this information to later login and manage your MongoDB.

Once you fill out the form, the website will create your account and you will be presented with the “Build Your New Cluster” pop up as shown in Figure 1.

"Build your new cluster"

To use the free tier scroll down and select, “M0”. When you do this the regions panel will be disabled. The free tier has some restrictions with the ability to select a region being one of them and your database size will be limited to 512MB of storage. Given that, when you are ready to use MongoDB for more than just some simple operations you can easily create another instance by choosing a size from the “Instance Size” list. Before you click “Confirm & Deploy” scroll down the page and notice the additional options shown in Figure 2.

Additional options in Build New Cluster dialog

From the “Build Your New Cluster” pop up you can see that there are other options available including choosing a 3, 5 or 7 node replica set and up to a 12 shard cluster. Note that the free tier does not allow you to chose anything more than the 3 node cluster, but if you move into other sizes these options will become available. At this point we are almost ready; the last thing to address is the admin username and password. You may also choose to have a random password generated for you by clicking the “Autogenerate Secure Password” button. Finally, click the “Confirm & Deploy” button to create your Atlas cluster. Setting up your IP Whitelist

While Atlas is creating your database you will need to define which IP’s are allowed access to your new database since MongoDB Atlas does not allow access from the internet by default. This list of granted IP addresses is called the “IP Whitelist”. To add the IP of your machine to this list click on the “Security” tab, then “IP Whitelist” then click the “+ ADD IP ADDRESS” button. This will pop up another dialog shown in Figure 3 below. You can click the “Add current IP Address” button to add your IP or provide a specific IP address or enable access to the world by not restricting IPs at all (not a fantastic idea but there in case you have no other choice and need to allow authentication from any IP).

Add whitelist entry

Once you have filled out this dialog click “Confirm” and this will update the firewall settings on your MongoDB Atlas cluster. Next, click on the “Clusters” tab and you should see your new MongoDB database ready for action!

"Cluster0" ready for action

Testing your connection

We want to make sure the MongoDB database is accessible from our development box before we start typing in code. A quick way to test is to make a connection using the Mongo Shell command line tool. Be sure to have your MongoDB connection information available. If you are using MongoDB Atlas you can obtain the connection information by clicking on the “Connect” button on the Clusters tab as shown in Figure 5.

Connect button of the MongoDB Atlas cluster

The Connect button will launch a dialog that provides connection information. At the bottom of this dialog you will see a prepared command line ready for you to simply copy and paste in a command prompt.

Connect with Mongo Shell section of the Connect dialog

Note that if you copy the connection text as-is you will have to replace with the password for the admin user, and with the name of the database to which you wish to connect.

The command text that comes from this dialog is lengthy. For clarity, let’s take a look at each of the parameters individually.

mongo
"mongodb://cluster0-shard-00-00-2ldwo.mongodb.net:27017,cluster0-shard-00-01-2ldwo.mongodb.net:27017,cluster0-shard-00-02-2ldwo.mongodb.net:27017/test?replicaSet=Cluster0-shard-0"
 --authenticationDatabase admin
--ssl
--username myadmin
--password S$meComPLeX1!

The first parameter is a string containing the list of all the nodes in our cluster including the definition of a replica set called, “Cluster0-shard-0”. The next parameter, “--authenticationDatabase” tells which database contains the user we want to authenticate. The “--ssl” forces the connection to be encrypted via SSL/TLS protocol. Finally we provide the username and password, and we are connected! Note that if you are not using MongoDB Atlas, your MongoDB deployment may not have security enabled or require SSL. Thus, connecting to it could be as simple as typing “mongo” in the command prompt.

You are now ready to use MongoDB!


If you're interested in learning everything you need to know to get started building a MongoDB-based app you can sign up for one of our free online MongoDB University courses.


How to Query Your Backup with MongoDB Atlas

$
0
0

Backups for MongoDB made easy

Ever accidentally drop something out of a database and realize that you aren't sure if it's in your backups? Need to compare data across different points in time? Or ever want to just look at a subset of your historical data without restoring your entire database? Queryable backup, provided in MongoDB Atlas, can help you address some of these challenges.

Backs up for MongoDB

Select Your Snapshot

If you've already enabled backup services when you created your cluster, you can go ahead and begin. If not, you can go to the Configuration section of your MongoDB Atlas interface and enable BACKUPS it at any time via the toggle switch.

Enable Backup

To get started, you can log into your MongoDB Atlas panel and the "Backup" icon on the left side of your screen. Once you've reached the backup section, you'll find an ellipsis ("...") dropdown menu with some options – select the "Query" option.

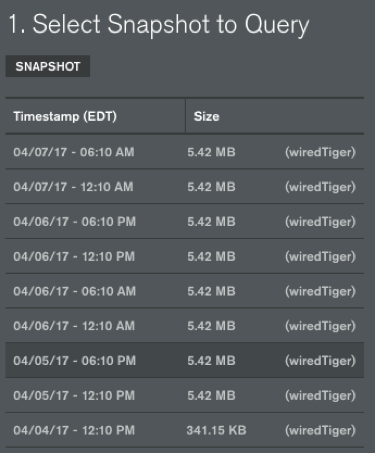
Select snapshot to query

After you select Query from this menu, you're given the option to select a specific snapshot in your archive. Select the time frame you'd like to query, then click NEXT.

You'll see a "Query a Snapshot" pane. MongoDB Atlas creates a virtual cluster with your backup snapshot. The virtual cluster provides you with the ability to query data much like you would any other MongoDB cluster using the mongo shell.

Open The Secure Tunnel

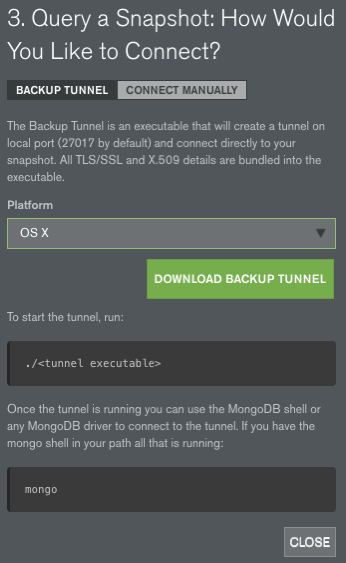
The connection to your snapshot will be over TLS/SSL and use an X.509 client certificate for authentication. You have the option of using a secure tunnel binary provided by our team or downloading the required certificates. In this example, we'll use the secure tunnel binary, which is available for Windows, Linux, and MacOS. A simple binary is downloaded when you request a backup query. This tunnel binary establishes a network connection to port 27017, directly to the snapshot you selected earlier.

Query a snapshot

I'll select OSX and then click "DOWNLOAD BACKUP TUNNEL" which will prompt me for a two factor password authentication request. This is to ensure those who are accessing your backup data are authorized.

Once the download has completed, decompress it with a double click or via the tar command.

Execute the tunnel to establish our connection like this:

bash-3.2$ ./tunnel-58e3eb6a3b34b96d5cd4b3e5
2017/04/04 15:09:49 Starting queryable backup tunnel v1.0.0.100 (9a817429f7e870b42e22e709148f650026a6b572)
2017/04/04 15:09:49 Listening on localhost:27017'

Access Your Backup

Now that a tunnel to our backup snapshot has been established, it's possible now to connect via the mongo shell.

Access your backup

Open a new terminal window, ensuring you leave the existing connection for your tunnel online. Now you can access your backups using the mongo shell:

bash-3.2$ mongo
MongoDB shell version v3.4.3
connecting to: mongodb://127.0.0.1:27017
MongoDB server version: 3.4.3
MongoDB Enterprise > show databases
admin  0.000GB
zips   0.002GB
zips1  0.002GB
zips2  0.002GB
MongoDB Enterprise > use zips
switched to db zips
MongoDB Enterprise > db.zips.find()
{ "_id" : "01001", "city" : "AGAWAM", "loc" : [ -72.622739, 42.070206 ], "pop" : 15338, "state" : "MA" }
{ "_id" : "01002", "city" : "CUSHMAN", "loc" : [ -72.51565, 42.377017 ], "pop" : 36963, "state" : "MA" }
{ "_id" : "01005", "city" : "BARRE", "loc" : [ -72.108354, 42.409698 ], "pop" : 4546, "state" : "MA" }

Close the Tunnel

When you're done with your backup queries, just exit the session and terminate the binary for the tunnel with a control-c or via killing the PID. You can determine the PID and kill on Linux or MacOS with the following command :

bash-3.2$ ps auxww |egrep tunnel
jaygordon        35312   0.0  0.0 145190748   6580 s001  S+   12:17PM   0:00.14 /Users/jaygordon/Downloads/tunnel-58e7b6f9d383ad2a1bbf2dbb/tunnel-58e7b6f9d383ad2a1bbf2dbb
bash-3.2$ kill -9 35312

Your MongoDB Atlas backup query session will last for 48 hours and then will close on its own.

Conclusion

Queryable backups are a huge time saver. Imagine wanting to inspect just a single document in a 2TB collection backup.The time associated with downloading the snapshot, decompressing it, getting it running in a local MongoDB node, and finally running the query would be significant. Not only that, but there are obvious nontrivial costs – both monetary and operational – associated with having to quickly spin up new environments. With MongoDB Atlas, there’s no extra time spent provisioning hardware to retrieve your backup data – you simply run the query and get back to coding!

Get started on the Atlas free tier

Deep Learning and the Artificial Intelligence Revolution: Part 1

$
0
0

Deep learning and Artificial Intelligence (AI) have moved well beyond science fiction into the cutting edge of internet and enterprise computing.

Access to more computational power in the cloud, advancement of sophisticated algorithms, and the availability of funding are unlocking new possibilities unimaginable just five years ago. But it’s the availability of new, rich data sources that is making deep learning real.

In this 4-part blog series, we are going to explore deep learning, and the role database selection plays in successfully applying deep learning to business problems:

  • In part 1 today we will look at the history of AI, and why it is taking off now
  • In part 2, we will discuss the differences between AI, Machine Learning, and Deep Learning
  • In part 3, we’ll dive deeper into deep learning and evaluate key considerations when selecting a database for new projects We’ll wrap up in part 4 with a discussion on why MongoDB is being used for deep learning, and provide examples of where it is being used

If you want to get started right now, download the complete Deep Learning and Artificial Intelligence white paper.

The History of Artificial Intelligence

We are living in an era where artificial intelligence (AI) has started to scratch the surface of its true potential. Not only does AI create the possibility of disrupting industries and transforming the workplace, but it can also address some of society’s biggest challenges. Autonomous vehicles may save tens of thousands of lives, and increase mobility for the elderly and the disabled. Precision medicine may unlock tailored individual treatment that extends life. Smart buildings may help reduce carbon emissions and save energy. These are just a few of the potential benefits that AI promises, and is starting to deliver upon.

By 2018, Gartner estimates that machines will author 20% of all business content, and an expected 6 billion IoT-connected devices will be generating a deluge of data. AI will be essential to make sense of it all. No longer is AI confined to science fiction movies; artificial intelligence and machine learning are finding real world applicability and adoption.

Artificial intelligence has been a dream for many ever since Alan Turing wrote his seminal 1950 paper “Computing Machinery and Intelligence”. In Turing’s paper, he asked the fundamental question, “Can Machines Think?” and contemplated the concept of whether computers could communicate like humans. The birth of the AI field really started in the summer of 1956, when a group of researchers came together at Dartmouth College to initiate a series of research projects aimed at programming computers to behave like humans. It was at Dartmouth where the term “artificial intelligence” was first coined, and concepts from the conference crystallized to form a legitimate interdisciplinary research area.

Over the next decade, progress in AI experienced boom and bust cycles as advances with new algorithms were constrained by the limitations of contemporary technologies. In 1968, the science fiction film 2001: A Space Odyssey helped AI leave an indelible impression in mainstream consciousness when a sentient computer – HAL 9000 – uttered the famous line, “I’m sorry Dave, I’m afraid I can’t do that.” In the late 1970s, Star Wars further cemented AI in mainstream culture when a duo of artificially intelligent robots (C-3PO and R2-D2) helped save the galaxy.

But it wasn’t until the late 1990s that AI began to transition from science fiction lore into real world applicability. Beginning in 1997 with IBM’s Deep Blue chess program beating then current world champion Garry Kasparov, the late 1990s ushered in a new era of AI in which progress started to accelerate. Researchers began to focus on sub-problems of AI and harness it to solve real world applications such as image recognition and speech. Instead of trying to structure logical rules determined by the knowledge of experts, researchers started to work on how algorithms could learn the logical rules themselves. This trend helped to shift research focus into Artificial Neural Networks (ANNs). First conceptualized in the 1940s, ANNs were invented to “loosely” mimic how the human brain learns. ANNs experienced a resurgence in popularity in 1986 when the concept of backpropagation gradient descent was improved. The backpropagation method reduced the huge number of permutations needed in an ANN, and thus was a more efficient way to reduce AI training time.

Even with advances in new algorithms, neural networks still suffered from limitations with technology that had plagued their adoption over the previous decades. It wasn’t until the mid 2000s that another wave of progress in AI started to take form. In 2006, Geoffrey Hinton of the University of Toronto made a modification to ANNs, which he called deep learning (deep neural networks). Hinton added multiple layers to ANNs and mathematically optimized the results from each layer so that learning accumulated faster up the stack of layers. In 2012, Andrew Ng of Stanford University took deep learning a step further when he built a crude implementation of deep neural networks using Graphical Processing Units (GPUs). Since GPUs have a massively parallel architecture that consist of thousands of cores designed to handle multiple tasks simultaneously, Ng found that a cluster of GPUs could train a deep learning model much faster than general purpose CPUs. Rather than take weeks to generate a model with traditional CPUs, he was able to perform the same task in a day with GPUs.

Essentially, this convergence – advances in software algorithms combined with highly performant hardware – had been brewing for decades, and would usher in the rapid progress AI is currently experiencing.

Why Is AI Taking Off Now?

There are four main factors driving the adoption of AI today:

More Data. AI needs a huge amount of data to learn, and the digitization of society is providing the available raw material to fuel its advances. Big data from sources such as Internet of Things (IoT) sensors, social and mobile computing, science and academia, healthcare, and many more new applications generate data that can be used to train AI models. Not surprisingly, the companies investing most in AI – Amazon, Apple, Baidu, Google, Microsoft, Facebook – are the ones with the most data.

Cheaper Computation. In the past, even as AI algorithms improved, hardware remained a constraining factor. Recent advances in hardware and new computational models, particularly around GPUs, have accelerated the adoption of AI. GPUs gained popularity in the AI community for their ability to handle a high degree of parallel operations and perform matrix multiplications in an efficient manner – both are necessary for the iterative nature of deep learning algorithms. Subsequently, CPUs have also made advances for AI applications. Recently, Intel added new deep learning instructions to its Xeon and Xeon Phi processors to allow for better parallelization and more efficient matrix computation. This is coupled with improved tools and software frameworks from it’s software development libraries. With the adoption of AI, hardware vendors now also have the chip demand to justify and amortize the large capital costs required to develop, design, and manufacture products exclusively tailored for AI. These advancements result in better hardware designs, performance, and power usage profiles.

More Sophisticated Algorithms. Higher performance and less expensive compute also enable researchers to develop and train more advanced algorithms because they aren’t limited by the hardware constraints of the past. As a result, deep learning is now solving specific problems (e.g., speech recognition, image classification, handwriting recognition, fraud detection) with astonishing accuracy, and more advanced algorithms continue to advance the state of the art in AI.

Broader Investment. Over the past decades, AI research and development was primarily limited to universities and research institutions. Lack of funding combined with the sheer difficulty of the problems associated with AI resulted in minimal progress. Today, AI investment is no longer confined to university laboratories, but is pervasive in many areas – government, venture capital-backed startups, internet giants, and large enterprises across every industry sector.

Wrapping Up Part 1

That wraps up the first part of our 4-part blog series. In Part 2, we discuss the differences between AI, Machine Learning, and Deep Learning

Remember, if you want to get started right now, download the complete Deep Learning and Artificial Intelligence white paper.

Secure Your MongoDB Database on the AWS Cloud

$
0
0
MongoDB Atlas Secure & Safe

Say you’ve just built your application and for the data layer, you’ve chosen to deploy MongoDB on AWS EC2 instances that you will manage yourself. Pause for a moment and consider your self-managed MongoDB instances over the lifetime of your application. Now ask yourself these questions:

  • Who will keep our database operating system up to date?
  • Who will ensure the database software is recent?
  • Who is supposed to configure network security for the database?
  • Who will buy, install, maintain and rotate our SSL certificates?
  • Who will ensure user accounts are properly managed over time?
  • Who will encrypt our data at rest?

If you don't really have answers for these questions, or, if your answer for these questions points to just one person, maybe it's time to consider a service that will do all of these things for you. When we approached the task of building MongoDB Atlas, our database as a service, our engineers made security a top priority. By hosting your data in the cloud with MongoDB Atlas, you can leverage the security best practices that are part of MongoDB Atlas.

Let's talk individually about the security features built into the MongoDB Atlas service.

Access Control, Always.

MongoDB Atlas has username and password based authorization and authentication enabled, always. MongoDB Atlas makes use of SCRAM-SHA-1 as it's default authentication mechanism, which is part of the MongoDB database core. It follows the IETF standard, RFC 5802, that defines best practice methods for implementation of challenge-response mechanisms for authenticating users with passwords.

You can use a variety of predefined user roles such as "Atlas admin" which is essentially a full rights, administration user, "Read and write to any database", which permits no administrative rights, or "Only read any database", which allows you read-only access.

Add new user

You also have the ability to define permissions for any specific user, i.e. : 1) what databases they can access and 2) what they’re authorized to do. I am creating a custom user account named "mdbuser" that can only perform reads and writes to one database, named "MyData”.

TLS/SSL Encryption by Default

MongoDB Atlas utilizes TLS/SSL to encrypt connections to your database. You can trust your data will be transmitted from endpoint to endpoint without concern thanks to this default configuration. All connections to your database, either from your shell or from your app, are encrypted using the TLS/SSL. All replication connections from your primary replica set member to your secondary MongoDB nodes in your cluster are also protected

Disk Encryption

MongoDB Atlas clusters on AWS make use of the General Purpose SSD (gp2) EBS volumes, which include support for AES-256 encryption. MongoDB Atlas makes encrypting your data at rest simple by allowing you to just point and click from the management GUI to encrypt your persistent storage

MongoDB Atlas GUI

You can select disk encryption either at creation time, or just go to the configuration section of your cluster and add it later.

Secure from the network

Password authentication and authorization are important controls, but it's difficult to compromise a database if you cannot connect to it at all.

By default, all MongoDB Atlas databases have no IP address entries permitted in the security whitelist. This means the database will never simply listen to the internet without a password. To permit our application to connect to our data, we can specify inbound network connections via our IP whitelist.

MongoDB Atlas secure network

You can add IPs via the control panel as shown above, or modify entries using the Atlas API.

VPC Peering

If you are using Amazon Web Services, you can peer your VPC (Virtual Private Cloud) where your AWS resources live to your MongoDB Atlas cluster VPC. This permits you to further reduce your risk profile by only permitting access to your data from private IP addresses on the AWS network, or via your security groups.

You can use native security group names from AWS or simply enter the CIDR annotation of the servers in your VPC you would like to connect to your Atlas cluster. For a full tutorial on how to implement VPC peering with your Atlas cluster, you can review this YouTube video, along with many other tutorials on using MongoDB Atlas features.

Automated Updates

MongoDB Atlas will always be running with the latest security fixes for your MongoDB database cluster. Updates and minor version database upgrades to your cluster are performed by us with no manual intervention from you, and no downtime. It’s all handled via automation agents, which report back to our engineers if any issues occur during the upgrade process, allowing our team of experts to monitor, review, and quickly rectify any potential problems.

MongoDB Atlas Automated Updates

Information on deployed upgrades to your cluster can be found by going to the "Activity Log" on your MongoDB Atlas Cluster in the Alerts section of the management GUI.

End to End Security in the Cloud

MongoDB offers some of the most sophisticated security controls of any modern database. MongoDB Atlas makes it simpler to reduce risk by having these controls built in and available to any cloud deployment. This approach allows you to concentrate on code, and spend less time managing security protection.


For more information, check out our downloadable guide on MongoDB Atlas security controls.

Restoring MongoDB Atlas Database Backups in AWS

$
0
0

MongoDB Atlas

DBAs, DevOps or Sys Admin professionals spend valuable time writing scripts for managing database backups. Whether a combination of common tools such as rsync or native dump scripts, database backups tend to be tricky from the OS level. Then there are options to do things such as snapshots of the disk, but is the database currently in the middle of a write when this snapshot happens? Do you have a RAID for your volumes that is frozen when you do such a snapshot?

What about commercially licensed enterprise backup software if you aren't certain how to leverage one of the other options mentioned? Are you spending on both your software license costs and the physical storage to retain these backups? There could be options for you, but think about the cost associated with the hardware you may need, the software licensing, then the monitoring associated with ensuring the backups actually happened.

Does your database in the cloud right now have a recovery time objective? Does your database in the cloud right now have recovery point objective? These are business critical processes to consider if you need a sustainable continuity plan during any data layer failure A cohesive backup strategy is directly connected to the existence of some businesses.

Several months back a large open source provider ran into an issue with database backups. The issue wasn't just that the backups weren't there, it was also that no one noticed the backups didn't work during a restore. This leads me to the next question: who do you trust to ensure that the vital application data will be easily restored in the case of a failure?

MongoDB Atlas backups consistently provide you with point in time recovery of your MongoDB data. There's no human intervention, just access your backups in the Atlas control panel and start working with your recovery data. We provide you with the ability to query one of the snapshots available to you to ensure that the data you're looking for exists prior to restoring it.

Let's go over how simple it is for you to either restore data to a new Atlas cluster, an existing cluster or even to your local computer.

Restore to a new cluster

If you decide you'd like another Atlas cluster with your MongoDB data it only takes a few clicks. First, build your new Atlas cluster and name it something unique. Then go to the backup section in your Atlas control panel and select the backup you'd like to restore. It's important to ensure you restore to a like version cluster. That means restore MongoDB 3.2 database snapshots to MongoDB Atlas 3.2 clusters. The same goes for all MongoDB 3.4 clusters. You will not be able to mix and match versions of backup and cluster.

Cluster0-shard-0 is the name of my original cluster, I can go to the backups for this and select my snapshot or point in time backup I would like to restore. Once I finish selecting a snapshot, I click "NEXT" in the bottom of the restore menu.

Section 2 of the restore process asks, "Do you want to restore this snapshot to a MongoDB cluster or download a copy of your data?" In this case I want to restore to a cluster, but I want to restore it to a new one. So first, I'll click "RESTORE MY SNAPSHOT" at the bottom of the window. I'll be brought to Section 3 of the restore process that will ask which replica set I want to restore to. I created "Cluster0-restore" just for this purpose, so I'll click the dropdown and select this cluster.

Choose replica set

Once I click the restore button, the Atlas agents will begin to copy the contents of the snapshot over to your Atlas cluster. Once completed it will ensure that all three nodes have replication working as normal.

Or restore to the same cluster

You do not have to restore to a new cluster. If the current production database requires a restore, you can select it as the restore target.

Your cluster will restore the data to one cluster node at a time and ensure replication continues to work once the restore process is done. There's no need for you to modify the application's connection string either. You can just wait for the process to finish and get your app back to work.

Additionally, you can select an HTTPS based download of the snapshot if you would like to work with this data locally or even to place in a cold storage location. Regardless of your restore method, you'll know that the data will be there if you use MongoDB Atlas backups.

Get started with MongoDB Atlas today, you can migrate easily using our live migration tool and ensure your data is always backed up!

Deep Learning and the Artificial Intelligence Revolution: Part 2

$
0
0

Welcome to part 2 of our 4-part blog series.

  • In part 1 we looked at the history of AI, and why it is taking off now
  • In today’s part 2, we will discuss the differences between AI, Machine Learning, and Deep Learning
  • In part 3, we’ll dive deeper into deep learning and evaluate key considerations when selecting a database for new projects We’ll wrap up in part 4 with a discussion on why MongoDB is being used for deep learning, and provide examples of where it is being used

If you want to get started right now, download the complete Deep Learning and Artificial Intelligence white paper.

Differences Between Artificial Intelligence, Machine Learning, and Deep Learning

In many contexts, artificial intelligence, machine learning and deep learning are used interchangeably, but in reality, machine and deep learning is a subset of AI. We can think of AI as the branch of computer science focused on building machines capable of intelligent behaviour, while machine and deep learning is the practice of using algorithms to sift through data, learn from the data, and make predictions or take autonomous actions. Therefore, instead of programming specific constraints for an algorithm to follow, the algorithm is trained using large amounts of data to give it the ability to independently learn, reason, and perform a specific task.

Figure 1: Timeline of Artificial Intelligence, Machine Learning, and Deep Learning

So what’s the difference between machine learning and deep learning? Before defining deep learning – which we’ll do in part 3, let’s dig deeper into machine learning.

Machine Learning: Supervised vs. Unsupervised

There are two main classes of machine learning approaches: supervised learning and unsupervised learning.

Supervised Learning. Currently, supervised learning is the most common type of machine learning algorithm. With supervised learning, the algorithm takes input data manually labeled by developers and analysts, using it to train the model and generate predictions. Supervised learning can be delineated into two groups: regression and classification problems.

Figure 2: Supervised Regression Example

Figure 2 demonstrates a simple regression problem. Here, there are two inputs, or features (square feet and price), that are used to generate a curve fitting line and make subsequent predictions of property price.

Figure 3: Supervised Classification Example

Figure 3 is an example of a supervised classification example. The dataset is labeled with benign and malignant tumors for breast cancer patients. The supervised classification algorithm will attempt to segment tumors into two different classifications by fitting a straight line through the data. Future data can then be classified as benign or malignant based on the straight-line classification. Classification problems result in discrete outputs, though that does not necessarily constrain the number of outputs to a fixed set. Figure 3 has only two discrete outputs, but there could be many more classifications (benign, Type 1 malignant, Type 2 malignant, etc.)

Unsupervised Learning. In our supervised learning example, labeled datasets (benign or malignant classifications) help the algorithm determine what the correct answer is. With unsupervised learning, we give the algorithm an unlabeled dataset and depend on the algorithm to uncover structures and patterns in the data.

Figure 4: Unsupervised Learning Example

In Figure 4, there is no information about what each data point represents, and so the algorithm is asked to find structure in the data independently of any supervision. Here, the unsupervised learning algorithm might determine there are two distinct clusters and make a straight-line classification between the clusters. Unsupervised learning is broadly applied in many use cases such as Google News, social network analysis, market segmentation, and astronomical analysis around galaxy formations.

Wrapping Up Part 2

That wraps up the second part of our 4-part blog series. In Part 3, we’ll dive deeper into deep learning and evaluate key considerations when selecting a database for new projects

Remember, if you want to get started right now, download the complete Deep Learning and Artificial Intelligence white paper.

DevOps Automation with MongoDB Atlas

$
0
0

Configuration Management

Configuration management tools such as Puppet, Chef and Ansible, which provide the ability to quickly automate config and deployment processes, have become a critical part of many engineering teams’ plans when building new systems. Implementing an additional cloud service should fit alongside the configuration management methods you already use. Luckily, the MongoDB Atlas API provides you with the ability to programmatically launch MongoDB clusters with your pre-existing toolset, ensuring a repeatable and reliable method that can be customized to your needs.

MongoDB Atlas API

The Atlas API follows the principles of the REST architectural style and exposes a number of internal resources which enable programmatic access to Atlas features. Instead of writing additional code for the aforementioned tools, you can call upon this HTTPS API with instructions for the MongoDB cluster you would like to use and a secure key for authentication. If you follow the documentation of your configuration management tool, you should be able to leverage a similar method to submit an HTTPS POST to launch a MongoDB Atlas Cluster.

Configure API Access

To use the MongoDB Atlas API from your configuration management tool, you'll first need to configure API access. This ensures a secure connection is always available between your configuration management server and the MongoDB API. Our documentation also shows you how to generate your API key and specify a whitelist of IP addresses that are permitted to modify your MongoDB Atlas clusters via your API key.

As shown in the screenshot above, MongoDB Atlas grants you to the ability to disable or delete API keys as needed; you can also easily see when your API keys were last used.

Cluster Attributes

Let's build our MongoDB Atlas M30 cluster named DataStore with 40 GB of disk, backups enabled, IOPS of 120, and 3 replica set members in total.
Items required for launching:

  • JSON file atlas.json
    {
    "name" : "DataStore",
    "numShards" : 1,
    "replicationFactor" : 3,
    "providerSettings" : {
     "providerName" : "AWS",
     "regionName" : "US_EAST_1",
     "instanceSizeName" : "M30",
     "diskIOPS" : 120,
     "encryptEBSVolume" : false
    },
    "diskSizeGB" : 40,
    "backupEnabled" : true
    }
    
    • My API Key
    • My Atlas account username (jay.gordon)
    • My Group ID (Found by going to Settings -> Group Settings at the top of the screen)
    • My AWS server with SSH key to permit ansible to log in
    • An ansible "hosts" file with our inventory

In this example I’ll use a simple curl from my local computer. I provided the API with some basic info:

bash-3.2$ curl -i -u "jay.gordon:$APIKEY" --digest -H "Content-Type: application/json" -X POST
 "https://cloud.mongodb.com/api/atlas/v1.0/groups/575ece95e4b0ec4f28db42ca/clusters" --data @atlas.json

In this situation, I've used a standard HTTPS curl POST with my JSON payload containing the settings I want for my cluster.

Launch a MongoDB Atlas Cluster with Ansible

Ansible allows you to execute complex playbooks from your local desktop computer; we’ll use it in this example to launch our MongoDB Atlas cluster.

The Ansible uri module can be used to interact with the MongoDB HTTPS API along with the created secure key.

The Ansible documentation for uri provides an example on how to generate a new JIRA ticket via HTTPS post:

- name: Create a JIRA issue
  uri:
    url: https://your.jira.example.com/rest/api/2/issue/
    method: POST
    user: your_username
    password: your_pass
    body: "{{ lookup('file','issue.json') }}"
    force_basic_auth: yes
    status_code: 201
    body_format: json

This is exactly the same kind of method we can with the MongoDB Atlas API to easily build a small playbook for any new Atlas Clusters we need.

- hosts: webapp
  vars:
    user: ENTER-MONGODB-ATLAS-USERNAME-HERE
    apikey: ENTER-SECRET-API-KEY-HERE
    groupid: ENTER-GROUPID-HERE
  remote_user: ec2-user
  become: true
  tasks:
    - name: pip httplib2
    # ansible uri module requires httplib2
      pip: name=httplib2 extra_args="--user"
    - name: setup atlas
      uri:
        url: https://cloud.mongodb.com/api/atlas/v1.0/groups/{{ groupid }}/clusters/
        method: POST
        user: "{{ user }}"
        password: "{{ apikey }}"
        body: "{{ lookup('file','atlas.json') }}"
        body_format: json
        HEADER_Content-Type: "application/json"
        status_code: 201

I've created a basic playbook which will do the following:

  1. Permit you to log into your AWS instance and install httpdlib2, a required library on our Amazon Linux server to use the uri feature in Ansible.
  2. It will gather the attributes for our requested cluster from the atlas.json file and send the payload in JSON format to the API
  3. It will begin building the cluster within your account

To execute the command and begin launching your cluster, you can do the following from your command line terminal window:

ansible-playbook -v create-atlas.yml

This will begin the process of installing the required software and making the API call to launch your Atlas cluster. Ansible will notify you that the process is completed by giving you a green "201" status code.

In the example I provided below, we can see the output from the API confirming our requirements:

TASK [setup atlas]
*************************************************************
ok: [34.206.142.222] => {"changed": false, "content_length": "510", "content_type": "application/json", "date": "Wed, 19 Apr 2017 13:15:03 GMT", "json": {"backupEnabled": true, "diskSizeGB": 40.0, "groupId": "588b776f96e82110b163ed93", "links": [{"href": "https://cloud.mongodb.com/api/atlas/v1.0/groups/588b776f96e82110b163ed93/clusters/DataStore1", "rel": "self"}], "mongoDBMajorVersion": "3.2", "mongoDBVersion": "3.2.12", "mongoURIUpdated": "2017-04-19T13:15:03Z", "name": "DataStore1", "numShards": 1, "providerSettings": {"diskIOPS": 120, "encryptEBSVolume": false, "instanceSizeName": "M30", "providerName": "AWS", "regionName": "US_EAST_1"}, "replicationFactor": 3, "stateName": "CREATING"}, "redirected": false, "status": 201, "strict_transport_security": "max-age=300"}
PLAY RECAP
 *********************************************************************
34.206.142.222             : ok=3    changed=0    unreachable=0    failed=0

Once the process of creating your cluster is completed, you can add the connection string to your application and begin working with your database.

Get Started Today

Thanks to the MongoDB Atlas API and Ansible, we've avoided having to write additional code to build our three node replica set. You can start working today by going to this github and cloning the basic playbook I used in this example— simply insert these details into your existing Ansible playbook or build a brand new one.

Leaf in the Wild: Qumram Migrates to MongoDB to Deliver Single Customer View for Regulatory Compliance & Customer Experience

$
0
0

Every financial services organization is tasked with two, often conflicting, priorities:

  1. The need for rapid digital transformation
  2. Implementing compliance controls that go beyond internal systems, extending all the way to their digital borders.

However, capturing and analyzing billions of customer interactions in real time across web, social, and mobile channels is a major data engineering challenge. Qumram solves that challenge with its Q-Suite portfolio of on-premise and cloud services.

Qumram’s software is used by the most heavily regulated industries in the world to help organizations capture every moment of the customer’s journey. Every keystroke, every mouse movement, and every button click, across all digital channels. Then store it for years. As you can imagine this generates an extraordinary volume and variety of data. Some Qumram customers ingest and store multiple terabytes of this sensitive data every day.

Starting out with relational databases, Qumram quickly hit the scalability wall. After extensive evaluation of alternatives, the company selected MongoDB to provide a single source of truth for all customer interactions across any digital channel.

I met with Simon Scheurer, CTO of Qumram AG, to learn more.

Can you start by telling us a little bit about your company?

Qumram provides a single view of all customer interactions across an organization’s digital channels, helping our customers to ensure compliance, prevent fraud, and enrich the experience they deliver to their users. Our unique session recording, replay, and web archival solution captures every user interaction across web, mobile, and social channels. This means that any user session can be replayed at a moment’s notice, in a movie-like form, giving an exact replica of the activity that occurred, when, and for how long. It’s pretty rare to provide a solution that meets the needs of compliance and risk officers while also empowering marketing teams – but that is what our customers can do with Q-Suite, built on modern technologies like MongoDB.

Q-suite Figure 1: Q-Suite recording of all digital interactions for regulatory compliance

Most of our customers operate in the highly regulated financial services industry, providing banking and insurance services. Qumram customers include UBS, Basler Kantonalbank, Luzerner Kantonalbank, Russell Investments, and Suva.

How are you using MongoDB?

Our solution provides indisputable evidence of all digital interactions, in accordance with the global regulatory requirements of SEC, US Department of Labor (DOL), FTC, FINRA, ESMA, MiFID II, FFSA, and more. Qumram also enables fraud detection, and customer experience analysis that is used to enhance the customer journey through online systems – increasing conversions and growing sales.

Because of the critical nature of regulatory compliance, we cannot afford to lose a single user session or interaction – unlike competitors, our system provides lossless data collection for compliance-mandated recording.

We use MongoDB to ingest, store, and analyze the firehose of data generated by user interactions across our customer’s digital properties. This includes session metadata, and the thousands of events that are generated per session, for example, every mouse click, button selection, keystroke, and swipe. MongoDB stores events of all sizes, from those that are contained in small documents typically just 100-200 bytes, through to session and web objects that can grow to several megabytes each. We also use GridFS to store binary content such as screenshots, CSS, and HTML.

Capturing and storing all of the session data in a single database, rather than splitting content across a database and separate file system massively simplifies our application development and operations. With this design, MongoDB provides a single source of truth, enabling any session to be replayed and analyzed on-demand.

You started out with a relational database. What were the challenges you faced there?

We initially built our products on one of the popular relational databases, but we quickly concluded that there was no way to scale the database to support billions of sessions every year, with each session generating thousands of discrete events. Also, as digital channels grew, our data structures evolved to become richer and more complex. These structures were difficult to map into the rigid row and column format of a relational schema. So in Autumn 2014, we started to explore non-relational databases as an alternative.

What databases did you look at?

There was no shortage of choice, but we narrowed our evaluation down to Apache Cassandra, Couchbase, and MongoDB.

What drove your decision to select MongoDB? We wanted a database that would enable us to break free of the constraints imposed by relational databases. We were also looking for a technology that was best-in-class among modern alternatives. There were three drivers for selecting MongoDB:

  1. Flexible data model with rich analytics Session data is richly structured – there may be up to four levels of nesting and over 100 different attributes. These complex structures map well to JSON documents, allowing us to embed all related data into a single document, providing us two advantages:

    1. Boosting developer productivity by representing data in the same structure as objects in our application code.
    2. Making our application faster as we only need issue a single query to the database to replay a session. At the same time, we need to be able to analyze the data in position, without the latency of moving it to an analytics cluster. MongoDB’s rich query language and secondary indexes allow us to access data by single keys, ranges, full text search, graph traversals, and geospatial queries, through to complex aggregations.
  2. Scalability The ability to grow seamlessly by scaling the database horizontally across commodity servers deployed on-premise and in the cloud, while at the same time maintaining data consistency and integrity.

  3. Proven We surveyed customers across our target markets, and the overwhelming feedback was that they wanted us to use a database they were already familiar with. Many global financial institutions had already deployed MongoDB and didn’t want to handle the complexity that came from running yet another database for our application. They knew MongoDB could meet the critical needs of regulatory compliant services, and that it was backed by excellent technical support, coupled with extensive management tools and rock-solid security controls.

As a result, we began development on MongoDB in early 2015.

How do your customers deploy and integrate your solution?

We offer two deployment models: on-premise and as a cloud service.

Many of the larger financial institutions deploy the Q-Suite with MongoDB within their own data centers, due to data sensitivity. From our application, they can instantly replay customer sessions. We also expose the session data from MongoDB with a REST API, which allows them to integrate it with their back-office processes, such as records management systems and CRM suites, often using message queues such as Apache Kafka.

We are also rolling out the Q-Suite as a “Compliance-as-a-Service” offering in the cloud. This option is typically used by smaller banks and insurers, as well the FinTech community.

How do you handle analytics against the collected session data?

Our application relies heavily on the MongoDB aggregation pipeline for native, in-database analytics, allowing us to roll-up session data for analysis and reporting. We use the new$graphLookup operator for graph processing of the session data, identifying complex relationships between events, users, and devices. For example, we can detect if a user keeps returning to a loan application form to adjust salary in order to secure a loan that is beyond his or her capability to repay. Using MongoDB’s in-built text search along with geospatial indexes and queries, we can explore session data to generate behavioral insights and actionable fraud intelligence.

Doing all of this within MongoDB, rather than having to couple the database with separate search engines, graph data stores, and geospatial engines dramatically simplifies development and ongoing operations. It means our developers have a single API to program against, and operations teams have a single database to deploy, scale, and secure.

I understand you are also using Apache Spark. Can you tell us a little more about that?

We use the MongoDB Connector for Apache Spark to feed session data from the database into Spark processes for machine learning, and then persist the models back into MongoDB. We use Spark to generate user behavior analytics that are applied to both fraud detection, and for optimization of customer experience across digital channels.

We are also starting to use Spark with MongoDB for Natural Language Processing (NLP) to extract customer sentiment from their digital interactions, and other deep learning techniques for anti-money laundering initiatives.

What does a typical installation look like?

The minimum MongoDB configuration for Q-Suite is a 3-node replica set, though we have many customers running larger MongoDB clusters deployed across multiple active data centers for disaster recovery and data locality. Most customers deploy on Linux, but because MongoDB is multi-platform, we can also serve those institutions that run on Windows.

We support both MongoDB 3.2 and the latest MongoDB 3.4 release, which gives our users the new graph processing functionality and faceted navigation with full text search. We recommend customers use MongoDB Enterprise Advanced, especially to access the additional security functionality, including the Encrypted storage engine to protect data at rest.

For our Compliance-as-a-Service offering, we are currently evaluating the MongoDB Atlas managed service in the cloud. This would allow our teams to focus on the application, rather than operations.

What sort of data volumes are you capturing?

Capturing user interactions is a typical time-series data stream. A single MongoDB node can support around 300,000 sessions per day, with each session generating up to 3,000 unique events. To give an indication of scale in production deployments, one of our Swiss customers is ingesting multiple terabytes of data into MongoDB every day. Another in the US needs to retain session data for 10 years, and so they are scaling MongoDB to store around 3 trillion documents.

Of course, capturing the data is only part of the solution – we also need to expose it to analytics, without impacting write-volume. MongoDB replica sets enable us to separate out these two workloads within a single database cluster, simultaneously supporting transaction and analytics processing.

Funnel metrics Figure 2: Analysis of funnel metrics to monitor customer conversion through digital properties

How are you measuring the impact of MongoDB on your business?

Companies operating in highly regulated industries, from financial services to healthcare to communications, are facing a whole host of new government and industry directives designed to protect digital boundaries. The Q-Suite solution, backed by MongoDB, is enabling us to respond to our customers’ compliance requirements. By using MongoDB, we can accelerate feature development to meet new regulatory demands, and implement solutions faster, with lower operational complexity.

The security controls enforced by MongoDB further enable our customers to achieve regulatory compliance.

Simon, thanks for sharing your time and experiences with the MongoDB community

To learn more about cybersecurity and MongoDB, download our whitepaper Building the Next Generation of Threat Intelligence with MongoDB


Empowering Sales with Sales Enablement

$
0
0

Jeremy Powers is the Director of Sales Enablement at MongoDB, and a recipient of the first annual Highspot Sales Enablement Superstar Award for Strategic Vision. Yes, it’s a mouthful of an award, but it’s as impressive as it is lengthy. He has been directly involved with the MongoDB sales strategy since 2014, but was not always an internal member of the team.

Andrea Dooley: To start, what exactly is Sales Enablement?
Jeremy Powers: It’s a hot topic right now in the sales world. Everyone is searching for the right way to develop and grow sales professionals. Sales Enablement focuses on sales productivity. Everything that we do – training, process implementation, tools that are put in place, and things that we help to coach on – are all squarely focused on how can we take sales reps and sales leaders and make them the most productive in their role.

AD: What’s it like at MongoDB?
JP: As a team, we want to be known as the gold standard for sales enablement in the industry and right now we believe we’re setting the bar. As far as how the team is built and what we focus on, we look at individual sales roles and what the key competencies and intangibles are that indicate success in a given role. We understand that we can tailor and customize our training and our coaching through the way we assess and the way we provide feedback from managers. We also have a very big focus on leadership – if we can empower and equip sales leaders to be the best recruiters of the best sales talent in the industry and to be the best developers of that talent, the execution will follow.

AD: How were you first introduced to MongoDB?
JP: During my time at a sales effectiveness consulting and training company. I was the Account Manager and lead consultant for the MongoDB account. My team and I facilitated several workshops with MongoDB leadership and cross functional teams to help define customer messaging, sales process, and management operating rhythm. The approach we took with clients was a “built by you, for you” one in which the organization’s full commitment to the process and authoring the content was non-negotiable. Once finalized, version 1.0 was rolled out in an in-person training format and sales leaders were certified to train incoming new hires.

AD: What initially piqued your interest to join MongoDB?
JP: For me it started with the leadership – their past success and their commitment to sales enablement and sales development. Specifically the two leaders who I built relationships with over the years were Dev and Carlos. These guys have done it before and I had the opportunity to help them do it again here, but hopefully even bigger and better.

AD: What were your thoughts on the future of the company?
JP: A very close second reason was the opportunity to help build an elite sales organization to capitalize on an enormous market (estimated at $36B, and growing 9% year over year) which is ripe for disruption. This is the largest market in the software industry and the incumbent vendors are extremely vulnerable. Our sales talent and Go-to-Market execution can make us the first truly unique open source software company in the world.

AD: So what was the deciding factor?
JP: If you combine the leadership and the market opportunity with a uniquely positioned product that has all the momentum in the world it becomes a no brainer. We are clearly the leader of the new database technology vendors. The evidence ranges from the 20M downloads of our software in 10 years (running at about 30K per day) to that fact that we work with more than 50% of the Fortune 100.

AD: Fast forward two years: how has sales enablement evolved at MongoDB?
JP: Sales enablement has gone through two evolutions in the last 3 years. The first took place with the hiring of CEO Dev Ittycheria, who was the former CEO and founder of BladeLogic, which was acquired by BMC. He then quickly brought in CRO Carlos Delatorre, who was the Head of Sales at Clearslide and DynamicOps prior. They came in to usher MongoDB into the next phase of the company, which is all about Go-to-Market excellence. They immediately installed a common sales vernacular, process, and methodology to support the imminent rapid growth, which essentially triggered the second evolution – our laser focus on enabling every member of our sales team to be as productive as possible.

AD: What can someone in sales expect to gain from Sales Enablement at MongoDB?
JP: We spend about 6x the industry average on sales reps in their first year of development. We run Bootcamps monthly, which are week long trainings at our NYC headquarters. Some are focused on new hires and getting them as ready as possible to do well and be productive, while others are focused on advanced sales training for people who are further along in their ramp. We dig into different topics like how to truly understand your territory, or how to get strategic within accounts to provide maximum value to our customers. We also participate in Quarterly Business Reviews and sometimes will sit in on sales calls as a silent partner and work to pre-call plan and debrief customer meetings. We’re really all in.

So, what can we expect for the future of MongoDB? If we continue to do an outstanding job in recruiting, develop the right skills and knowledge, stay nimble, and keep ourselves apprised of the ever changing market, the consistent sales execution will certainly follow.


Learn more about working in sales at MongoDB.

Deep Learning and the Artificial Intelligence Revolution: Part 3

$
0
0

Welcome to part 3 of our 4-part blog series.

  • In part 1 we looked at the history of AI, and why it is taking off now
  • In part 2, we discussed the differences between AI, Machine Learning, and Deep Learning
  • In today’s part 3, we’ll dive deeper into deep learning and evaluate key considerations when selecting a database for new projects
  • We’ll wrap up in part 4 with a discussion on why MongoDB is being used for deep learning, and provide examples of where it is being used

If you want to get started right now, download the complete Deep Learning and Artificial Intelligence white paper.

What is Deep Learning?

Deep learning is a subset of machine learning that has attracted worldwide attention for its recent success solving particularly hard and large-scale problems in areas such as speech recognition, natural language processing, and image classification. Deep learning is a refinement of ANNs, which, as discussed earlier, “loosely” emulate how the human brain learns and solves problems.

Before diving into how deep learning works, it’s important to first understand how ANNs work. ANNs are made up of an interconnected group of neurons, similar to the network of neurons in the brain.

Neuron Model

Figure 1: The Neuron Model

At a simplistic level, a neuron in a neural network is a unit that receives a number of inputs (xi), performs a computation on the inputs, and then sends the output to other nodes or neurons in the network. Weights (wj), or parameters, represent the strength of the input connection and can be either positive or negative. The inputs are multiplied by the associated weights (x1w1, x2w2,..) and the neuron adds the output from all inputs. The final step is that a neuron performs a computation, or activation function. The activation function (sigmoid function is popular) allows an ANN to model complex nonlinear patterns that simpler models may not represent correctly.

Neural Network Diagram

Figure 2: Neural Network Diagram

Figure 2 represents a neural network. The first layer is called the input layer and is where features (x1, x2, x3) are input. The second layer is called the hidden layer. Any layer that is not an input or output layer is a hidden layer. Deep learning was originally coined because of the multiple levels of hidden layers. Networks typically contain more than 3 hidden layers, and in some cases more than 1,200 hidden layers.

What is the benefit of multiple hidden layers? Certain patterns may need deeper investigation that can be surfaced with the additional hidden layers. Image classification is an area where deep learning can achieve high performance on very hard visual recognition tasks – even exceeding human performance in certain areas. Let’s illustrate this point with an example of how additional hidden layers help perform facial recognition.

Deep Learning Recognition

Figure 3: Deep Learning Image Recognition

When a picture is input into a deep learning network, it is first decomposed into image pixels. The algorithm will then look for patterns of shapes at certain locations in the image. The first hidden layer might try to uncover specific facial patterns: eyes, mouth, nose, ears. Adding an additional hidden layer deconstructs the facial patterns into more granular attributes. For example, a “mouth” could be further deconstructed into “teeth”, “lips”, “gums”, etc. Adding additional hidden layers can devolve these patterns even further to recognize the subtlest nuances. The end result is that a deep learning network can break down a very complicated problem into a set of simple questions. The hidden layers are essentially a hierarchical grouping of different variables that provide a better defined relationship. Currently, most deep learning algorithms are supervised; thus, deep learning models are trained against a known truth.

How Does Training Work?

The purpose of training a deep learning model is to reduce the cost function, which is the discrepancy between the expected output and the real output. The connections between the nodes will have specific weights that need to be refined to minimize the discrepancy. By modifying the weights, we can minimize the cost function to its global minimum, which means we’ve reduced the error in our model to its lowest value. The reason deep learning is so computationally intensive is that it requires finding the correct set of weights within millions or billions of connections. This is where constant iteration is required as new sequences of weights are tested repeatedly to find the point where the cost function is at its global minimum.

Deep Learning Image Recognition

Figure 4: Deep Learning Cost Function

A common technique in deep learning is to use backpropagation gradient descent. Gradient descent emerged as an efficient mathematical optimization that works effectively with a large number of dimensions (or features) without having to perform brute force dimensionality analysis. Gradient descent works by computing a gradient (or slope) in the direction of the function global minimum based on the weights. During training, weights are first randomly assigned, and an error is calculated. Based on the error, gradient descent will then modify the weights, backpropagate the updated weights through the multiple layers, and retrain the model such that the cost function moves towards the global minimum. This continues iteratively until the cost function reaches the global minimum. There may be instances where gradient descent resolves itself at a local minimum instead of global minimum. Methods to mitigate this issue is to use a convex function or generate more randomness for the parameters.

Database Considerations with Deep Learning

Non-relational databases have played an integral role in the recent advancement of the technology enabling machine learning and deep learning. The ability to collect and store large volumes of structured and unstructured data has provided deep learning with the raw material needed to improve predictions. When building a deep learning application, there are certain considerations to keep in mind when selecting a database for management of underlying data.

Flexible Data Model. In deep learning there are three stages where data needs to be persisted – input data, training data, and results data. Deep learning is a dynamic process that typically involves significant experimentation. For example, it is not uncommon for frequent modifications to occur during the experimentation process – tuning hyperparameters, adding unstructured input data, modifying the results output – as new information and insights are uncovered. Therefore, it is important to choose a database that is built on a flexible data model, avoiding the need to perform costly schema migrations whenever data structures need to change.

Scale. One of the biggest challenges of deep learning is the time required to train a model. Deep learning models can take weeks to train – as algorithms such as gradient descent may require many iterations of matrix operations involving billions of parameters. In order to reduce training times, deep learning frameworks try to parallelize the training workload across fleets of distributed commodity servers.

There are two main ways to parallelize training: data parallelism and model parallelism.

  • Data parallelism. Splitting the data across many nodes for processing and storage, enabled by distributed systems such as Apache Spark, MongoDB, and Apache Hadoop
  • Model parallelism. Splitting the model and its associated layers across many nodes, enabled by software libraries and frameworks such as Tensorflow, Caffe, and Theano. Splitting provides parallelism, but does incur a performance cost in coordinating outputs between different nodes

In addition to the model’s training phase, another big challenge of deep learning is that the input datasets are continuously growing, which increases the number of parameters to train against. Not only does this mean that the input dataset may exceed available server memory, but it also means that the matrices involved in gradient descent can exceed the node’s memory as well. Thus, scaling out, rather than scaling up, is important as this enables the workload and associated dataset to be distributed across multiple nodes, allowing computations to be performed in parallel.

Fault Tolerance. Many deep learning algorithms use checkpointing as a way to recover training data in the event of failure. However, frequent checkpointing requires significant system overhead. An alternative is to leverage the use of multiple data replicas hosted on separate nodes. These replicas provide redundancy and data availability without the need to consume resources on the primary node of the system.

Consistency. For most deep learning algorithms it is recommended to use a strong data consistency model. With strong consistency each node in a distributed database cluster is operating on the latest copy of the data, though some algorithms, such as Stochastic Gradient Descent (SGD), can tolerate a certain degree of inconsistency. Strong consistency will provide the most accurate results, but in certain situations where faster training time is valued over accuracy, eventual consistency is acceptable. To optimize for accuracy and performance, the database should offer tunable consistency.

Wrapping Up Part 3

That wraps up the third part of our 4-part blog series. We’ll conclude in part 4 with a discussion on why MongoDB is being used for deep learning, and provide examples of where it is being used

Remember, if you want to get started right now, download the complete the complete Deep Learning and Artificial Intelligence white paper.

Integrating MongoDB Atlas, Twilio, and AWS Simple Email Service with AWS Step Functions - Part 2

$
0
0

This is Part 2 of the AWS Step Functions overview post published a few weeks ago. If you want to get more context on the sample application business scenario, head back to read Part 1. In this post, you’ll get a deep dive into the application’s technical details. As a reference, the source code of this sample app is available on GitHub.

AWS Step Functions Visual Workflow

Setting up the Lambda functions

The screenshot above is the graphical representation of the state machine we will eventually be able to test and run. But before we get there, we need to set up and publish the 4 Lambda functions this Step Functions state machine relies on. To do so, clone the AWS Step Functions with MongoDB GitHub repository and follow the instructions in the Readme file to create and configure these Lambda functions.

If you have some time to dig into their respective codebases, you'll realize they're all made up of just a few lines, making it simple to embed Twilio, AWS and MongoDB APIs in your Lambda function code. In particular, I would like to point out the concise code the Get-Restaurants lambda function uses to query the MongoDB Atlas database:

The code snippet above is a simple yet powerful example of aggregation framework queries using the $match and $project stages along with the $avg and $max accumulator operators. In a nutshell, this aggregation filters the restaurants dataset by 3 properties (zip code, cuisine, and name) in the $match stage, returns a subset of each restaurant’s properties (to minimize the bandwidth usage and query latency), and computes the maximum and average values of health scores obtained by each restaurant (over the course of 4 years) in the $project stage. This example shows how you can very easily replace SQL clauses (such as WHERE(), MAX() and AVG()) using MongoDB’s expressive query language.

Creating the Step Functions state machine

Once you are done with setting up and configuring these Lambda functions, it's time to finally create our Step Functions state machine.

AWS created a JSON-based declarative language called the Amazon States Language, fully documented on the Amazon States Language specification page. A Step Functions state machine is essentially a JSON file whose structure conforms to this new Amazon States Language. While you don’t need to read its whole specification to understand how it works, I recommend reading the AWS Step Functions Developer Guide to understand its main concepts and artifacts.

For now, let's go ahead and create our WhatsThisRestaurantAgain state machine. Head over to the Create State Machine page in AWS Step Functions and give your new state machine a name (such as WhatsThisRestaurantAgain).

Next, copy and paste the following JSON document (also available on GitHub) into the Code text editor (at the bottom of the Create State Machine page):

Once you’re done pasting this JSON document, press the Refresh button of the Preview section right above the Code editor and... voilà! The state machine now shows up in its full, visual glory:

AWS Step Functions Visual Workflow

We’re not quite done yet. But before we complete the last steps to get a fully functional Step Functions state machine, let me take a few minutes to walk you through some of the technical details of my state machine JSON file.

Note that 4 states are of type "Task" but that their Resource attributes are empty. These 4 "Task" states represent the calls to our 4 Lambda functions and should thus reference the ARNs (Amazon Resource Names) of our Lambda functions. You might think you have to get these ARNs one by one—which might prove to be tedious—but don't be discouraged; AWS provides a neat little trick to get these ARNs automatically populated!

Simply click inside the double quotes for each Resource attribute and the following drop-down list should appear (if it doesn't, make sure you are creating your state machine in the same region as your Lambda functions):

AWS Step Functions Code Editor - Lambda Functions ARN Dropdown List

Once you have filled out the 4 empty Resource attributes with their expected values, press the Create State Machine button at the bottom. Last, select the IAM role that will execute your state machine (AWS should have conveniently created one for you) and press OK:

AWS Step Functions IAM Role

On the page that appears, press the New execution button:

AWS Step Functions - Created

Enter the following JSON test document (with a valid emailTo field) and press Start Execution:

{
    "startsWith": "M",
    "cuisine": "Italian",
    "zipcode": "10036",
    "phoneTo": "+15555555555",
    "firstnameTo": "Raphael",
    "emailTo": "raphael@example.com",
    "subject": "List of restaurants for {{firstnameTo}}",
}

If everything was properly configured, you should get a successful result, similar to the following one:

AWS Step Functions - Execution Result

If you see any red boxes (in lieu of a green one), check CloudWatch where the Lambda functions log their errors. For instance, here is one you might get if you forgot to update the emailTo field I mentioned above:

AWS Step Functions - CloudWatch Error

And that's it (I guess you can truly say we’re "done done" now)! You have successfully built and deployed a fully functional cloud workflow that mashes up various API services thanks to serverless functions.

For those of you who are still curious, read on to learn how that sample state machine was designed and architected.

Design and architecture choices

Let's start with the state machine design:

  1. The GetRestaurants function queries a MongoDB Atlas database of restaurants using some search criteria provided by our calling application, such as the restaurant's cuisine type, its zip code and the first few letters of the restaurant's name. It retrieves a list of matching restaurants and passes that result to the next function (CountItems). As I pointed out above, it uses MongoDB's aggregation framework to retrieve the worst and average health score granted by New York's Health Department during its food safety inspections. That data provides the end user with information on the presumed cleanliness and reliability of the restaurant she intends to go to. Visit the aggregation framework documentation page to learn more about how you can leverage it for advanced insights into your data.

  2. The CountItems method counts the number of the restaurants; we'll use this number to determine how the requesting user is notified.

  3. If we get a single restaurant match, we'll send the name and address of the restaurant to the user's cell phone using the SendBySMS function.

  4. However, if there's more than one match, it's probably more convenient to display that list in a table format. As such, we'll send an email to the user using the SendByEmail method.

At this point, you might ask yourself: how is the data passed from one lambda function to another?

As it turns out, the Amazon States Language provides developers with a flexible and efficient way of treating inputs and outputs. By default, the output of a state machine function becomes the input of the next function. That doesn't exactly work well for us since the SendBySMS and SendByEmail methods must know the user's cell phone number or email address to properly work. An application that would like to use our state machine would have no choice but to pass all these parameters as a single input to our state machine, so how do we go about solving this issue?

Fortunately for us, the Amazon States Language has the answer: it allows us to easily append the result of a function to the input it received and forward the concatenated result to the next function. Here's how we achieved this with our GetRestaurants function:

"GetRestaurants": {
    "Type": "Task",
    "Resource": "arn:aws:lambda:REGION:ACCOUNT_ID:function:FUNCTION_NAME",
    "ResultPath": "$.restaurants",
    "Next": "CountItems"
}

Note the ResultPath attribute above where we instruct Step Functions to append the result of our GetRestaurants task (an array of matching restaurants) to the input it received, whose structure is the test JSON document I mentioned above (duplicated here for reading convenience):

{
    "startsWith": "M",
    "cuisine": "Italian",
    "zipcode": "10036",
    "phoneTo": "+15555555555",
    "firstnameTo": "Raphael",
    "emailTo": "raphael@example.com",
    "subject": "List of restaurants for {{firstnameTo}}"
}

This input contains all the information my state machine might need, from the search criteria (startsWith, cuisine, and zipcode), to the user's cell phone number (if the state machine ends up using the SMS notification method), first name, email address and email subject (if the state machine ends up using the email notification method).

Thanks to the ResultPath attribute we set on the GetRestaurants task, its output has a structure similar to the following JSON document (additional data in bold):


{
  "firstnameTo": "Raphael",
  "emailTo": "raphael@example.com",
  "subject": "List of restaurants for {{firstnameTo}}",
 "restaurants": [
  {
    "address": {
      "building": "235-237",
      "street": "West 48 Street"
    },
    "borough": "Manhattan",
    "name": "La Masseria"
  },
  {
    "address": {
      "building": "315",
      "street": "West 48 Street"
    },
    "borough": "Manhattan",
    "name": "Maria'S Mont Blanc Restaurant"
  },
  {
    "address": {
      "building": "654",
      "street": "9 Avenue"
    },
    "borough": "Manhattan",
    "name": "Cara Mia"
  }
]
}

As expected, the restaurants sub-document has been properly appended to our original JSON input. That output becomes by default the input for the CountItems method. But, we don't want that function to have any dependency on the input it receives. Since it's a helper function, we might want to use it in another scenario where the input structure is radically different. Once again, the Amazon States Language comes to the rescue with the optional InputPath parameter. Let's take a closer look at our CountItems task declaration in the state machine’s JSON document:

"CountItems": {
    "Type": "Task",
    "Resource": "arn:aws:lambda:REGION:ACCOUNT_ID:function:FUNCTION_NAME",
    "InputPath": "$.restaurants",
    "ResultPath": "$.count",
    "Next": "NotificationMethodChoice"
}

By default, the InputPath value is the whole output of the preceding task (GetRestaurants in our state machine). The Amazon States Language allows you to override this parameter by explicitly setting it to a specific value or sub-document. As you can see in the JSON fragment above, this is exactly what I have done to only pass an array of JSON elements to the CountItems Lambda function (in my case, the array of restaurants we received from our previous GetRestaurants function), thereby making it agnostic to any JSON schema. Conversely, the result of the CountItems task is stored in a new count attribute that serves as the input of the NotificationMethodChoice choice state that follows:

"NotificationMethodChoice": {
    "Type": "Choice",
    "Choices": [
        {
            "Variable": "$.count",
            "NumericGreaterThan": 1,
            "Next": "SendByEmail"
        },
        {
            "Variable": "$.count",
            "NumericLessThanEquals": 1,
            "Next": "SendBySMS"
        }
    ],
    "Default": "SendByEmail"
}

The logic here is fairly simple: if the restaurants count is greater than one, the state machine will send an email message with a nicely formatted table of the restaurants to the requesting user’s email address. If only one restaurant is returned, we’ll send a text message to the user’s phone number (using Twilio’s SMS API) since it’s probably faster and more convenient for single row results (especially since the user might be on the move while requesting this piece of information). Note that my JSON "code" actually uses the NumericLessThanEquals operator to trigger the SendBySMS task and not the Equals operator as it really should. So technically speaking, even if no result is returned from the GetRestaurants task, the state machine would still send a text message to the user with no restaurant information whatsoever! I’ll leave it up to you to fix this intentional bug.

Next steps

In this post, I showed you how to create a state machine that orchestrates calls to various cloud services and APIs using a fictitious restaurant search and notification scenario. I hope you enjoyed this tutorial explaining how to deploy and test that state machine using the AWS console. Last, I went through various design and architecture considerations, with a focus on data flow abilities available in Step Functions.

If you haven’t done so already, sign up for MongoDB Atlas and create your free M0 MongoDB cluster in minutes.
Next, you can get more familiar with AWS Lambda development and deployment by following our 101 Lambda tutorial.
If you already have some experience with AWS Lambda, Developing a Facebook Chatbot with AWS Lambda and MongoDB Atlas will walk through a richer use case.
As a last step, you might be interested in Step Functions integration with API Gateway to learn how to call a state machine from an external application.

About the Author - Raphael Londner

Raphael Londner is a Principal Developer Advocate at MongoDB, focused on cloud technologies such as Amazon Web Services, Microsoft Azure and Google Cloud Engine. Previously he was a developer advocate at Okta as well as a startup entrepreneur in the identity management space. You can follow him on Twitter at @rlondner.

Disrupting the Database Industry: MongoDB Named CNBC Disruptor 4th Year in a Row

$
0
0

For the fourth year in a row, MongoDB has been recognized as one of CNBC’s Disruptor 50 Companies. With more than 800 nominations this year, the list comprises 50 organizations across all spaces from technology, to education, to apparel. All organizations “question established norms and discover billion-dollar opportunities”..

According to CNBC, “In the process, they are creating new ecosystems for their products and services. Unseating corporate giants is no easy feat. But we ranked those venture capital–backed companies doing the best job.”

With the launch of MongoDB 3.4 and the database as a service MongoDB Atlas this year, it is especially gratifying to see our name appear once again alongside some of the world’s most innovative organizations. When the database was originally created in 2007, it was designed to address development and scalability issues of traditional database approaches by processing huge data sets in a fraction of the time. In the ten years since, we have seen MongoDB downloaded over 20 million times, are present in over 100 countries, expanded to the cloud, established office locations worldwide, and are the trusted partner of more than half of the Fortune 100.

The final Disruptor 50 list was ultimately determined by CNBC's Disruptor 50 Advisory Council. The council deemed that two of the most important criteria for this years list were user growth and scalability, and it was those qualities that held the most weight when selecting the final 50. For more information on how the list was created, read about CNBC’s methodology.

The unique ability of our teams to leverage feedback from our community of users and customers to make updates, quickly release new features, and develop new products and services is how we’ve managed to remain a prevalent disruptor in the database space. Throughout the last decade we have learned as an organization to be incredible nimble, flexible, and adaptable to the rapidly changing world.

Thank you to CNBC for recognizing our efforts and our vision. We appreciate the nomination, and look forward to next year!

Leaf in the Wild: Appsee Shapes the Mobile Revolution with Real-Time Analytics Service Powered by MongoDB

$
0
0

20 billion documents, 15TB of data scaled across a MongoDB cluster in the cloud. New apps each adding 1 billion+ data points per month

With mobile now accounting for more than 90% of all time spent online in some countries, delivering rich app experiences is essential. Appsee is a new generation of mobile analytics company providing business owners with deep insights into user behavior, enabling them to increase engagement, conversion, and monetization. Customers include eBay, AVIS, Virgin, Samsung, Argos, Upwork, and many more. Appsee is also featured in Google’s Fabric platform. Appsee relies on MongoDB to ingest the firehose of time-series session data collected from its customers’ mobile apps, and then makes sense of it all.

I met with Yoni Douek, CTO and co-founder of Appsee, to learn more.

Can you start by telling us a little bit about your company?

Appsee is a real-time mobile app analytics platform that provides what we call “qualitative analytics”. Our goal is to help companies understand exactly how users are using their app with a very deep set of tools, so that they can improve their app. Traditional analytics help you see numbers – we also provide reasons behind these numbers.

One of Appsee's key qualitative tools is session recordings and replay, which enable our customers to obtain the most accurate and complete picture of each user's in-app experience. We also offer touch heatmaps, which highlight exactly where users are interacting with each screen, and where users are encountering any usability issues. Our platform also provides real-time analytics, user flows, UX insights, crash statistics, and many more insights that help companies in optimizing their app.

Appsee sessiom replay
Figure 1: Appsee session replay provides developers with deep customer experience insights

Please describe how you’re using MongoDB

Our service has two distinct data storage requirements, both of which are powered by MongoDB.

Session database: storing activity from each user as they interact with the mobile application. Session data is captured as a time-series data stream into MongoDB, including which screens they visit, for how long, what they are tapping or swiping, crashes, and so on. This raw session data is modeled in a single document, typically around 6KB in size. Complete user sessions can be reconstructed from this single MongoDB document, allowing mobile app professionals to watch the session as a video, and to optimize their app experiences.

Real-time mobile analytics database: session data is aggregated and stored in MongoDB to provide in-depth analysis of user behavior. Through 50+ charts and graphs, app owners can track a range of critical metrics including total installs, app version adoption, conversion funnels and cohorts, user flows, crash analytics, average session times, user retention rates, and more.

We make extensive use of MongoDB’s aggregation pipeline, relying on it for matching, grouping, projecting, and sorting of raw session data, combined with the various accumulator and array manipulation expressions to transform and analyze data. MongoDB’s secondary indexes allow us to efficiently access data by any dimension and query pattern. We typically enforce three or four secondary indexes on each collection.

Appsee dashboard
Figure 2: Appsee dashboard provides qualitative analytics to mobile app owners

Why did you select MongoDB?

When we began developing the Appsee service, we had a long list of requirements for the database:

  • Elastic scalability, with almost infinite capacity for user and data growth
  • High insert performance required for time-series data, coupled with low latency read performance for analytics
  • Reliable data storage so we would never lose a single user session
  • Flexible data model so we could persist highly complex, rapidly changing data generated by new generations of mobile apps
  • Developer ease-of-use, to allow us to maximize the productivity of our team, and shorten time to market. This was especially important in the early days of the company, as at the time, we only had two developers
  • Support for rich, in-database analytics so we could deliver real-insights to app owners, without having to move data into dedicated analytics nodes or data warehousing infrastructure.

As we came from a relational database background, we initially thought about MySQL. But the restrictive data model imposed by its relational schema, and inability to scale writes beyond a single node made us realize it wouldn’t meet our needs.

We reviewed a whole host of NoSQL alternatives, and it soon became clear that the best multi-purpose database that met all of our requirements was MongoDB. Its ability to handle high velocity streams of time series data, and analyze it in place was key. And the database was backed by a vibrant and helpful community, with mature documentation that would reduce our learning curve.

Can you tell us what your MongoDB deployment looks like?

We currently run a 5-shard MongoDB cluster, with a 3-node replica set provisioned for each shard, providing self-healing recovery. We run on top of AWS, with CPU-optimized Linux-based instances.

We are on MongoDB 3.2, using the Python and C# drivers, with plans to upgrade to the latest MongoDB 3.4 release later in the year. This will help us take advantage of parallel chunk migrations for faster cluster balancing as we continue to elastically scale-out.

Can you share how MongoDB is performing for you?

MongoDB is currently storing 20 billion documents, amounting to 15TB of data, which we expect to double over the next 12 months. The cluster is currently handling around 50,000 operations per second, with a 50:50 split between reads and inserts. Through our load testing, we know we can support 2x growth on the same hardware footprint.

Can you share best practices for scaling?

My top recommendation would be to shard before you actually need to – this will ensure you have plenty of capacity to respond to sudden growth requirements when you need to. Don’t leave sharding until you are close to maximum utilization on your current setup.

To put our scale into context, every app that goes live with Appsee can send us 1 billion+ data points per month as soon it launches. Every few weeks we run a load test that simulates 2x of the data we are currently processing. From those tests, we adapt our shards, collections and servers to be able to handle that doubling in load.

How do you monitor your cluster?

We are using Cloud Manager to monitor MongoDB, and our own monitoring system based on Grafana, Telegraf, and Kapacitor for the rest of the application stack.

Appsee heat maps
Figure 3: Appsee heat maps enable app designed to visualize complex data sets

How are you measuring the impact of MongoDB on your business?

Speed to market, application functionality, customer experience, and platform efficiency.

  • We can build new features and functionality faster with MongoDB. When we hire new developers, MongoDB University training and documentation gets them productive within days.
  • MongoDB simplifies our data architecture. It is a truly multi-purpose platform – supporting high speed data ingest of time-series data, coupled the ability to perform rich analytics against that data, without having to use multiple technologies.
  • Our service is able to sustain high uptime. Using MongoDB’s distributed, self-healing replica set architecture, we deploy across AWS availability zones and regions for fault tolerance and zero downtime upgrades.
  • Each generation of MongoDB brings greater platform efficiency. For example, upgrading to the WiredTiger storage engine cut our storage consumption by 30% overnight.

MongoDB development is open and collaborative – giving us the opportunity to help shape the product. Through the MongoDB Jira project, we engage directly with the MongoDB engineering team, filing feature requests and bug reports. It is as though MongoDB engineers are an extension of our team!

Yoni, thanks for taking the time to share your experience with the company

To learn more about best practices for deploying and running MongoDB on AWS, download our guide.

Viewing all 2423 articles
Browse latest View live