GDPR is now in effect in Europe and you are still wondering how you are going to handle this? No worries, MongoDB Views are here to help but first a little definition.
Definition
“Pseudonymization is a data management procedure by which personally identifiable information fields within a data record are replaced by one or more artificial identifiers, or pseudonyms. A single pseudonym for each replaced field or collection of replaced fields makes the data record less identifiable while remaining suitable for data analysis and data processing.”
MongoDB Views
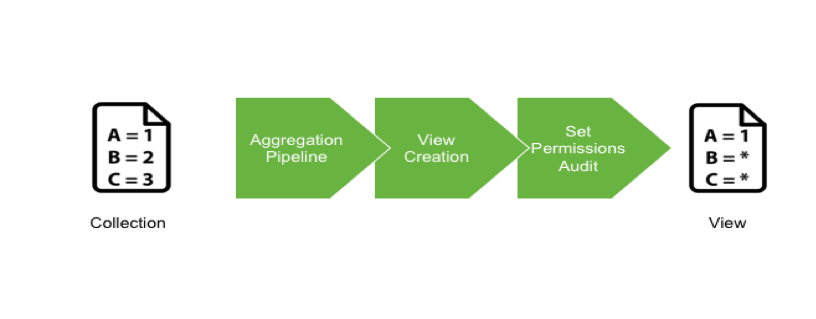
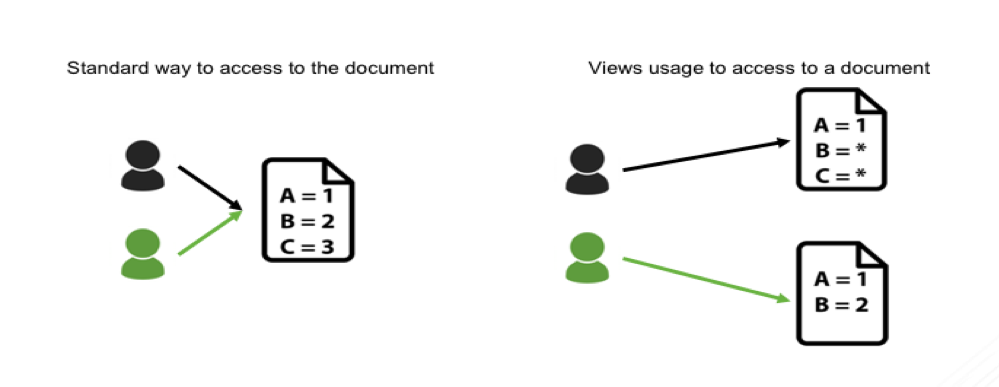
A view in MongoDB is a read-only projection of an existing collection or another view. The purpose of a view is to provide an alternative way to present documents. As we use the Aggregation Pipeline to generate a view, a projection can be done to pseudonymize each field. Consequently, it is possible to create several views, based on use cases and keep a golden copy of the data on the Master Collection.


Considerations
- Views are read only
- Views use index from the master collection
- Some restrictions exist for the projection - see Official MongoDB Documentation
Example
I want to show you a practical approach to pseudonymization using views in MongoDB. We will be using a Game of Thrones characters collection, with their status (dead/alive). Here is an example of one document:
{
 "_id" : ObjectId("5ae13de5f54a365254c62ad1"),
 "firstName" : "Daenerys",
 "lastName" : "Targaryen",
 "nickName" : "Khaleesi",
 "house" : "Targaryen",
 "actor" : "Emilia Clarke",
 "gender" : "female",
 "status" : "alive"
}
You can download the dataset here.
And you can import it directly from command line:
mongoimport --drop -d gameofthrones -c characters 
gameofthrones.characters.json
Explore the dataset and notice that the “status” is not always specified. Sometimes this key/value is missing and we need to take that into account in our view.
Because the “status” is a sensitive data full of spoilers, we want to hide this in a spoiler-free view.
Create the view
In this example, we used the following aggregation pipeline to generate the view:
> use gameofthrones
> db.characters.aggregate([
{ "$project" : 
 { 
 _id : 0,
 "firstName" : 1, 
 "lastName" : 1, 
 "house" : 1,
 "status" : 
 {
 "$cond": [{ "$eq": [ "$status", undefined ] }, $status = "Not Specified", $status = "*****" ],
 } 
 } 
} 
])
This aggregation pipeline will project the collection and replace the content of the field “status” with “*****” if this field exists. If not, the “status” will mention “Not Specified”.
Let’s create a view called “charactersNoSpoil”, based on the “characters” collection. We can leverage the aggregation pipeline created in the previous step:
> use gameofthrones
> db.createView(
 "charactersNoSpoil", 
 "characters", 
 [{ 
 "$project" : 
 { 
 _id : 0,
 "firstName" : 1, 
 "lastName" : 1, 
 "house" : 1, 
 "status" : 
 {"$cond": [{ "$eq": [ "$status", undefined ] }, $status = "Not Specified", $status = "*****" ]}
 }
 }] 
)
With the view created you can check it by performing a “show collections”, a “db.getCollectionInfos()” or a “db.charactersNoSpoil.find()” command.
> use gameofthrones
> db.charactersNoSpoil.find({},{firstName:1, status:1})
{ "firstName" : "Daenerys", "status" : "*****" }
{ "firstName" : "Joffrey", "status" : "*****" }
{ "firstName" : "Robert", "status" : "*****" }
{ "firstName" : "Tyron", "status" : "Not Specified" }
{ "firstName" : "Jaime", "status" : "*****" }
{ "firstName" : "Jon", "status" : "*****" }
{ "firstName" : "Cersei", "status" : "*****" }
{ "firstName" : "Sansa", "status" : "*****" }
{ "firstName" : "Tywin", "status" : "Not Specified" }
{ "firstName" : "Arya", "status" : "Not Specified" }
{ "firstName" : "Eddard", "status" : "Not Specified" }
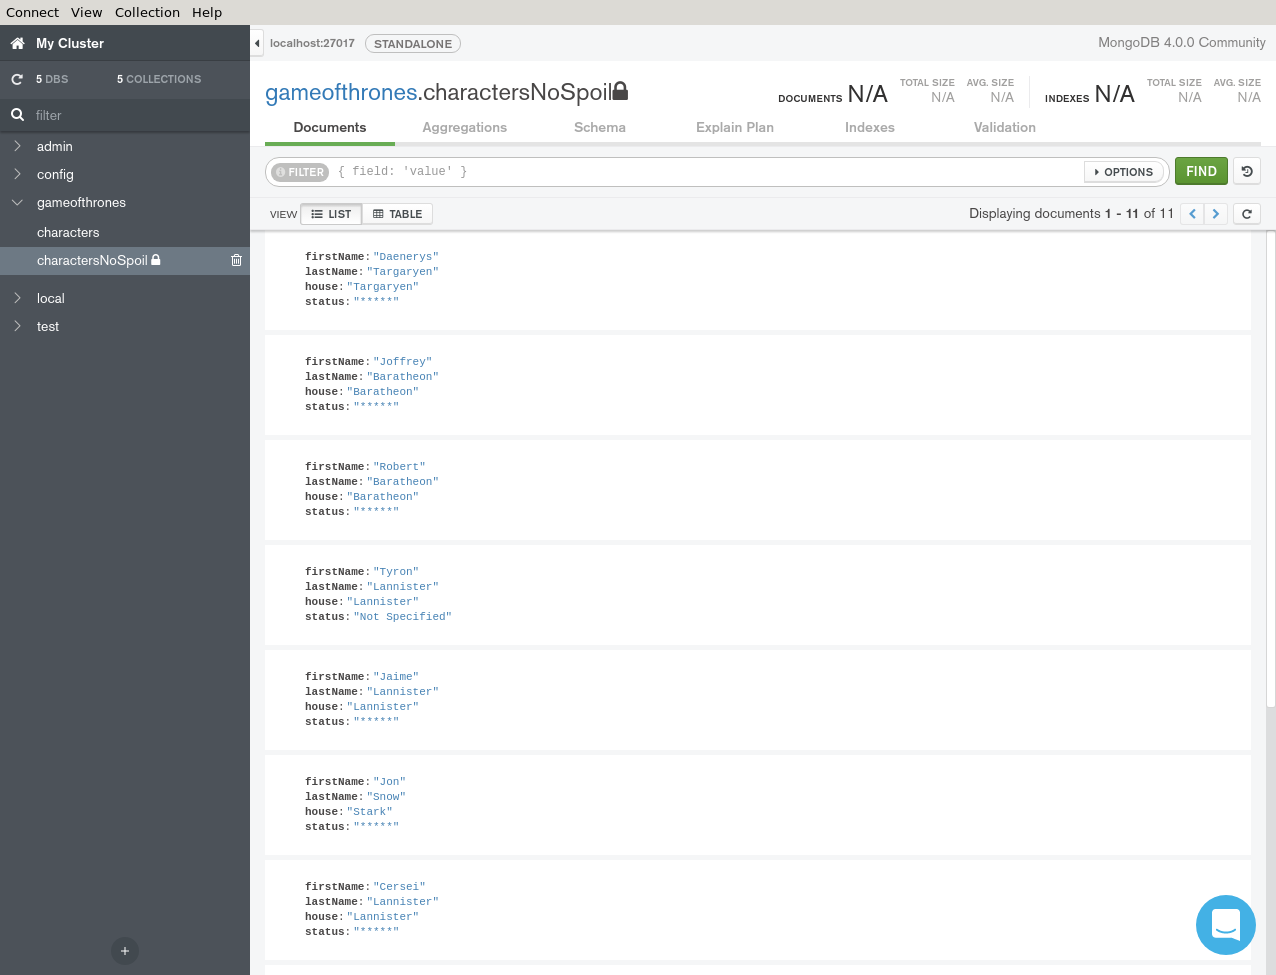
If you are using MongoDB Compass, you should see the following result.

Working with Views
As mentioned in the introduction, views are read-only and use the index from the collection source.
Insert a new document
To add a new document on the view, you have to create the document on the original collection. The new document will be automatically accessible through the view.
> db.characters.insertOne({
 "firstName": "Hodor", 
 "actor": "Kristian Nairn", 
 "gender": "male", 
 "status": "dead"
})
Then check that this document appears within the “charactersNoSpoil” view.
> db.charactersNoSpoil.find({firstName: "Hodor"}) 
{ "firstName" : "Hodor", "status" : "*****" }
Create an Index
To create an index that could be used by the view, you have to create an index on the collection.
> db.characters.createIndex({"house":1})
> db.charactersNoSpoil.find({house: "Stark"}).explain()

extract of the winning plan:
"winningPlan" : {
 "stage" : "FETCH",
 "inputStage" : {
 "stage" : "IXSCAN",
 "keyPattern" : {"house" : 1},
 "indexName" : "house_1",
 "isMultiKey" : false,
 "multiKeyPaths" : {"house" : [ ]},
 "isUnique" : false,
 "isSparse" : false,
 "isPartial" : false,
 "indexVersion" : 2,
 "direction" : "forward",
 "indexBounds" : {"house" : ["[\"Stark\", \"Stark\"]"]}
 }
}
And as you can see here the explain plan shows we are using the index {“house”:1} for the find in our view.
Setup the Access control
Now that the view is created, it is important to segregate who can read the view and who can write to the master collection.
To enforce this example, you will create users and roles to secure the data.
- Alice should only be able to write in the master collection,
- Bob should only be able to read the view.
By doing this, you will prevent unauthorized read to the “characters” collection, thus no spoilers :-).
Before starting
If you have not done that already, you need to enable Role-Based Access Control on your MongoDB server by adding “--auth” in the command line or by adding the following lines into your “/etc/mongod.conf” file.
security:
 authorization: enabled
Then you need to connect, create an admin user and log in as this new admin user.
> use admin
> db.createUser( { user: "admin", pwd: "safepassword", roles:["root"] })
> db.auth("admin","safepassword")
If you want to know more about our security recommendations for running MongoDB in production, have a look at our security checklist.
Create the roles
Now that we have a super user, we can create the two roles we need for Alice and Bob.
The first role “writeOnly” will be for Alice:
> use admin
> db.createRole({
 role : "writeOnly",
 privileges : [
 {
 resource : { db : "gameofthrones", collection : "characters" },
 actions : [ "insert" ]
 }
 ],
 roles : []
 })
And the second one for Bob:
> use admin
> db.createRole({
 role : "noSpoilers",
 privileges : [
 {
 resource : { db : "gameofthrones", collection : "charactersNoSpoil" },
 actions : [ "find" ]
 }
 ],
 roles : []
 })
Now we can create our two users:
> use admin
> db.createUser({ user : "Alice", pwd : "a", roles : ["writeOnly"] })
> db.createUser({ user : "Bob", pwd : "b", roles : ["noSpoilers"] })
Verifications
Alice has only been granted the right to insert into the collection “characters”.
$ mongo -u Alice -p a --authenticationDatabase admin gameofthrones
> db.characters.insertOne({
 "firstName": "Catelyn", 
 "lastName": "Stark", 
 "actor": "Michelle Fairley", 
 "gender": "female", 
 "status": "dead"
})
==> Succeed
> db.characters.findOne()
==> Returns an error: unauthorized.
> db.charactersNoSpoil.findOne()
==> Returns an error: unauthorized.
Bob has only been granted the right to read the view so he cannot be spoiled.
$ mongo -u Bob -p b --authenticationDatabase admin gameofthrones
> db.charactersNoSpoil.findOne()
{
 "firstName" : "Daenerys",
 "lastName" : "Targaryen",
 "house" : "Targaryen",
 "status" : "*****"
}
> db.characters.findOne()
==> Returns an error: unauthorized.
> db.characters.insertOne({
 "firstName": "Jorah", 
 "lastName": "Mormont", 
 "actor": "Iain Glen", 
 "gender": "male", 
 "status": "alive"
})
==> Returns an error: unauthorized.
Audit the View
Now that the view is correctly setup, it’s important to audit the access and actions on the view.
The auditing capability is only available in MongoDB Enterprise Advanced which is free for testing environment and downloadable at https://www.mongodb.com/download-center#enterprise
By default, the audit feature is not activated in MongoDB. It has to be specified at MongoDB start-up by adding options on the command line or by modifying the configuration file.
Here is the command line I am using to start my MongoDB server now:
$ mongod --dbpath /tmp/data \
--auth \
--setParameter auditAuthorizationSuccess=true \
--auditDestination file \
--auditFormat JSON \
--auditPath /tmp/audit.json \
--auditFilter '{ atype: "authCheck", "param.ns": "gameofthrones.charactersNoSpoil", "param.command": { $in: [ "find", "insert", "delete", "update", "findandmodify" ] } }' 
Or the equivalent with a MongoDB configuration file:
storage:
 dbPath: /tmp/data

security:
 authorization: enabled

auditLog:
 destination: file
 format: JSON
 path: /tmp/audit.json
 filter: '{ atype: "authCheck", "param.ns": "gameofthrones.charactersNoSpoil", "param.command": { $in: [ "find", "insert", "delete", "update", "findandmodify" ] } }'

setParameter:
 auditAuthorizationSuccess: true
Thanks to these lines, the Audit system will push information on a JSON file. This could also be sent to syslog for processing purposes.
Now perform a findOne() with Bob on the view and get the following results in /tmp/audit.json.
{ 
 "atype":"authCheck",
 "ts":{ 
 "$date":"2018-07-18T19:46:28.252+0200"
 },
 "local":{ 
 "ip":"127.0.0.1",
 "port":27017
 },
 "remote":{ 
 "ip":"127.0.0.1",
 "port":41322
 },
 "users":[ 
 { 
 "user":"Bob",
 "db":"gameofthrones"
 }
 ],
 "roles":[ 
 { 
 "role":"noSpoilers",
 "db":"gameofthrones"
 }
 ],
 "param":{ 
 "command":"find",
 "ns":"gameofthrones.charactersNoSpoil",
 "args":{ 
 "find":"charactersNoSpoil",
 "filter":{ 

 },
 "limit":1,
 "singleBatch":true,
 "$db":"gameofthrones"
 }
 },
 "result":0
}
Here you can see that the user Bob performed a successful find (“result” : 0) on the charactersNoSpoil view.
When you perform the same with Alice, the “result” code will be 13 – “Unauthorized to perform the operation”.
{ 
 "atype":"authCheck",
 "ts":{ 
 "$date":"2018-07-18T20:00:12.117+0200"
 },
 "local":{ 
 "ip":"127.0.0.1",
 "port":1234
 },
 "remote":{ 
 "ip":"127.0.0.1",
 "port":41390
 },
 "users":[ 
 { 
 "user":"Alice",
 "db":"gameofthrones"
 }
 ],
 "roles":[ 
 { 
 "role":"writeOnly",
 "db":"gameofthrones"
 }
 ],
 "param":{ 
 "command":"find",
 "ns":"gameofthrones.charactersNoSpoil",
 "args":{ 
 "find":"charactersNoSpoil",
 "filter":{ 

 },
 "limit":1,
 "singleBatch":true,
 "$db":"gameofthrones"
 }
 },
 "result":13
}
You can read the documentation about the audit message here.
Next Steps
Thanks for taking the time to read my post. I hope you found it useful and interesting.
If you are looking for a very simple way to get started with MongoDB, you can do that in just 5 clicks on our MongoDB Atlas database service in the cloud. And if you want to learn more about how MongoDB’s security features better help you comply with new regulations, take a look at our guide GDPR: Impact to Your Data Management Landscape.
Also, we recently released MongoDB 4.0 with a lot of great features like multi-document ACID transactions. If you want to learn more, take our free course on MongoDB University M040: New Features and Tools in MongoDB 4.0 and read our guide to what’s new in MongoDB 4.0 where you can learn more about native type conversions, new visualization and analytics tools, and Kubernetes integration.
Sources
Pseudonymization Definition: https://en.wikipedia.org/wiki/Pseudonymization
Data Set for this example: https://s3-eu-west-1.amazonaws.com/developer-advocacy-public/blog/gameofthrones.characters.json