MongoDB Atlas, our fully-managed MongoDB as a service, allows organizations to take advantage of the database without having to worry about the operational overhead of managing a distributed system. For developers that seek to integrate the underlying database programmatically with tools or development platforms they're already using, Atlas also provides a full-featured API. We covered how to work with the MongoDB Atlas API from the command line in a recent blog post; today we're going to explore using the API with 3rd party API integration services, sometimes referred to as online workflows or serverless API frameworks.
We have partnered with a number of vendors in this space to allow users to take advantage of Atlas and MongoDB features from within their favored development environments. This blog will provide overviews and walkthroughs of 2 integrations with API integration platforms: Stamplay and Built.io.
Getting started with MongoDB Atlas
To get started, you will need a MongoDB Atlas account. If you don’t have one already, feel free to sign up for one here.

Once you have an account, you will see the main "MongoDB Atlas Clusters" screen which we will ignore as we will be programmatically creating our clusters as shown below.

Click on Settings>Account and copy the User Name in the Profile section (note this may or may not be set to your email address):

Click on Settings>Public API Access and click on the Generate button:

Assign a name to the key. After the key is generated, be sure to jot it down because this is the only time that the UI will display it in full:

The user name and API key values are all you need to connect your API integration tools to MongoDB Atlas.
Stamplay integration with MongoDB Atlas
Stamplay is an integration platform for creating new services by combining existing ones, often with little code required. It allows users to integrate, mix, and match APIs to create new services and automate processes thanks to 80+ cloud connectors and out of the box APIs for data storage, webhooks, NodeJS runtime, user authentication and hosting. Stamplay allows users to trigger workflows either based on events in your MongoDB Atlas cluster or with devops meta-scripts.
The following walkthrough describes the easiest way to use Stamplay to spin up a new MongoDB Atlas cluster, add an IP to the IP whitelist, create new database users and the database itself in the cluster, and finally creating a Slack notification when the cluster is ready. Stamplay supports a wide range of other popular APIs such as Sendgrid, Twilio, Box, and more.
Getting started with Stamplay
Visit stamplay.com to get started:

After you have signed up and logged in, you will be able to view your projects:

Click the [+] button and select “USE A BLUEPRINT” to use a sample MongoDB Atlas cluster deployment blueprint with Slack notifications:

In the following screen, you can see a number of blueprints, including the MongoDB autopilot API, which allows you to create a MongoDB cluster in Atlas and get a notification when it's available in Slack. Select it by clicking the “GET IT” button associated:


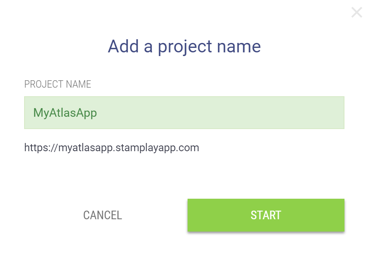
As you can see, Stamplay assigns your project a new unique endpoint with a public URL. In the next screen, follow along in the wizard to complete your blueprint. Name your project and click “START”:

Click “NEXT” and paste the previously saved user name and API key into the following fields:

Then click “CONNECT” and if everything was configured correctly, the connection with MongoDB Atlas will be established. Click “CONNECT” in the Slack section and choose your Slack account in the pop-up (or select the "Create a new team" link and then choose a new team to sign up for one"). After signing in with Slack, click the Authorize button to let Stamplay access your Slack account.

Click “NEXT”.
MongoDB cluster configuration in Stamplay
Now it’s time to configure the cluster when you trigger this API workflow. You can configure anything that is available via the Atlas API like disk size, backup, encryption, cluster region and so on.

NOTE: You need to select the Group ID of the MongoDB Atlas group where you’d like the new cluster to be deployed (you can find it in the Settings->Group Settings screen in your Atlas UI).
After that you’ll only need to select a Slack channel where the notification will be sent after the cluster is created. Click “NEXT” and you’ll get to the final screen with the completed API endpoint information.

Testing Stamplay workflow
To test the workflow, simply click on the provided link and review the response:

If everything went according to plan, you should see the JSON response containing the result of all the API requests made against MongoDB Atlas and be able to observe your cluster being created in the Atlas UI itself:

How MongoDB Atlas integration works in Stamplay
The API endpoint that we’ve just created is powered by a workflow that chains together a series of MongoDB Atlas actions with the Webhook core component.
The workflow is triggered every time the Webhook called autopilot catches something. The workflow expects to receive two parameters on the Webhook endpoint: a clustername and an IP address. These are used in the following steps of the flow to be able to dynamically pass the name of cluster we’re creating and add an IP address to the whitelist.

The workflow leverages the Reply with JSON action from the Webhook component and can be used to create microservice workflows that combine or update data across multiple cloud services with a single API.
The sync=true parameter that you can see in the API URL provided at the end of the walkthrough tells the system that the Webhook should wait for execution to complete before returning a response to the client. You can read more about building APIs with Stamplay’s Flows and Webhooks here.
The workflow we created above also uses Stamplay’s error handling capabilities to manage potential failures in Atlas API calls to Atlas — such as trying to create a cluster with a duplicate name — to further improve the developer productivity with the Atlas API.
Built.io integration with MongoDB Atlas
MongoDB has also partnered with Built.io, which provides its own API-first platform to developers. Its main product, Built.io Flow, is an integration Platform-as-a-Service that helps IT professionals and developers unify disparate IT systems.
The following is a quick guide on how to spin up a new cluster in MongoDB Atlas and email its status with Built.io Flow. This same workflow can be used as the foundation for many other integrations, including Cisco Spark, PagerDuty, Slack, and others.
Getting started with Built.io Flow
To get started with Built.io, you will need a Built.io Flow Enterprise account. If you don’t have an existing account, sign up for a free trial account here.
At the end of this process, you should have constructed a flow that looks like this:

Starting from scratch, drag the following actions on to your blank canvas organized in a similar layout as shown above:
- Create Cluster
- Add Group Whitelist Entry
- Create Database User
- Send an Email
Connect the actions as displayed in the image above.
MongoDB cluster configuration in Built.io
After connecting everything, edit the Create Cluster action. The following screen is an example of the information you’ll need to input in order to set up the Create Cluster action:

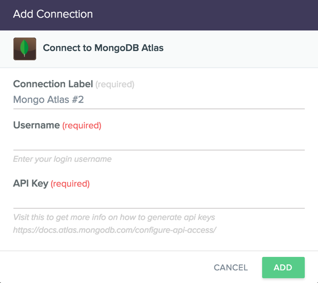
The first thing in the edit window is the Connect to MongoDB Atlas section. Choose Add New and the following screen should pop up. Input your MongoDB Atlas username and then input your API key:

Once you’ve completed adding the connection, get the Group ID from your MongoDB Atlas installation and input it in the Group ID field. Input the Instance Size, the Provider Name, and the Region Name you’d prefer for your new cluster. Be sure to examine all of the fields and their descriptions to customize your new cluster appropriately.
The second step is to enter in the appropriate information for whitelisting an IP Address (or CIDR block) to enable access to your MongoDB cluster. In this case, you’ll need to do a few things:
- First, you’ll need to click on Show optional fields to display all of the options.
- Second, click inside the Group ID box to grab the mouse focus.
- Third, notice the Input section on the right-hand side of the edit window. Click on groupId to place the groupId from the newly formed cluster into the Group ID field here.
- Last, go ahead and enter the IP Address or CIDR Block you’d like to whitelist for access to your cluster.

The third step is to create a new user for your MongoDB database:
- As before, pull the Group ID information directly from the newly created cluster.
- Then go through and enter all the required information.
- Be careful: If you end up changing "Is Editable" to false then you will be unable to edit or delete the created user.
- Be sure to record the password as you will never be able to retrieve it from the MongoDB Atlas API.

The final step is to send out a confirmation email that everything has been done. This particular action is sent from Built.io’s servers, so it does not require any authentication on your part:
- Make sure to show the optional fields if you want to specify whether to send the email via HTML or plain text.
- Choose the email address and subject you’d like.
- In the Body section, you can click on username from the Create Database User response and name from the Create Cluster response to place both of those in the email.
- Press Done.

If you have followed the steps correctly, your MongoDB Atlas workflow is now fully configured.
Testing Built.io workflow
Now that you’re done with your MongoDB Atlas workflow, you can execute it any time you want to by pressing the Play button in the top right corner of the window.

There are some other interesting things you can do with Built.io Flow Enterprise. In this particular workflow, you may want to consider looking at the triggers by pressing the Settings icon over the Play action on the canvas. The very first trigger you’ll see available is the Webhook trigger. If you select it and press Save, you’ll set your workflow up to be triggered via a URL. You can use this URL in your scripts or anywhere else that accepts a URL for a web hook.
Another interesting trigger to explore is the PagerDuty trigger. Using a MongoDB Atlas integration with PagerDuty, you can have your Flow execute automatically every time a PagerDuty alert goes out. This can allow you to automate updating a cluster every time you get a low disk space alert from PagerDuty, for example.
Conclusion
Using the MongoDB Atlas API is simple. You can code against it in the programming language of your choice or you can take advantage of one of the modern API integration frameworks available today, such as Built.io or Stamplay, to increase your productivity without sacrificing any of the benefits of MongoDB Atlas.
What was demonstrated here uses only a small portion of the Atlas API. The majority of Atlas API functions, such as working with clusters, users, alerts, and whitelists, are supported both in Built.io Flow and Stamplay and can be leveraged to rapidly create even more comprehensive and sophisticated applications.
Want to know more about MongoDB Atlas? Check out MongoDB Atlas API Documentation and M034 course at MongoDB University!
About the Author – Aleksey Savateyev
Aleksey Savateyev is a Senior Solutions Architect at MongoDB, based in Silicon Valley and focusing on maximizing the value customers get from their investments in MongoDB and MongoDB Atlas.